
Service manual

Disassembly / Reassembly Procedures
February 20004-2
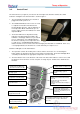
4-2. Feed-in Table
Necessary tools: medium flat head screwdriver.
Approximate time: 1 minute.
To remove the feed-in table, do the following steps:
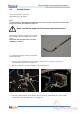
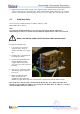
Insert the screwdriver in one of the holes,
situated on the feed-in table. See figure 9.
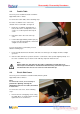
1. Rotate the screwdriver approximately ¼
turn; the direction is not important, as the
screw is a so-called ‘quarter-turn snap-in
screw’.
2. Repeat this at the other side of the top
cover.
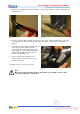
3. Lift the table approximately 20 mm (3/8”) by
means of the two knurled knobs, and slide it
straight out of the machine.
To insert and lock the feed-in table, proceed
with the following steps:
1. Insert the table back into the machine, and make sure that it goes in straight, otherwise it might
get stuck.
2. Once the table falls into it’s position, rotate the screws back ¼ turn (to their original position). Use
the same screwdriver to press both screws until they snap back into their locks.
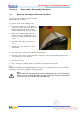
Note:
Please make sure, that after any procedure, requiring the feed-in table to be
removed, the feed-in table is closed and locked. For safety reasons the operator is
not allowed to have free access to the hot roller and roller nip.
4-3. Plastic Side Covers
Necessary tools: hexalobular screwdriver TX25, Allen key 4mm.
Approximate time: 5 minutes.
Note:
To remove the covers, it is necessary to
perform the ‘Opening / Closing the
Aluminum Top Cover’ Procedure, described
in Section 4-1.
To remove the side covers, do the following
steps:
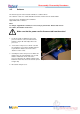
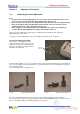
1. Remove the two self-tapping screws, using
the TX25 driver, as shown in figure 10. The
right hand cover is shown here.
fig. 9
fig. 10