
User Manual

NOTE: It is our policy to continually improve products and as such we reserve the right to alter data, specifications and component parts without prior notice.
IMPORTANT: No liability is accepted for incorrect use of this product.
WARRANTY: Guarantee is 12 months from purchase date, proof of which will be required for any claim.
INFORMATION: For a copy of our latest catalogue and promotions call us on 01284 757525 and leave your full name and address, including postcode.
01284 757500
01284 703534
sales@sealey.co.uk
Sole UK Distributor, Sealey Group,
Kempson Way, Suffolk Business Park,
Bury St. Edmunds, Suffolk,
IP32 7AR
www.sealey.co.uk
Web
email
Original Language Version
VS392 Issue: 1 - 27/09/13
Environmental Protection.
Recycle unwanted materials instead of disposing of
them as waste. All tools, accessories and packaging
should be sorted, taken to a recycle centre and
disposed of in a manner which is compatible with the
environment.
© Jack Sealey Limited
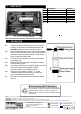
Item Description Part No.
1 Puller Base Plate VS392.01
2 Telescopic Puller VS392.02
3 Puller Handle VS392.03
4 Piston Clamp VS392.04
5 Piston Clamp Bolt 34mm x2 VS392.05
6 Piston Clamp Bolt 59mm x2 VS392.06
7 'T' Handle Hex Key 6mm VS392.07
3. PARTS LIST
3.1. Position the Piston Clamp (item 4) over the piston
shaft so it rests on the shock absorber main body
(DO NOT tighten the Piston Clamp hex bolts).
3.2. Screw Puller Base Plate (item 1) and Puller Handle
(item 3) onto Telescopic Puller (item 2) and position
over shock absorber piston shaft so it rests on the
PistonClamppreviouslytted.
3.3. Fit original shock absorber nut onto piston thread
(hand tight only).
3.4. Rotate Puller (item 3) handle clockwise to extend
shock absorber piston.
3.5. Once piston shaft is fully extended, tighten hex bolts
with the 6mm Hex Key supplied to clamp
the piston shaft in the extended position.
3.6. Remove Puller assembly (items 1, 2, 3) and
assemble road spring and upper mounting as
per the manufacturer's instructions.
3.7. Once strut is assembled remove the piston clamp
(item 4).
3. OPERATION