
Instruction Manual


DO NOT use the heater with a programmer, timer or any other device that switches the heater on automatically.
DO NOT touch the lamps, even when cold.
DO NOT use the heater without the wheels fitted and locked.
DO NOT allow children to touch or to operate the heater.
DO NOT locate the heater below an electrical socket outlet.
DO NOT use the heater without the grille fitted.
DO NOT use the heater out of doors. These heaters are designed for indoor use only.
DO NOT use this heater if it has been dropped.
DO NOT use if there are visible signs of damage to the heater.
DO NOT cover heater when in use, and do not obstruct the air inlet and outlet grilles.
DO NOT place heater too close to yourself or any object, allow the air to circulate freely.
DO NOT touch the outlet grille of the heater during and immediately after use as it will be hot.
Children of less than 3 years should be kept away unless continuously supervised.
Children aged from 3 years and less than 8 years shall only switch on/off the appliance provided that it has been placed or installed in
its intended normal operating position and they have been given supervision or instruction concerning the use of the appliance in a safe
way and understand the hazards involved. Children aged from 3 years to less than 8 shall not plug in, regulate and clean the appliance or
perform user maintenance.
This appliance can be used by children aged from 8 years and above and persons with physical, sensory or mental capabilities or lack
of experience and knowledge if they have been given supervision or instruction concerning the use of the appliance in a safe way and
understand the hazards involved. Children shall not play with the appliance. Cleaning and user maintenance shall not be made by
children without supervision.
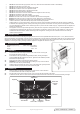
2. INTRODUCTION P
Powder coated metal construction with tilting head giving directional heat control. Adjustable thermostat control (15°C – 45°C). Soft-touch control
panel with LED display. Programmable 7-day timer function. Equipped with a tilt cutout switch for added safety. Fitted with two ruby halogen infrared
elements and chemically polished reflectors for maximum heat emission. Stand features easy-rolling castors with a locking castor fitted to the rear.
Suitable for a wide range of heating including restorative applications. Supplied with cable and 3-pin plug.
3. SPECIFICATION
Dimensions (W x D x H) ............. Heater: 597 x 488 x 792mm
Power .................................................................1400-2800W
Supply .................................................................. 230V - 13A
4. ASSEMBLY
4.1. Fit the handle section of the support frame to the wheel section ensuring the
fixing holes align. Refer to Parts List.
4.2. Fit the heater to the support frame using the bolts provided, ensuring the shaped
spacers are fitted either side of the frame as shown. Tighten the bolts sufficiently to retain
the heater at the required angle.
4.3. Remove the front grille by unscrewing the retaining screws.
4.4. WARNING! Never touch element glass directly with fingers, only touch the ceramic
ends or use a soft cloth, to prevent damage.
4.5. Carefully insert each element into the two push-in side fittings with a gentle pressure.
4.6. Check the element is properly located, then replace front grille.
5. OPERATION
5.1. Place the heater on a level floor in the area you require to heat. Allow a minimum
of 2 metres between the heater and adjacent objects.
5.2. Plug the heater into the mains supply and turn on the unit using the side mounted rocker switch.
5.3. To switch the unit off, select “0” on the rocker switch and unplug from the mains. Allow the unit to cool before handling or storage.
Original Language Version
© Jack Sealey Limited
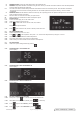
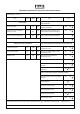
On/Off
Increase
Set
Timer / Date
Timer On/Off
Decrease
Half power
Full power
Set
Temperature
Day/Time
Work state
Indicator
Scale
IR15 Issue:2(5.15) 24/08/21