
Instruction Manual


Original Language Version
© Jack Sealey Limited
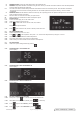
5.10.4. Press to save the date and time or wait 5 seconds without pressing the buttons and selected day and time will be saved .
5.10.5. Repeat above procedure to reset day and time.
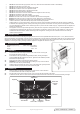
5.11. SETTING DAYS OF WEEK WORKING TIME MODES
5.11.1. Power on. Press once to set days of the week timer.
5.11.2. When MON fl ashes select days of the week by pressing
5.11.3. Heater has 7 daily programs and 3 working time modes can be set up within each day.
5.11.4. Press again and select working time modes 01, 02 03 by pressing
5.11.5. Press again to set the timer for power on (hours fi rst, then minutes) by pressing
5.11.6. Press again to set the timer for power off . Operation is the same as above (selected using )
5.11.7. Then press again to set temperature. Default temperature setting is 30°C.
5.11.8. Press again to fi nish the timer setting for that day. Repeat the above procedure for other days.
5.11.9. Press to activate or deactivate the days of week working time modes. When week and time symbols are both displayed it means
the days of week working time mode is active.
5.11.10. Repeat above procedures to change weekly working time modes timer.
5.11.11. RESET
Enter process as far as day selection then press for 3 seconds, all existing set programs for that day will be deleted. Users can
only reset existing programs day by day.
5.12. OPEN WINDOW DETECTION FUNCTION
5.12.1. When ambient temperature drops over 5°C in 10 minutes, heater will power off automatically and sound 3 alarm beeps. Power on
again by pressing
5.13. All set programs will be stored even if the power is off .
5.14. Temperature is only adjustable when the days of week working time modes is inactive.
5.15. Clock continues to work after power off . Charge battery after 3 hours of initial use (standby and working modes will both charge the
battery).
5.16. Should the power cord require replacement, a complete wiring loom should be purchased and fitted by a
suitably qualified person.
suitably qualified person.
6. MAINTENANCE
WARNING! Before attempting any maintenance ensure the unit is unplugged from the mains power supply, it is cool and on level
ground.
DO NOT touch the element glass, even when cold.
DO NOT use the heater with out the grilles fi tted.
6.1. To clean the refl ector, remove the front grill by unscrewing the retaining screws and wipe the refl ector with a clean dry cloth. DO NOT
use abrasives or solvents. The surface of the refl ector is very soft and scratches may cause it to overheat. Replace the grille.
6.2. To change the element remove the front grille by unscrewing the retaining screws.
6.2.1. Ease the sprung sockets on the ends of the element back and pull the element forward so that it clears the socket, remove element.
WARNING! Never touch element glass directly with fingers, only touch the ceramic ends or use a soft cloth, to prevent damage.
6.2.2. Carefully insert the replacement lamp into the two push in side fittings with gentle pressure.
6.3. BATTERY REPLACEMENT
6.4. Refer to Parts Diagram. Battery is located on the lower PCB. It is recommended that this is replaced by a suitable qualified person.
6.4.1. Check the element is properly located, then replace front grille.
IR15 Issue:2(5.15) 24/08/21