
Typewriter User Manual

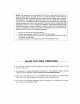


Paper Support
Power Switch
2. Turn On Typewriter
Raise the Paper Support and tum on the Power Switch
located on the right side of the typewriter. The following
initial operations occur."
1. A beep sounds and the Power-on Lamp (green) on the
keyboard lights up.
2. The Carder moves to the extreme left side and then
moves to the left margin: The Printwheel rotates and
stops at the programmed position.
While the above operations are occurring, all other type-
writer functions stop. Start the next operation only after
the initial operations are completed,
• Make sure the Printwheel, Ribbon Cassette and Correc-
tion Tape are properly installed and that there is a suffi-
cient quantity of ribbon and correction tape remaining,
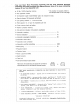
Platen Knob.
Paper Bail
3. Insert Paper
1) Insert paper between the Paper Support and Platen Roll-
er.
2)
Turn the, Platen Knob on the left of the typewriter to
advance the paper. When the top of the paper comes into
sight, pull the Paper Bail upward by hand. to open it and
continue turning the Platen Knob to feed paper in be-
tween the Paper Bail and Platen Roller.
Knob
3)
®
The paper is released when the Paper Release Knob is
turned backward, enabling you to freely move the paper
by hand for alignment purposes.
Close the Paper Bail and return the Paper Release Knob
to, its forward position before typing.