
Typewriter User Manual


7, MARGINS
The following auto margins are
permanently stored in this typewriter.
Left Margin Right Margin
PICA typing 10 75
(10 pitch)
EUTE typing 12 90
(12 pitch)
MICRO typing 15 113
(15 pitch)
1. Auto Margins (Standard Pre-set Margins)
When the power is first turned on, the Print Point Indicator
moves to the left auto margin. A beep sounds when the
6th character or space is printed before the right margin,
informing you that the Print Point Indicator is nearing the
right margin. Printing stops after 5 more characters (or
spaces) are typed, and a beep signals that the Print Point
Indicator is at the right margin.
Left Margin Right Margin
" Minimum distance 1 inch
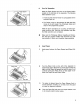
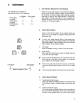
2. Setting New Margins
®
1)
2)
®
O
Move the Print Point Indicator to the position where you
want to set a new margin by using the Space Bar and/or
Backspace Key.
To set a new margin beyond either of the present mar-
gins, press and release the Margin Release Key while the
Print Point Indicator is at that margin, then move the Print
Point Indicator to the desired position.
Left Margin
Press the Margin Set Key to set the new left margin.
Right Margin
Hold down the Code Key and press the Margin Set Key
to set the new right margin.
A beep sounds, signaling that a new margin has been set.
When yo_ set a new left or right margin, the respective
auto margins are automatically cleared.
/
The' LCD must be clear to set new margins, and the Auto
center a,nd Decimal tab functions must not be in active
use.
• The left and right margins must be at least one inch apart.
o
1)
2)
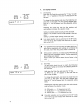
Typing Beyond Margins
Typing beyond right margin:
Press and release the Margin Release Key when the Print
Point Indicator stops at the right margin and continue typ-
ing.
Typing beyond left margin:
Press and release the Margin Release Key at the left mar-
gin, and press the Backspace Key to move the Print Point
Indicator to the position where you want to start typing.
11