
User's Manual


• 6 •
Recommended minimum AWG size for extension cord:8.3
100 feet long or less - use a 14 gauge extension cord.•
Over 100 feet long - use a 10 gauge extension cord.•
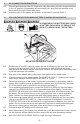
ASSEMBLY INSTRUCTIONS9.
Remove all cord wraps and uncoil the cables prior to using the battery charger.
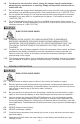
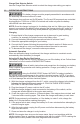
FEATURES /CONTROL PANEL10.
Ammeter1.
Battery Type Selector Switch2.
Charge Rate Selector Switch3.
Battery Clips4.
Full Charge LED5.
1
5
2
3
4
Setting the controls
All of the controls for your charger are located on the front of the charger. Read these
instructions to properly set the charger controls.
Ammeter
The Ammeter indicates the amount of current, measured in amps, that is being drawn
by the battery. As a battery takes on a charge, it draws less current from the charger.
Correspondingly, the meter will show less current being drawn by the battery. When the
current stops decreasing, the battery is charged.
The 2 amp charge rate may indicate some activity on the meter, although the meter
does not have the resolution to display this low rate. For the 2 amp charge rate, a
triangle has been provided. Its accuracy has been calibrated for use with small batteries.
Percent of Charge•
The percent of charge is based on the current drawn by the battery. For this reason,
accuracy will vary with the size and battery type.
LED Indicators
Full Charge LED -• Indicates the battery is fully charged and the charger is in
Maintain Mode.
Battery Type Switch
Use this switch to set the type of battery to be charged; Standard or AGM. Both settings
are for regular and deep cycle batteries. If you are not sure what type of battery you
have, select the AGM setting.