SF_AIRS Kenmore CONTENTS SAFETY ........... , .............. . ............................. ............... .....1-3 INSTALLATION .........................,..............,.............. ................... 4-7 USE AND CARE Your Counter Unit and Its Features .......................... TO START THINGS 8 COOKING Cooktop Cooking .................................................... 8. g Control Knobs ............................................................. 9 Spark Ignition .....................
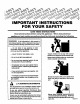
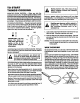
IMPORTANT INSTRUCTIONS FOR YOUR SAVE Read appliances, all instructions basic safety before SAFETY THESE using precautions I WARNING: INSTRUCTIONS this appliance. should be followed, When using including electrical the following: I If the InformaUon In this manual Is not followed exactly, a fire or explosion may result causing property damage, personal Injuryordeath. -- Do not store or use gasoline or other flammable vapors and liquids In the vicinity of this or any other appliance.
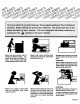
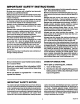
Never use your counter unit for warming or heating a room. You could be burned or seriously Injured. Such mlsuse could also cause damage to the counter unit. Never wear loose clothing when using your counter unit. Such clothIng could catch fire. Always keep the counter unit area clear and free from things that will burn. CAUTION: Never store things In an ovenor near cooktop elements/burners. These things may catch fire and plastic Items could melt.
IMPORTANT SAFETY INSTRUCTIONS Keep this book for later use. Never try to move a pan of hot fat, especially a deep fat fryer. Watt until the fat has cooled. Be sure your counter untt Is Installed and grounded properly by a qualified technician. Always keep the counter unit area clear and free from things that will burn, gasoline and other flammable vapors and liquids. Never try to remove burner bowls from glass top ranges. Never operate the burners unless the burner tops are In place.
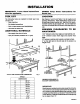
INSTALLATION IMPORTANT: with the TOOL Leave these instructions OWNER: Keep future use. appliance. LIST these instructions for LOCATION The following tools are needed to Install your new counter unit. Pipe wrenches See Figures 1 and 2 and Table 1 for all rough-In and spacing dimensions. These dimensions must be met for safe use of your counter unit. See Fig. 3 for recommended location of gas supply line. Do not Install the unit near an outside door or where a draft may affect Its use.
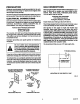
PREPARATION GAS CONNECTIONS Adequate counterspace must be provided for the unit. The area should be easy to reach and be lighted with natural light during the day. Call your gas supplier and ask which codes apply In your area. If there are no codes, you must follow the NATIONAL FUEL GAS CODE, ANSIiZ223.LStest Edition. You can get a copy by writing: See t he first page for cutout dimensions. Mark the cutout on t he counter. Use a hand or saber saw to make t he cut.
GAS CONNECTIONS Use pipe wrenches to make connections. strain on the connection line assembly. (continued) A pressure regulator IS supplied and must be Installed In the gas supply line underthe unit. Install the regulator in the gas supply line between the shut off valve and the unit connection (see Fig ure 5). The top of the regulator should face toward the cabinet front and be easily accessible through the cabinet doors.
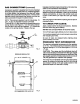
REMOVING SHIPPING SCREWS Lift the cooktop (g rasp at front) and remove the shipping screw from each of the four surface burner assemblies (see Fig. 7). The screws can be discarded. If the flames blow away from the burner, close the shutter more. Check the Inner cone of the flame. It should be about 11/16" long. If the length of the inner cone of the flame Is not correct, use a 1/2" open end wrench or adjustable joint pliers to adjust the orifice hood. ADJUSTMENTS L.P.
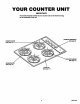
YOUR COUNTER UNIT IMPORTANT: The model and serial number of your counter unit can be found on a tag on the underside of the unit.
TO START THINGS COOKING During burner glass €ooktop could get hot. COOKTOP SPARK IGNITION -- When you turn the cooktop knob to LITE, the spark Igniters make a series of electric sparks (ticking sounds) which light the burner. After the burner Ignitesthetlcklng wlllstop. Ifthetlcklng sound persists afterthe burner lights, turn the burner off and rellg ht. If the ticking Is still present, call for eervlce. During a power failure the burners will not light automatically.
CLEANING Referalsoto TIPS next page when cleaning yourcounterunlt. Cooktop finishes will be either porcelain enamel or brushed chrome. Porcelain enamel looks like a painted surface. Brushed chrome has a metallic appearance. Warm water, a mild detergent and a soft cloth are safe to use on all cleaneble parts of your counter unit. Do not use metal scouring pads, except where recommended.
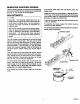
LIFT-UP COOKTOP The cooktop can be raised or removed so the area underneath (burner box bottom) can be cleaned. To raise ¢ooktop: 1. Remove the burner grates, bowls and knobs. 2. Grasp the cooktop at the front and lift up. 3. Raise the support rod Into place to hold the cooktop while cleaning. Securethe rodlnto the spacer bracket on the cooktop. Porcelain enamel can chip If dropped. Handle porcelain enameled cooktops carefully. To lower the cooktop: 1.
REMOVABLE KNOBS To replace All control knobs may be removed for easy cleaning by pulling the knob straight off the stem. Be sure that the knob Is In the OFF position before removal. the knob: 1. Match the flat side of the "D" Shaft on the knob to the flat side of the stem and replace knob. Hint: Slip a thin cloth (such as a handkerchief) or a piece of String under and around the knob edge and pull up. Caution: Read these instructions carefully before replacing the knobs.
NOTES 13
KENMORE GAS COUNTER UNIT WARRANTY FULL ONE YEAR WARRANTY ON THE FUNCTIONING PARTS EXCEPT GLASS PARTS Dear Customer: Our constant directed efforts are toward making sure your new Kenmors Counter Unit will arrive at your home In perfect condltlon and will give you proper performance. As part of these efforts, we feel it Is our responsibility to provide you with this warranty for your range.