CONTENTS Ken SAFETY USE AND CARE Your Range and Its Features ..................................... 5 Range Control ..................................................................... 6-8 Cooktop Cooking ................................................................................ 9 Cooktop Controls ................................................................................ 9 Burner Ignition .......................................................................................
TJ TY SAVE Read all instructions appliances, WARNING: basic safety before THESE using precautions INSTRUCTIONS this shouldi appBiance. be followed, When using Uncluding electrical the follow,rig. M If the information in this manual is not followed exactly, a fire or explosion may result causing property damage, personal injury or death. Do not store or use gasoline or other flammable vapors and liquids in the vicinity of this or any other appliance.
:.To insure safety for YOurself and your home, please read your Owner's Manual carefully. Keep it handy for quick easy reference. Pay close attention to the safety sections of your manual. loOking for the i_ You can recognize the safety sections by symbol or the word "Safety". Never leave cooktop elements/ burners unwatched at high heat settings. Boilovers cause smoking and greasy spiilovers could catch fire, Never use a towel or other bulky cloth as a potholder.
Never block the flow of combustion and ventilation air Keep this book for later use. Be sure your range is installed and grounded by a qualified technician. through oven vents and cooktop burners. properly Never try to move a pan of hot fat, especially a deep fat fryer. Wait until the fat has cooled. Always keep the range area clear and free from things that will burn, gasoline and other flammable vapors and liquids. Never tryto remove burnerbowIs from glasstop ranges.
mMPORTANT BH CASE SAFETY |NSTRUCT|OHS iMPORTANT OF FIRE.. Never use water on a grease fire _ it will only spread the flames, GREASE Never pick up a flaming FaRE pan... Instead: 1. Turn off the burner. 2. Smother the fire with a tightly fitting pan lid, baking soda or wit h a dry chemical or foam type extinguisher.
YO NOTE: The model and serial number of your range can be found on a tag, located on the range front frame. To locate tag, open the storage drawer. OVEN VENT (Area may get hot during range use; NOT block vent) BURNER GRATE (See page 18) BURNER (See page 9) GLASS COOl(TOP (See page 15) RANGE CONTROL (See pages 6-8) OVEN LIGHT SWITCH Push to turn Itght on and off.
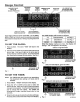
ange Control CLOCK / 'TEMPERATURE TIMER DISPLAY DISPLAY PROGRAM STATUS DISPLAY CANCELS BAKE, BROIL OR CLEAN OPERATION I PRESS TO TURN TIMER ON AND OFF DOWN ARROW PAD (DECREASES TIME OR TEMPERATURE) SET AUTOMATIC OVEN OPERATIONS The TIMER display will increase as follows: Your range control is touch controlled. To set BAKE, BROIL, TIMER or CLEAN, touch the desired function pad and select the temperature o r time by touching the arrow pad. :10 t:00 1HR:00 TO SET THE Press CLOCK.
TO = "TIMER" counting the UP or time and continue TO CANCELBAKE will stop flashing and the TIMER will start down a few seconds after you stop touching DOWN arrow, if you pause while selecting the the timer activates, press TIMER again and to set the time. After TIMER begins to count down, press 'TIMER and hold TIMER in at least four seconds until "TIMER" quits flashing and time of day returns to display. FIG,_6 TI ilED BAKING: TO SET BROIL; AUTOMATIC 1.
DELAYED ON AND OFF: Never let food, such as dairy products, fish, meat, poultry, etc., sit for more than 1 hour before cooking starts when you set your oven for a delay start. Room temperature promotes the growth of harmful bacteria. Be sure the oven light is off because heat from the bulb will speed bacteria growth. You can set the oven to turn on and off automatically. The control will calculate the ttme to start cooking. Press COOK TIME. 2. Press UP or DOWN arrowto to bake. set how long you want 3.
T© TH[iN $ ©OI T©P C@OKmNG COOKt NG BURNER BGNtT OH TO OPSRATE COOKTOP CONTROLS - The sign near each cooktop control knob shows which burner is turned on by that knob_ COOKTOP SPARK _GN_T_ON - When you turn the cooktop knob to LITE, the spark igniter makes a series of electric sparks (ticking sound) which lights the burner. Push to turn knobs to LiTr_ position. After the burner ignites, the ticking sound of the spark will stop. Set knob to desired flame setting.
@VEN VENT WOK COOKgNG When the oven is on, heated air moves through a vent behind the cooktop. On the cooktop, this hot air may make pot handles hot or melt plastic items left too near the vent. We recommend that you use only a flat-bottomed wok. Fiat-bottomed woks are available at your local retail store. Do not use woke which have support rings.
OVEN COOKING When cooking a food for the first time in your new oven, use time given on recipes as a guide. Cakes, cookies, muffins, and quick breads should be baked in shiny pans -- to reflect the heat -because they should have a light golden crust. Yeast breads and pie crusts should be baked in glass or dull (non-shiny) pans --to absorb the heat -- because they should have a brown, crisp crust. Your new oven has been set correctly at the factory and is more apt to be accurate than the oven it replaced.
BROILmNG To BroUn: t Never leave a soiled bro_ier pan in the range. Grease in the pan may smoke or burn the next time the oven is used. 2 Be sure you know tLhe correct procedure putting out a grease fire, See the section safety, Press once for LO for on Press twice for H! Do not cover the entire broiler grid with foil. Poor drainage of hot fat may cause a broiler fire. Df a fire starts, close the oven door and turn controls off. if fire con. tinues, throw baking soda on the fire.
BEFORE . A CLEAN AFTER CYCLE If white spots remain, remove them with a soap-filled steel wool pad. Be sure to rinse thoroughly with a vinegar and water mixture. These deposits are usually a salt residue that cannot be removed by the clean cycle. tf the oven is not clean after one clean cycle, the cycle may need to be repeated.
TO SET SELF=CLEAN CYCLE: TO BNTERRUPT 1, Close oven door. The door locks automatically after the control is set. 2. Push CLEAN, Fig. t. A CLEAN ©YCLE: 1. Push CLEAR. Follow instructions under '%rtVHENA CLEAN CYCLE IIS FSNBSHE_'. Thetlme display will show ( .... ). See TO SET DELAYED CYCLE: SELFoCLEAN Follow steps 1-3 under "TO CYCLE", THEN: SET SELF-CLEAN 4, Press STOP TIME, @ Fig_1 5. Set the time of day when you want the clean cycle to end. See Fig. 4.
CLEANING T F$ On the following pages, all removable parts on your range are shown. Warm water, a mild detergent Do not use metal scouring Refer to those pages when cleaning your range. and a soft cloth are safe to use on all cleanable parts of your range. pads, except where recommended. PART CLEANING REMARKS MATERnALS Control panel, knobs All-purpose, non-abrasive cleaner, warm water, soft cloth Do not scour. cleaning.
REMOVABLE OVEN DOOR To replace: 1. Hold the door over the hinges with the slots at the bottom edge of the door lined up with the hinges. The hinge arms must still be in the stop position. To remove: 1. Open the door to the stop position (see Illustrat[on), 2. Grasp the door at each side and lift up and off the hinges, STOP {BR_ POSITION NOTE: When the door is removed and hinge arms are at stop position, do not bump or try to move the hinge arms.
REMOVABLE OVEN BOTTOM The oven bottom may be removed for cleaning heavy spillovers or to reach the oven burner. Be careful not to scratch the oven finish removing or replacing the oven bottom. when To remove: UNLOCK_-_.LOCK 1o Slide the tab at the center front of the oven bottom to the left. 2, Lift the oven bottom up and out. To replace: . 1. Slip the oven bottom into the oven so the tabs in the rear of the oven bottom fit into the slots In the oven back.
REMOVABLE COOKTOP BURNER COMPONEHTS 3. Place burner burner bowl. g rate ringers In the burner Be sure that all controls are turned off and that the unit is cool. To remove; Lift off burner grate, burner top and trim ring_ Do not remove burner bowl. grate over burner assembly and into The bottoms of the four larger burner fit Into four corresponding Indentations bowl. See the Cleaning Tips Chart in this manual Be sure to dry burner tops completely before re.assembling burner.
ANTB-TSP DEVICE NOTE: To insure the device Rfyour range is removed for cleaning, servicing or any reason, be sure anti. tip device is re-engaged properly when the range is replaced. Failure to take this precaution could result in tipping of the range and cause injury.
Save time and money -- Check this list before you call for service, To eliminate unnecessary service calls, first, read all the instructions in this manual carefully. Then, if you have a problem, always check this list of common problems and possible solutions before you call for service. if you do have a problem you cannot fix yourself, call your nearest Sears Store or Service Center for help. When calling, have this manual, the Repair Parts List, model number and purchase date handy.
BEFORE CALUNG FOR SERVBCE PROBLEM Foods do not broil properly POSSIIBLE (continued) DON'T CALL FOR SERVICE UNTEL YOU CHECK CAUSE . Oven door not closed • Improper rack position • • , Oven preheated Improper utensilused Improper broiling time • • • Close oven door. Check broil pan placement; see Broiling section. Do not preheat when broiling. Use broiler pan and grid supplied with range, Check broiling chart, Dirty oven Broiler pan full of grease left in oven o • Check for heavy spillover.
THERMOSTAT ADJUSTU_HT$ The temperature in your new oven has been set correctly at the factory, so be sure to follow the recipe temperatures and cooking times the first few times you bake in your 4. The temperature can be adjusted ur_tO +35°F hotter or-35°F cooler. Use _] or _ to select the temperature adjustment you want. oven. See Fig. 3. The temperature you select is the new preset oven display.
KEN E WARRANTY ........... f " f i,i _1, H ,i FULL ONE YEAR WARRANTY ON THE FUNCTIONING PARTS EXCEPT GLASS PARTS OF ALL if, within one year from the date of installation, any part, other than a glass part, fails to function properly due to a defect in material or workmanship, Sears will repair or replace it, free of charge. Dear Customer: FULL 30.