I CONTENTS SAFETY USE AND T nf...................................... Kenmore CARE Your Range and Its Features ..................................... 4 Clock end Timer .......................................................... 5 Cooktop Cooking ........................................................ 6 Oven Cooking ............................................................. 7 Broiling ................ _....................................................... 8 Continuous-Cleaning Oven (Some Models) ..
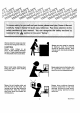
_•" _ •::_i_:_ _ •:_, • IMPORTANT INSTRUCTIONS FOR YOUR SAFETY SAVE Read appliances, all instructions basic safety THESE before using precautions INSTRUCTIONS this appliance. should be followed, When using including electrical the following: Teach children notto play with control knobs or any other pert of the range. Never leave children alone or unattended where a range is in use. Caution: Never store things children might want above a range.
Always keep the range area clear and free from things that will burn. Never use your range for warming or heating a room. You could be burned or seriously injured. Such misuse could also cause damage to the range. CAUTION: Never store things in an oven or near cooktop elements/ burners. These things may catch fire and plastic Items could melt. Never wear loose clothing when using your range. Such clothing could catch fire. Never use a towel or other bulky cloth as a potholder.
IMPORTANT SAFETY INSTRUCTIONS Keep this book for later use. Only some kinds of glass or ceramic pans can be used for cooldop cooking. Be sure that the pan you use will not break when heated on the cooktop elements. Be sure your range Is Installed and grounded properly by a quallfled tschnlclan. Never try to repair or replace any part of the range unless Instructions are given In this book. All other work should be done by a skilled technician.
YOUR RANGE IMPORTANT: The model and serial number of your oven can be found on a tag located below the lift-up cooktop, at the rear. Oven Vent (under right rear ) element; area may get hot during oven use. DO NOT BLOCK vent area.
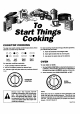
CLOCK AND TIMER The CLOCK and TIMER are operated by four touch pads; The CLOCK and TIMER do not contl'ol the oven. TO SET THE TIME OF DAY CLOCK TO RESET 1. Press CLOCK. 3. The clock will start keeping time and the words"SET TIME" will disappear within the next 60 seconds. THE TIMER To reset the timer during countdown use the UP or DOWN arrow pad. "SET TIM ER" will flash and you can reset the TIMER.
To Start Things Cooking COOKTOP COOKING The sign near each cooktop control knob shows which element is turned on by that knob. O0 • 0 eO O0 Oe O0 O0 O• Left Front Left Rear Right Rear Right Front To operate cooktop For best cooking results and energy efficient operation, you should use pans that: A. Have flat bottoms and straight sides. B. Have light handles that do not tilt pans. C. Are about the same size as the element. OVEN controls: 1. Push cooktop control in and turn. 2.
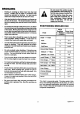
OVEN COOKING When cooking a food for the first time In your new oven, use time given on recipes as a guide. Avoid opening the door too often to check the food during baking as heat will be lost. This may cause poor baking results. Your new oven has been set correctly at the factory and Is more apt to be accurate than the oven It replaced. Cakes, cookies, muffins, and quick breads should be baked In shiny pans w to reflect the heat -because they should have a light golden crust.
BROILING Do not cover the entire broiler grid with foil. Poor drainage of hot fat may cause a broiler fire. Broiling Is cooking by direct heat from the broil burner. Tender cuts of meat or marinated meat should be selected for broiling. For best results steaks and chops should be at least 3/4" thick. if e fire starts, close the oven door and tum controls off. If • fire continues, throw baking soda on the fire. Do not put water on the fire.
CONTINUOUS-CLEANING OVEN FINISH The rough surfaces In your oven have a continuouscleaning finish. Spatters spread and fill the pores of this spsclal finish and then gradually burn away at medium to high temperatures. The continuous-cleaning process Is Illustrated below: Heavy splllovers or bollovers need a lift le help from you: Use clear water and a detergent or a cleanser such as Fantastlk®, Liquid Ajax®, Top Job_, Liquid Lysol® or Mr.
CLEANING TIPS Refer to the removable parts section when cleaning your oven. Warm water, a mild detergent and a soft cloth are safe to use on all cleanable parts of your oven. Do not use metal scouring pads, except where recommended. PART CLEANING MATERIALS REMARKS Control panel Detergent, warm water, soft cloth Do not use abrasive cleaners, steel wool or plastic scouring pads. Dry thoroughly after cleaning.
REMOVABLE The oven door OVEN can DOOR be removed for cleaning. TO removo: STOP (BROIL) POSITION 1. Open the door to the broil stop position (see Illustration). 2. Grasp the door at each side and lift up and off the hinges. NOTE: When the door is removed and hinge arms are at stop position, do not bump or try to move the hinge arms. The hinges could snap back causing an injury to the hands or damage to the porcelain on the front of the oven.
REMOVABLE KNOBS All control knobs may be removed for easy cleaning by pulling the knob straight off the stem. Be sum that the knob Is In the OFF position before removal. MOLDED RIB Hint: Slip a thin cloth (such as a handkerchief) or a piece of string under and around the knob edge and pull up. Caution: Read these InstrucUons carefully before replacing the knobs. Replacing the knobs improperly will damage the knobs and the spring clip on the stems. If this happens, the knobs will fit loosely.
REPLACING THE OVEN Notez LIGHT Be sure that the light switch is in the off position. Do not touch hot oven bulb• Do not touch oven bulb with wet hands. Do not wipe oven light area with wet cloth• Never touch the electrically bulb when replacing it. live collar We recommend you use a 40 watt appliance bulb that is no longer than 3 1/2". The bulb Is available at your Sears Store or Sears Service Center. on the Electrical power must be shut off if you have to replace a broken bulb.
BEFORE CALLING FOR SERVICE POSSIBLE PROBLEM DON'T CALL FOR SERVICE UNTIL YOU CHECK CAUSE Foods do not broil properly Improper rack position Oven preheated Improper utensil used Improper broiling time Door Is closed Check broil pan placement in broiling section. Do not preheat when broiling. Use broiler pan and grid supplied with range. Check broiling chart In broiling section. Check to Insure door Is open to broil position.
KENMORE ELECTRIC f Dear Customer: Our constant efforts are directed toward making sure your new Kenmore Range will arrive at your home In perfect condlUon and will give you proper performance. AS part of these efforts, we feel It Is our responsibility to provide you with thlswarranty for your range.