OWNER’S MANUAL Model No. 47002 6/2 AMP MANUAL BATTERY CHARGER CAUTION: Read and Follow All Safety Rules and Operating Instructions Before Every Use of this Product. Sears Canada Inc., 222 Jarvis St.
Table Of Contents Warranty .................................................................. Important Safety Instructions ................................. Parts ......................................................................... Before Using Your Battery Charger ........................ Plugging it in .......................................................... Using an extension cord ........................................ Preparing your battery to be charged ...................
Important Safety Instructions w – SAVE THESE INSTRUCTIONS – ! WARNING L To reduce the risk of explosion, explosive gases, or injury while using your battery charger, follow the precautions listed below: • Read all instructions and cautions printed on the battery charger, battery, and vehicle or equipment using battery. • Use charger only on lead-acid type rechargeable batteries, such as those used in cars, trucks, trac-tors, airplanes, vans, RV’s, trolling motors, etc.
Parts This section shows an illustration of your battery charger. Use it to become familiar with where all the parts are located, and what they look like.
Before Using Your Battery Charger It is important to prepare your charger for use. This section will tell you about your charger's electrical requirements and how to prepare a battery for charging. Plugging it in L ! WARNING Electrical Shock Hazard Be sure that power cord fits properly into outlet. If not, have a qualified technician install a proper outlet. Never alter the AC cord or plug provided. Improper connection can result in electrical shock.
Preparing your battery to be charged It is important that you read and follow these guidelines while you are preparing to charge your battery. • Make sure that you have a 12 volt lead-acid battery. • Clean the battery terminals. Be careful to keep corrosion from getting in or around your eyes. • If you have a battery with removable cell caps, if required, add distilled water to each cell until the battery acid reaches the level recommended by the manufacturer.
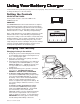
Using Y our Battery Charger Your For best results from your battery charger, learn to use it properly. This section tells how to set the controls and how to charge a battery in or out of the vehicle. Setting the Controls SELECTOR SWITCHES: A 2-way switch is used to select the 2-AMP or the 6-AMP charge rate. AMMETER: L 6 AMP L 2 AMP The AMMETER indicates the measured amount of amperes being drawn by the battery.
6. Connect the clamp to the battery post and twist or rock back and forth to make a solid connection. This will help keep the clamps from slipping off the posts and causing sparks. 7. Select the charge rate with the Selector Switch then plug the power cord into a grounded AC outlet to begin charging. 8. The charger will not stop when the battery is fully charged. For this reason it is important to check charging progress frequently.
Calculating charge time The Chart Method Use the following table to more accurately determine the time it will take to bring a battery to full charge. First, identify where your battery fits into the chart. • Small batteries — motorcycles, garden tractors, etc. — are usually rated in Ampere Hours (AH). For example; 6 to 12 AH, or 12 to 32 AH. • Batteries in cars and smaller trucks are usually rated in Reserve Capacity (RC), Cold-Cranking Amps (CCA), or both.
Maintenance and care A minimal amount of care can keep your battery charger working properly for years. 1. Clean the clamps each time you are finished charging. Wipe off any battery fluid that may have come in contact with the clamps to prevent corrosion. 2. Coil the input and output cords neatly when storing the charger. This will help prevent accidental damage to the cords and charger. 3.
Troubleshooting Performance problems often result from little things that you can fix yourself. Please read through this chart for a possible solution if a problem occurs. PROBLEM POSSIBLE CAUSE SOLUTION/REASONS No ammeter reading. Clamps not making good connection. Check for poor connection at battery. Make sure clamps and posts are clean. 2-amp charge rate. Ammeter needle will indicate little activity at the 2-amp charge rate. No AC power reaching charger.
6/2 AMP OWNER’S MANUAL MANUAL BATTERY CHARGER Model No. 200.47002 For information about troubleshooting Call toll-free from anywhere in the U.S.A.