Owner's Manual ® SLEEVE HITCH Model No. 486.24536 CAUTION: Before using this product, read this manual and follow all Safety Rules and Operating Instructions. IMPORTANT: For Missing Parts or • • • • • Safety Assembly Operation Maintenance Parts Assembly Questions Call 1-866-576-8388 Sears, Roebuck and Co., Hoffman Estates, IL 60179 U.S.A. www.sears.com/craftsman PRINTED IN USA FORM NO. 49814 (REV.
TABLE OF CONTENTS SAFETY RULES .......................................................... 2 FULL SIZE HARDWARE CHART ................................ 3 CARTON CONTENTS ................................................. 4 ASSEMBLY .................................................................. 4 OPERATION ................................................................ 6 MAINTENANCE .......................................................... 6 REPAIR PARTS ILLUSTRATION ................................
ACCESSORIES The following accessories are available at most Sears retail outlets. ELECTRIC ASSIST KIT - MODEL 486.24545 HARDWARE PACKAGE CONTENTS A B C D F E O N P L G I Q M J H K KEY QTY. A B C D E F G H I 2 2 4 1 4 3 2 2 1 DESCRIPTION Hex Bolt, 5/8" x 2" Hex Bolt, 5/8" x 1-3/4" Hex Bolt, 3/8" x 1-1/4" Hex Bolt, 5/16" x 1" Carriage Bolt, 3/8" x 1" Clevis Pin Jam Nut, 5/8" Nylock Nut, 5/8" Nylock Nut 5/16" KEY QTY.
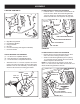
ASSEMBLY CARTON CONTENTS 1 4 2 IF YOUR TRACTOR LOOKS LIKE FIGURE 2A • Install two 3/8" x 1-1/4" hex bolts in the left side of the tractor as shown. Attach the Left Mounting Bracket (pin at top facing in) to the bolts using two 3/8" lock washers and 3/8" hex nuts. Repeat on the right side. 5 3 3/8" x 1-1/4" HEX BOLT 7 6 8 RIGHT MOUNTING BRACKET 1. 2. 3. 4. 5. 6. 7. 8.
FOR ALL TRACTORS • Place the Left Pivot Bracket onto the end of the Lift Lever Assembly (the Right Pivot Bracket comes already installed on the assembly). See figure 3. • Attach the Right and Left Pivot Brackets to the Sleeve Hitch Frame Assembly using four 3/8" x 1" carriage bolts and 3/8" nylock nuts. See figure 3. • • LEFT PIVOT BRACKET RIGHT PIVOT BRACKET Assemble the two 5/8" jam nuts halfway onto the two 5/8" x 2" hex bolts.
ASSEMBLY OPERATION • Move the lift lever backward to lower the sleeve hitch. • • Attach an implement using the sleeve hitch pin. Tighten the 5/8" x 2" stabilizer bolts against the implement hitch and then tighten the jam nuts. See Figure 5 on Page 5. To tow an implement that has a tow hitch, simply remove three clevis pins and then remove the Sleeve Hitch Lift Assembly from the Sleeve Hitch Frame Assembly.
ASSEMBLY PARTS REPAIR PARTS FOR MODEL 486.24536 SLEEVE HITCH 26 20 27 16 24 21 25 3 18 19 17 4 7 1 12 11 8 15 A 11 23 15 9 14 2 10 5 12 A 13 22 13 11 Ref Part No.
Get it fixed, at your home or ours! Your Home For repair – in your home – of all major brand appliances, lawn and garden equipment, or heating and cooling systems, no matter who made it, no matter who sold it! For the replacement parts, accessories and owner’s manuals that you need to do-it-yourself. For Sears professional installation of home appliances and items like garage door openers and water heaters. 1-800-4-MY-HOME® (1-800-469-4663) Call anytime, day or night (U.S.A. and Canada) www.sears.