JACKSON GRILLS INC. #106-2480 Mt. Lehman Rd. Abbotsford, BC V4X 2N3 TELEPHONE: (604) 855-6756 FAX: (604) 855-5373 SUPPORT: support@jacksongrills.com WEB SITE: www.jacksongrills.com ASSEMBLY, USE AND CARE MANUAL MANUAL FOR MODELS: JLS400-LP / JLS550-LP / JLS700-LP MODEL NAMES: LUX Series 2/3/4 Burner Pedestal Model FOR OUTDOOR USE ONLY DANGER If you smell gas: 1. Shut off gas to the appliance. 2. Extinguish any open flame. 3. Open lid. 4.
Table of Contents Messages to Our Users -----------------2 Installer Final Check List-------------------16 Important ------------------------------------4 Grill Lighting Instructions-------------------16 Installation Safety Precautions----------5 Operation Instructions-----------------------18 Exploded View & Parts List-------------6 Care & Maintenance-------------------------20 Assembly Instructions-------------------10 Trouble Shooting-----------------------------21 Gas Connections--------------
A special message to our customers: Thank you for choosing the Jackson Grill for your new gas grill. This appliance is designed with quality components and we are confident that it will provide you with years of excellent operation. Please take the time to read the whole manual and familiarize yourself with all of the features of the Jackson Grill. This manual also contains important safety information and operation instructions. Ensure that this manual remains handy to the barbeque for quick reference.
Important The symbols and boxes shown below explain what each symbol means. Read and follow every message found in this manual. !!! DANGER !!! DANGER: Indicates an imminently hazardous situation which will result in death or serious bodily injury if not followed. !!! WARNING !!! WARNING: Warning of the possibility of serious bodily injury if the instructions are not followed strictly. Be sure to always read and follow all of the instructions.
Installation Safety Precautions !!! WARNING !!! Do not try to install this appliance without reading the “INSTALLATION SAFETY PRECAUTIONS” section of this manual. 1. 2. 3. 4. 5. This grill is designed to use L.P. gas only. Only use this grill with L.P. gas and the regulator assembly supplied by the manufacturer. This grill is supplied with a Natural Gas Conversion Kit. When converting to Natural Gas, a qualified Gas installer should perform all gas conversions. See conversion section of this manual.
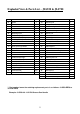
Exploded View & Parts List – JLS550 & JLS700 6
Exploded View & Parts List – JLS550 & JLS700 REF# 01 02 03 04 05 06 07 08 09 10 11 12 13 14 15 16 17 18A 18B 19 20 21 22 23 DESCRIPTION Q’TY Hood Thermometer Black Insulator Hood Handle Inner Hood Warming Rack Rotisserie Handle Rotisserie Rod/Forks Cooking Grids (A & B each one) Rear Burner Mount Rear Burner Cell Rear Burner Electrode Rear Burner Electrode Cover Flame Diffusers Main Burners Firebox Pedestal Side Right Gas Valve, Rear Burner Gas Valve, Main Burners Cutting Board Side Shelf Right Logo Bad
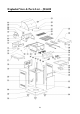
Exploded View & Parts List – JLS400 8
Exploded View & Parts List – JLS400 REF# 01 02 03 04 05 06 07 08 09 10 11 12 13 14 15 16 17 18 19 20 21 22 23 24 25 26 DESCRIPTION Thermometer Hood Rubber Bumpers Black Insulator Hood Handle Warming Rack Cooking Grids Hood Hood Spacer Rotisserie Motor Bracket LED Rotisserie Light Rotisserie Motor Hood Washer Rear Burner Mount Rear Burner Electrode Rear Burner Rear Burner Electrode Cover Side Shelf Bumpers Pedestal Back Pedestal Support Tube R/L Pedestal Side Left Propane Hose & Regulator Pedestal Base Hol
Assembly Instructions Please ensure the proper tools are used for ease of installation. Please remove all components from the packaging and inspect all components to ensure there is no damage to any components in the packaging. Please remove all packaging from all components of the gas grill before operating. Tool Required for Assembly: 1. #2 Phillips screwdriver. Side Shelf Installation: 1. Carefully remove the side shelves from the packaging. 2.
Flame Diffusers, Cooking Grids Installation: 1. Remove the flame diffusers form the packaging. Please ensure that all protective plastic has been removed from these parts. These flame diffusers should be placed on the ledge installed on the firebox front and rear. Ensure that all of the flame diffusers have been installed correctly in the slots provided or the unit will not work correctly. 2. Once the flame diffusers have been installed, the cooking grids can be installed into the grill.
For your safety: Ensure that the black plastic grommets of the regulator provided are in place and that the hose does not come into contact with the heat shield or the grill head. Connect the regulator to the L.P. tank: VERY IMPORTANT: a. THE REGULATOR SHALL INCORPORATE IN SUCH A LOCATION THAT IT WILL NOT ATTAIN A TEMPERATURE ABOVE 140℉(60℃). b. THE REGULATOR SHALL INCORPORATE A PRESSURE RELIEF VALVE OR OVERPRESSURE DEVICE. c.
because surplus gas may leak from safety relief valve. The safety relief valve on a L.P. tank could activate to release gas and cause a fire. 3. The spare L.P. tank must have safety caps installed on the L.P. tank outlet. 4. If any gas leaks are found on the spare L.P. tank, immediately go away from it and call the fire department. VERY IMPORTANT: DISCONNECT THE TANK WHEN THIS GRILL IS NOT IN USE. 1. 2. 3. 4. To disconnect L.P. gas tank: Turn all the knobs off.
4. 7. After all the propane orifices are removed from the grill place them in a safe spot away from your work area. This will ensure you do not re-install the propane orifices. Using an approved thread sealant, replace the main burner orifices with the NEW natural gas orifices supplied. Before reinstalling the main burners make sure to FULLY close the air shutter on each burner.
Leak Testing GENERAL Although all gas connections on the grill are leak tested at the factory prior to shipment, a complete gas tightness check must be performed at the installation site due to possible mishandling in shipment, or excessive pressure unknowingly being applied to the unit. Periodically check the whole system for leaks, or immediately check if the smell of gas is detected. 5. 6. 7. 8.
Installer Final Check List At least 36” clearance maintained from combustible constructions to the sides and back of this grill. There is no unprotected combustible construction over the grill. All internal packaging removed. Burners are sitting properly on orifices. Knobs turn freely. The regulator & hose connected to grill is provided by the manufacturer (pre-set for 11.0” water column). Unit tested and free of leaks. User informed of gas supply shut off valve location.
TO LIGHT REAR BURNER OF THE GRILL: THE WARMING RACK MUST BE REMOVED BEFORE LIGHTING THE REAR BURNER! 1. Read instructions before lighting. 2. Turn all knobs to “OFF” then open the L.P. tank valve. Always keep your face and body as far from the grill as possible when lighting 3. Open lid during lighting. 4. Push and turn rear burner control knob to the “HIGH” position. Push and hold igniter button until burner lights. Up to 5 seconds is allowed for ignition. 5.
Operation Instructions !!! CAUTION !!! 1. Clean your grill often. Failing to do so may cause a grease fire that may damage the grill. Please clean your grill frequently. 2. NEVER leave the grill unattended while using. 3. Do not use water to extinguish a grease fire, it may cause body injury. Turn knobs off and L.P. tank off in case grease fire occurs. 4. Grease fires cannot be put out by closing the lid. Turn off knobs and L.P. tank IMMEDIATELY if any grease fire occurs.
USING THE GRILL: Grilling requires high heat for searing and proper browning. Most foods are cooked at the “HI” heat setting for the entire cooking time. However, when grilling large pieces of meat or poultry, it may be necessary to turn the heat to a lower setting after the initial browning. This cooks the food through without burning the outside. Foods cooked for a long time or basted with a sugary marinade may need a lower heat setting near the end of the cooking time.
Care & Maintenance MAINTENANCE 1. Keep the grill area clear and free from combustible materials, gasoline and other flammable vapors and liquids. 2. Keep the holes in the three sides of the cart clear and free from debris, thus ensure the flow of combustion and ventilation air is unobstructed. 3. Visually check burner flames as following: a. Remove cooking grids and flame tamers b. Light burners. c.
Troubleshooting SPIDER AND INSECT WARNING Spiders and insects can nest in the burners after storing, these nest can cause fires inside the tube or beneath the grill. This is very dangerous condition. So always clean the burners before use after storing. WHEN TO LOOK FOR SPIDERS Inspect the burners at least once a year or immediately in case any of the following conditions occur: 1. Yellow flame with insects burning smell. 2. Temperature can’t rise. 3. Heats unevenly. 4.
Grilling Tips 1. The doneness of meat, whether rare, medium, or well done, is affected by the thickness to a large extent. 2. The cooking time is affected by the kind of meat, the size and shape of the cut, the temperature of the meat when cooking begins, and the degree of doneness desired. 3. Defrost meat in the refrigerator overnight. Don’t use a microwave, this always yields a juicier. 4.
Limited Lifetime Warranty MODEL NO.: JLS400-LP / JLS550-LP / JLS700-LP (LUX SERIES 2, 3 & 4 BURNER) Jackson Grills Inc. warrants the following materials and workmanship to be free of defects for as long as you own the grill.