USE & CARE MANUAL MODEL No. 592.85610-0 592.85613-0 592.85614-0 592.85619-0 KNOW YOUR UNIT Read this booklet so you will be able to enjoy all the features in your Kenmore Microwave Oven. Record in the space provided below the Model No. and the Serial No. of the appliance. Model No. Serial No. Retain this information for future reference. *Sold by Sears Canada Inc. Part No. DE68-03143S CANADA-MH5 DE68-03143S_EN.indd 1 MICROWAVE OVEN Use and Care Manual SEARS. CANADA INC., TORONTO. M5B 2B8 www.sears.
TABLE OF CONTENTS TABLE OF CONTENTS. . . . . . . . . . . . . . . . . . . 2 POPCORN. . . . . . . . . . . . . . . . . . . . . . . . . . . . BAKED POTATO. . . . . . . . . . . . . . . . . . . . . . . VEGETABLE. . . . . . . . . . . . . . . . . . . . . . . . . . COOK. . . . . . . . . . . . . . . . . . . . . . . . . . . . . . . . REHEAT. . . . . . . . . . . . . . . . . . . . . . . . . . . . . . HOLD WARM. . . . . . . . . . . . . . . . . . . . . . . . . . KIDS MEALS. . . . . . . . . . . . . . . . . . . . . . . . .
IMPORTANT SAFETY INSTRUCTIONS WHAT YOU NEED TO KNOW ABOUT SAFETY INSTRUCTIONS CAUTION To avoid personal injury or property damage, observe the following: 1. Do not deep fat fry in oven. Fat could overheat and be hazardous to handle. 2. Do not cook or reheat eggs in shell or with an unbroken yolk using microwave energy. Pressure may build up and erupt. Pierce yolk with fork or knife before cooking. 3. Pierce skin of potatoes, tomatoes, and similar foods before cooking with microwave energy.
SAFETY PRECAUTIONS TO AVOID POSSIBLE EXPOSURE TO EXCESSIVE MICROWAVE ENERGY A. DO NOT attempt to operate this oven with the door open since open door operation can result in harmful exposure to microwave energy. It is important not to defeat or tamper with the safety interlocks. B. DO NOT place any object between the oven front face and the door or allow soil or cleaner residue to accumulate on sealing surfaces. C. DO NOT operate the oven if it is damaged.
SAFETY WARNING 10. DO NOT heat baby bottles in oven. 11. DO NOT operate this oven if it has a damaged cord or plug, if it is not working properly, or if it has been damaged or dropped. 12. This oven, including power cord, must be serviced ONLY by qualified service personnel. Special tools are required to service oven. Contact nearest authorized service facility for examination, repair, or adjustment. 13. DO NOT cover or block filter or other openings on oven. 14. DO NOT store this oven outdoors.
SAFETY WARNING To avoid risk of electrical shock or death, this oven must be grounded and plug must not be altered. GROUNDING INSTRUCTIONS Oven MUST be grounded. Grounding reduces risk of electric shock by providing an escape wire for the electric current if an electrical short occurs. This oven is equipped with a cord having a grounding wire with a grounding plug. The plug must be plugged into an outlet that is properly installed and grounded. See Installation Instructions.
INFORMATION TESTING YOUR DINNERWARE OR COOKWARE Test dinnerware or cookware before using. To test a dish for safe use, put it into oven with a cup of water beside it. Cook at 100% cook power for one minute. If the dish gets hot, do not use it. Some dishes (melamine, some ceramic dinnerware, etc.) absorb microwave energy, becoming too hot to handle and slowing cooking times.
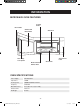
INFORMATION MICROWAVE OVEN FEATURES Cooking Guide Door Handle Window with Metal Shield Wire Rack Oven Control Panel Door Safety Lock System Model and Serial Number Plate Glass Glide OVEN SPECIFICATIONS Power Supply 120 VAC, 60 Hz Input Power 1,500W Cooking Power 1,000W IEC 60705 Standard Frequency 2,450 MHz Outer Dimensions 29 7/8 (W) x 16 13/16 (H) x 16 (D) Cavity Volume 2.0 Cu. Ft. Net Weight 52.9 lbs. - - CANADA-MH5 DE68-03143S_EN.
INFORMATION OVEN CONTROL PANEL - - CANADA-MH5 DE68-03143S_EN.
INFORMATION 1. DISPLAY: The Display includes a clock and indicators to tell you time of day, cooking time settings and cooking functions selected. 2. POPCORN: Touch this pad when popping popcorn in your microwave oven. The oven’s sensor will tell the oven how long to cook depending on the amount of humidity it detects from the popcorn. 3. COOK: Touch this pad to cook beverage, frozen dinner, frozen breakfast, chicken breast.
OPERATION LEARN ABOUT YOUR MICROWAVE OVEN This section introduces you to the basics you need to know to operate your microwave oven. Please read this information before use. CAUTION • • To avoid risk of personal injury or property damage, do not run oven empty. To avoid risk of personal injury or property damage, do not use stoneware, aluminum foil, metal utensils, or metal trimmed utensils in the oven unless marked microwave-safe. Clock CONTROL SETUP You can change the default values.
OPERATION VENT FAN CHILD LOCK The VENT moves steam and other vapors from the cooking surface. You may lock the control panel to prevent the microwave from being accidentally started or used by children. The Child Lock feature is also useful when cleaning the control panel. Child Lock prevents accidental programming when wiping the control panel. Example: To set Level 4. 1. Touch ON/OFF pad. This shows the last level until you select the fan speed level. 2.
OPERATION LIGHT TIMER LIGHT HI/LO/OFF You can set the LIGHT to turn on and off automatically at any time. The light comes on at the same time every day until reset. Touch LIGHT HI/LO/OFF pad once for bright light, twice for night light, or three times to turn the light off. Example: Turn on 2:00 AM, turn off 7:00 PM. 12 hour clock mode. 1. Touch TIMER pad. 2. Enter the time you want the LIGHT to turn on. 3. Touch ENTER/START pad. 4. Touch 1 for AM.
OPERATION COOKING AT HIGH POWER LEVELS COOKING WITH MORE THAN ONE COOK CYCLE For best results, some recipes call for one Power Level for a certain length of time, and another Power Level for another length of time.Your oven can be set to change from one to another automatically, for up to three cycles if the first cycle is defrost. Example: To cook food for 8 minutes 30 seconds at 100% power. 1. Enter the cook time. 2. Touch ENTER/START pad.
OPERATION COOKING GUIDE FOR POWER LEVELS The power levels allow you to choose the best power level for the food you are cooking. Below are listed all the power levels, examples of foods best cooked at each level, and the amount of microwave power you are using. POWER LEVEL MICROWAVE OUTPUT USE 10 High 100 % • • • • • • • 9 90 % • Reheat meat slices quickly. • Saute onions, celery, and green pepper. 8 80 % • All reheating. • Cook scrambled eggs. 7 70 % • • • • 6 60 % • Cook pasta.
OPERATION SENSOR OPERATING INSTRUCTIONS SENSOR COOKING GUIDE Sensor Cook allows you to cook most of your favourite foods without selecting cooking times and power levels. The display will indicate the sensing period by scrolling the name of the food. The oven automatically determines required cooking time for each food item. When the internal sensor detects a certain amount of humidity coming from the food, it will tell the oven how much longer to cook. The display will show the remaining heating time.
OPERATION PIZZA SLICE BAKED POTATO The PIZZA SLICE pad lets you reheat one to four slices of pizza without selecting cooking times and power levels. The BAKED POTATO pad lets you bake one to six potatoes without selecting cooking times and power levels. NOTE: Example: To reheat 2 slices of pizza. Touch PIZZA SLICE pad. When the cook time is over, you will hear four beeps and END will display. • Recommended amounts: 1-4 slices. • • Use the More(9)/Less(1) pads if cooking larger or smaller potatoes.
OPERATION COOK REHEAT Using COOK pad lets you heat common microwaveprepared foods without needing to program cooking times and power levels. COOK has 4 preset food categories: Beverage, Frozen Dinner, Frozen Breakfast and Chicken Breast. REHEAT pad lets you heat foods without needing to program cooking times and power levels. REHEAT has 3 preset categories: Dinner Plate, Casserole and Pasta. Example: To reheat Casserole. Example: To cook Frozen Breakfast. 1. Touch REHEAT pad. 1. Touch COOK pad. 2.
OPERATION SENSOR COOK TABLE CATEGORY DIRECTIONS AMOUNT Use only one microwave-only bag of popcorn at a time. Use caution when removing and opening the hot bag from oven. Let oven cool for at least 5 minutes before using again. 3.0 to 3.5 oz. 1 package Potato Prick each potato several times with fork. Place on turntable in spoke-like fashion. Let stand 3-5 minutes. Let oven cool for at least 5 minutes before using again. Use More(9) pad when cooking larger potatoes.
OPERATION KIDS MEALS KIDS MEALS lets you heat 4 categories of food: Chicken Nuggets, Hot Dogs, French Fries and Frozen Sandwiches. Example: To cook frozen sandwiches. 1. Touch KIDS MEALS pad. 2. Choose food category(1-4). Category Touch Pad Number Chicken Nuggets 1 Hot Dogs 2 French Fries 3 Frozen Sandwiches 4 3. Touch ENTER/START pad. KIDS MEALS CHART ITEM Frozen Chicken Nuggets Hot Dogs French Fries Frozen Sandwiches AMOUNT OR SERVINGS REMARKS 1 serving (4-5 oz.) 2 servings (6-7 oz.
OPERATION Soften/melt SOFTEN/MELT lets you soften or melt 3 categories of food: Melt Chocolate, Soften Cream Cheese and Melt Butter. Example: To melt chocolate. 1. Touch SOFTEN/MELT pad. 2. Choose food category(1-3). Category Touch Pad Number Melt Chocolate 1 Soften Cream Cheese 2 Melt Butter 3 3. Touch ENTER/START pad.
OPERATION Snacks SNACKS lets you heat 4 categories of food: Nachos, Chicken Wings, Potato Skins, and Cheese Sticks. Example: To cook chicken wings. 1. Touch SNACKS pad. 2. Choose food category(1-4). Category Touch Pad Number Nachos 1 Chicken Wings 2 Potato Skins 3 Cheese Sticks 4 3. Touch ENTER/START pad. Snacks chart ITEM AMOUNT OR SERVINGS 1 serving • Place tortilla chips on plate without overlapping. • Sprinkle evenly with cheese.
OPERATION Auto Defrost Defrost choices are preset in the oven. The defrost feature provides you with the best defrosting method for frozen foods, because the oven automatically sets the defrosting times according to the weight you enter. For added convenience, the AUTO DEFROST beeps to remind you to check or turn over the food during the defrost cycle. After touching the AUTO DEFROST pad once, enter the food weight. Available weight ranges are 0.1 to 6.0 lbs. Example: To defrost 1.2 lbs of meat. 1.
OPERATION Defrost tips • • • • • When using AUTO DEFROST, the weight to be entered is the net weight in pounds and tenths of pounds (the weight of the food minus the container). Use AUTO DEFROST only for raw food. AUTO DEFROST gives best results when food to be thawed is a minimum of 0°F (taken directly from a true freezer).
OPERATION Cooking guide Guide for cooking meat in your microwave • • • Place meat on a microwave-safe roasting rack in a microwave-safe dish. Start meat fat-side down. Check the temperature in several places before letting the meat stand the recommended time. Food • • Cook time 7-11 min./lb. for 145° F (Rare) Roast Beef Boneless (Up to 4 ls.) 8-12 min./lb. for 160° F (Medium) Pork Boneless or bone-in (Up to 4 lbs.) 11-15 min./lb. for 170° F (Well Done) 9-14 min./lb.
OPERATION Guide for cooking seafood in your microwave • • • • Cook fish until it flakes easily with a fork. Place fish on a microwave-safe roasting rack in a microwave-safe dish. Use a tight cover to steam fish. A lighter cover of wax paper or paper towel provides less steaming. Do not overcook fish; check it at minimum cooking time. Food Cook Time/Power Level Directions Steaks Up to 1.5 lbs. Cooking Time: 6-10 min. / lb. Power Level: Medium-High(7).
OPERATION Wire rack The wire rack gives you extra space when cooking in more than one container at the same time. CAUTION To avoid risk of property damage: • Do not use rack to pop popcorn. • Rack must be on the four plastic supports when used. • • Use the rack only when cooking food on rack position. Do not cook with rack on floor of the oven. To use rack: 1. Place rack securely in the four plastic supports. • Rack MUST NOT touch metal walls or back of microwave oven. 2.
MAINTENANCE Care and Cleaning For best performance and safety, keep the oven clean inside and outside. Take special care to keep the inner door panel and the oven front frame free of food or grease build-up. Never use rough powder or pads. Wipe the microwave oven inside and out, including the hood bottom cover, with a soft cloth and a warm (not hot) mild detergent solution. Then rinse and wipe dry. Use a chrome cleaner and polish on chrome, metal and aluminum surfaces.
MAINTENANCE Charcoal Filter replacement If your oven is vented to the inside, the charcoal filter should be replaced every 6 to 12 months, and more often if necessary. The charcoal filter cannot be cleaned. The charcoal filter is available from Sears by calling 1-800-4-MY-HOME® 1. Unplug oven or turn off power at the main power supply. 2. Open the door. 3. Remove the two vent grill mounting screws. (2 middle screws) 4. Slide the grill to the left, then pull straight out.
MAINTENANCE Oven Light replacement 1. Unplug oven or turn off power at the main power supply. 2. Open the door. 3. Remove the vent cover mounting screws. (2 middle screws) 4. Slide the grill to the left, then pull straight out. 5. Remove the screw located above the door near the center of the oven that secures the bulb holder. 6. Remove bulb holder. 7. Replace bulb with a 40 watt appliance bulb. 8. Replace the bulb holder. 9. Replace the grill and 2 screws.
MAINTENANCE LEARN ABOUT YOUR MICROWAVE OVEN This section introduces you to the basics you need to know to operate your microwave oven. Please read this information before use. Microwave utensil guide USE DO NOT USE OVEN PROOF GLASS (treated for high intensity heat): Utility dishes, loaf dishes, pie plates, cake plates, liquid measuring cups, casseroles and bowls without metallic trim. METAL UTENSILS: Metal shields the food from microwave energy and produces uneven cooking.
BEFORE CALLING FOR SERVICE Troubleshooting guide You see sparks or arcing. Before you call a repair person for your oven, check this list of possible problems and solutions. • Neither the oven’s display nor the oven operate. The turntable makes noises or sticks. • • • • • • Properly insert the plug into a grounded outlet. If the outlet is controlled by a wall switch, make sure the wall switch is turned on. Remove the plug from the outlet, wait ten seconds, then plug it in again.
- 33 - CANADA-MH5 DE68-03143S_EN.
WARRANTY MICROWAVE HOOD COMBINATION WARRANTY One Year Limited Warranty When installed, operated and maintained according to all instructions supplied with the product, if this appliance fails due to a defect in material or workmanship within one year from the date of purchase, call 1-800-4-MY-HOME® to arrange for free inhome repair. If this appliance is used for other than private family purposes, this warranty applies for only 90 days from the date of purchase.
- 35 - CANADA-MH5 DE68-03143S_EN.
MANUEL D’UTILISATION ET D-ENTRETIEN N° DE MODELE 592.85610-0 592.85613-0 592.85614-0 592.85619-0 FAMILIARISEZ-VOUS AVEC VOTRE APPAREIL Lisez attentivement ce manuel afin de pouvoir profiter pleinement de toutes les fonctionnalités offertes par votre four à micro-ondes Kenmore. Prenez soin de noter les numéros de modèle et de série de l’appareil dans l’espace fourni ci-dessous. Model No. N° de série Conservez précieusement ces informations afin de pouvoir vous y reporter ultérieurement.
TABLE DES MATIERES TABLE DES MATIERES. . . . . . . . . . . . . . . . . . . . . . . 2 Décongélation 1 livre . . . . . . . . . . . . . . . . . . . . . . . . . . . . . 24 Guide de cuisson . . . . . . . . . . . . . . . . . . . . . . . . . . . . . . . . 25 Grille métallique . . . . . . . . . . . . . . . . . . . . . . . . . . . . . . . . . 27 SECURITE . . . . . . . . . . . . . . . . . . . . . . . . . . . . . . . . . 3 CONSIGNES IMPORTANTES DE SECURITE . . . . . . . . . . 3 ENTRETIEN . . . . . . . . . . . . . .
CONSIGNES IMPORTANTES DE SECURITE CE QUE VOUS DEVEZ SAVOIR SUR LES CONSIGNES DE SECURITE ATTENTION Les avertissements et consignes de sécurité figurant dans ce manuel d’entretien et d’utilisation ne sont pas destinés à couvrir toutes les conditions et situations possibles. Des mesures de bon sens, de précaution et de soin doivent être prises lors de l’installation, de l’entretien ou de l’utilisation du micro-ondes.
SECURITE CONSIGNES PERMETTANT D’EVITER UNE EXPOSITION EXCESSIVE AUX MICROONDES AVERTISSEMENT Les liquides tels que l’eau, le café ou le thé peuvent être chauffés au-delà du point d’ébullition sans que le phénomène ne soit visible. L’ébullition et le bouillonnement ne sont pas toujours visibles au moment où le récipient est retiré du micro-ondes. CELA PEUT ENTRAINER UN DEBORDEMENT SOUDAIN PAR EBULLITION DE LIQUIDES TRES CHAUDS LORSQU’UNE CUILLERE OU UN AUTRE USTENSILE EST INTRODUIT DANS LE LIQUIDE.
SECURITE AVERTISSEMENT Lorsque vous utilisez des appareils électriques, des règles de sécurité de base doivent être respectées afin de réduire les risques de brûlure, de choc électrique, d’incendie, de blessures ou d’exposition à une quantité trop importante de micro-ondes. 1. LISEZ ATTENTIVEMENT toutes les consignes avant d’utiliser le four. 2. LISEZ ATTENTIVEMENT ET RESPECTEZ les « CONSIGNES PERMETTANT D’EVITER UNE EXPOSITION EXCESSIVE AUX MICRO-ONDES » en page 4. 3.
SECURITE AVERTISSEMENT Pour éviter tout risque de choc électrique susceptible d’entraîner une électrocution ou un accident mortel, reliez le four à la terre et veillez à ce que la prise ne soit pas endommagée ou modifiée de quelque manière que ce soit. CONSIGNES DE MISE A LA TERRE Le four DOIT être relié à la terre. La mise à la terre réduit le risque de choc électrique en fournissant un fil de sortie au courant en cas de court-circuit.
INFORMATION ESSAI DE LA VAISSELLE OU DES USTENSILES Testez votre vaisselle ou vos ustensiles avant toute utilisation. Afin de définir si votre plat peut être utilisé en toute sécurité, placez-le dans le four à côté d’un verre d’eau. Faites cuire à pleine puissance pendant une minute. Si le plat devient chaud, ne l’utilisez pas. Certains plats (mélamine, vaisselle en céramique, etc.) absorbent les micro-ondes. Ils deviennent trop chauds pour être manipulés et ralentissent la cuisson.
INFORMATION FONCTIONNALITES DU FOUR A MICRO-ONDES Guide de cuisson Poignée de la porte Fenêtre avec écran métallique Système de verrouillage de sécurité de la porte Grille métallique Plaque des numéros de modèle et de série Plateau en verre Tableau de commande du four CARACTERISTIQUES TECHNIQUES DU FOUR Alimentation CA 120 V, 60 Hz Puissance absorbée 1500 W Puissance de cuisson 1000 W (Norme CEI 60705) Fréquence 2450 MHz Dimensions extérieures 29 7/8 (I) x 16 13/16 (H) x 16 (P) Volume inté
INFORMATION TABLEAU DE COMMANDE DU FOUR - - CANADA-MH5 DE68-03143S_FR.
INFORMATION 1. 2. 3. 4. 5. 6. 7. 8. 9. 10. 11. 12. 13. 14. DISPLAY (AFFICHAGE) : l’écran affiche une horloge et des témoins vous indiquant l’heure, les paramètres de temps de cuisson et les fonctions sélectionnées. POPCORN (POPCORN) : permet de faire du popcorn. Le capteur intégré calcule automatiquement le temps de cuisson en fonction de la teneur en eau du pop-corn.
FONCTIONNEMENT DECOUVREZ VOTRE MICRO-ONDES Cette section vous présente les fonctions de base que vous devez connaître avant d’utiliser votre four micro-ondes. ATTENTION • • Pour éviter tout risque de dommages corporels ou matériels, ne faites jamais fonctionner le four à vide.
FONCTIONNEMENT VENT FAN (VENTILATEUR) CHILD LOCK (SECURITE ENFANTS) Le VENTILATEUR permet de chasser les vapeurs émises par les aliments hors de la zone de cuisson. Vous pouvez verrouiller le tableau de commande afin d’éviter que le four ne soit démarré accidentellement ou manipulé par des enfants. Cette fonction se révèle également très utile lorsque vous nettoyez le tableau de commande. Elle évite en effet que vous ne lanciez accidentellement un programme en passant le chiffon sur les touches.
FONCTIONNEMENT LIGHT HI/LO/OFF (ECLAIRAGE ELEVE/FAIBLE/DESACTIVE) LIGHT TIMER (MINUTERIE D’ECLAIRAGE) Vous pouvez régler la mise sous et hors tension automatique de l’ECLAIRAGE à tout moment. L’éclairage s’allume à la même heure tous les jours jusqu’à réinitialisation. ppuyez une fois sur la touche LIGHT HI/LO/OFF (ECLAIRAGE ELEVE/FAIBLE/DESACTIVE) pour obtenir une lumière forte, deux fois pour activer la veilleuse et trois fois pour éteindre la lumière. Exemple : Allumer à 2 h, éteindre à 19 h.
FONCTIONNEMENT IMPORTANT : Exemple : pour rappeler le programme personnalisé. • NE RANGEZ ni n’utilisez la grille dans ce four à moins de cuire plusieurs aliments ou à moins que la recette ne le nécessite. 1. Appuyez sur la touche CUSTOM PROGRAM (PROGRAMME PERSONNALISE). 2. Appuyez sur la touche ENTER/START (ENTREE/DEPART). • Le four pourrait être endommagé.
FONCTIONNEMENT GUIDE DE CUISSON POUR LES NIVEAUX DE PUISSANCE Les niveaux de puissance vous permettent de choisir le niveau le plus adapté aux aliments que vous cuisinez. Vous trouverez ci-dessous toutes les puissances du four ainsi que des exemples de plats et le rendement du micro-ondes associés à chacune d’elles. PUISSANCE RENDEMENT DU MICROONDES15 10 Elevé 100 % • Faire bouillir de l’eau. • Faire cuire du boeuf haché ou démarrer la cuisson de rôtis. • Faire des bonbons.
FONCTIONNEMENT CONSIGNES D’UTILISATION DU CAPTEUR GUIDE DE CUISSON PAR CAPTEUR La cuisson par capteur vous permet de cuire la plupart de vos plats préférés sans avoir à sélectionner de temps de cuisson ni de niveaux de puissance. Pour afficher le temps de détection, faites défiler le nom de l’aliment. Le four calcule automatiquement le temps de cuisson nécessaire pour chaque plat.
FONCTIONNEMENT PIZZA SLICE (PART DE PIZZA) BAKED POTATO (POMME DE TERRE AU FOUR) La touche PIZZA SLICE (PART DE PIZZA) vous permet de réchauffer de une à quatre parts de pizza sans avoir à sélectionner de temps de cuisson ni de niveau de puissance. La touche BAKED POTATO (POMME DE TERRE AU FOUR) vous permet de faire cuire de une à six pommes de terre sans sélectionner ni temps de cuisson ni niveau de puissance. REMARQUE : Exemple : pour réchauffer 2 parts de pizza.
FONCTIONNEMENT COOK (CUISSON) Quantités recommandées : La touche COOK (CUISSON) vous permet de préparer des aliments généralement prévus pour être cuisinés aux micro-ondes sans avoir à programmer de temps de cuisson ni de puissance. La touche COOK (CUISSON) propose 4 catégories d’aliments programmées : boisson, dîner surgelé, petit-déjeuner surgelé et blanc de poulet. Exemple : pour faire cuire un petit-déjeuner surgelé. 1. Appuyez sur la touche COOK (CUISSON). 2. Choisissez la catégorie d’aliment.
FONCTIONNEMENT TABLEAU DE CUISSON AVEC CAPTEUR INSTRUCTIONS QUANTITE Popcorn (Pop-corn) Ne faites chauffer qu’un seul sachet de pop-corn spécial micro-ondes à la fois. Soyez prudent lorsque vous ouvrez le sachet après l’avoir retiré du four. Laissez le four refroidir pendant au moins 5 minutes avant toute nouvelle utilisation. 3,0 à 3,5 oz 1 sachet Pomme de terre Piquez chaque pomme de terre plusieurs fois à l’aide d’une fourchette. Disposez-les en étoile sur le plateau.
FONCTIONNEMENT KIDS MEALS (REPAS ENFANTS) La fonction KIDS MEALS (MENUS ENFANTS) vous permet de faire réchauffer les 4 catégories d’aliments suivantes : Beignets de poulet, Hot-dogs, frites et sandwiches surgelés. Exemple : pour faire cuire un sandwich surgelé. 1. Appuyez sur la touche KIDS MEALS (MENUS ENFANTS). 2. Choisissez la catégorie d’aliment (1 à 4). Catégorie Touche numérique Beignets de poulet 1 Hot-dogs 2 Frites 3 Sandwichs surgelés 4 3.
FONCTIONNEMENT Faire ramollir/fondre La fonction SOFTEN/MELT (RAMOLLIR/FONDRE) vous permet de ramollir ou faire fondre trois catégories d’aliments : Faire fondre du chocolat, faire ramollir du fromage à la crème et faire fondre du beurre. Exemple : pour faire fondre du chocolat. 1. Appuyez sur la touche SOFTEN/ MELT (RAMOLLIR/FONDRE). 2. Choisissez la catégorie d’aliments (1 à 3).
FONCTIONNEMENT Casse-Croute La fonction Casse-Croute vous permet de faire réchauffer les 4 catégories d’aliments suivantes : nachos, ailes de poulet, pommes de terre farcies et bâtonnets de fromage. Exemple : pour faire cuire des ailes de poulet. 1. Appuyez sur la touche SNACKS (EN-CAS). 2. Choisissez la catégorie d’aliment (1 à 4). Catégorie Touche numérique Nachos 1 Ailes de poulet 2 Pommes de terre farcies 3 Bâtonnets de fromage 4 3. Appuyez sur la touche ENTER/ START (ENTREE/DEPART).
FONCTIONNEMENT Décongélation automatique Le four propose plusieurs fonctions de décongélation. La fonction Defrost (Décongélation) est la meilleure façon de décongeler vos aliments car le four programme automatiquement le temps de décongélation à partir du poids de l’aliment que vous avez saisi. Pour vous faciliter la tâche, des signaux sonores sont émis pendant la décongélation automatique pour vous rappeler de vérifier ou de retourner les aliments pendant la phase de décongélation.
FONCTIONNEMENT Astuces de décongélation • • • • • Lorsque vous utilisez la fonction AUTO DEFROST (DECONGELATION AUTOMATIQUE), le poids à indiquer est le poids net en kilogrammes et en dizaines de kilogrammes (le poids de l’aliment moins celui du récipient). Utilisez AUTO DEFROST (DECONGELATION AUTOMATIQUE) uniquement pour des aliments crus. AUTO DEFROST (DECONGELATION AUTOMATIQUE) donne de meilleurs résultats si les aliments à décongeler sont au minimum à 0°F (retiré directement du congélateur).
FONCTIONNEMENT Guide de cuisson Guide de cuisson de la viande • • • Placez la viande sur une grille à rôtir adaptée à la cuisson aux micro-ondes et le tout dans un plat du même type. Lancez la cuisson en plaçant la viande côté gras vers le bas. Vérifiez la température à différents endroits avant de laisser la viande reposer pendant la durée recommandée. Aliments • • Temps de cuisson 7 à 11 min. / lb à 145°F (saignant) Rôti de bœuf désossé (jusqu’à 4 livres) 8 à 12 min.
FONCTIONNEMENT Guide de cuisson des fruits de mer • • • • Faites cuire le poisson jusqu’à ce qu’il s’émiette facilement à la fourchette. Placez le poisson sur une grille à rôtir adaptée à la cuisson aux micro-ondes et le tout dans un plat du même type. Utilisez un couvercle hermétique pour cuire le poisson à l’étuvée. L’utilisation de papier sulfurisé ou d’une serviette en papier comme couvercle produit moins de vapeur. Ne faites pas trop cuire le poisson.
FONCTIONNEMENT Grille métallique La grille métallique permet un gain de place non négligeable lorsque vous utilisez plusieurs récipients. ATTENTION Pour éviter les risques de dommages matériels : • N’utilisez pas la grille pour faire cuire du pop-corn. • Pour l’utiliser, veillez à la placer sur les quatre supports en plastique prévus à cet effet. • • Ne l’utilisez que lorsque la cuisson le requiert. Ne la placez pas à même le plancher du four pendant la cuisson. Pour utiliser la grille : 1.
ENTRETIEN Entretien et nettoyage Pour un fonctionnement et une sécurité maximum, gardez l’intérieur et l’extérieur du four propres. Veillez à ce que la partie intérieure de la porte du four et le cadre avant ne contiennent pas de traces d’aliments ou de graisse incrustées. N’utilisez jamais de poudre ou de tampons à récurer. Nettoyez l’intérieur et l’extérieur du four, y compris le couvercle inférieur de la hotte, à l’aide d’un chiffon doux et d’un détergent doux et tiède (non chaud). Rincez et essuyez.
ENTRETIEN Remplacement du filtre à charbon Si la ventilation fonctionne à l’intérieur du four, le filtre à charbon doit être remplacé tous les 6 à 12 mois ou plus si nécessaire. Le filtre à charbon ne doit pas être nettoyé. Le filtre à charbon est disponible auprès de Sears si vous appelez le 1-800-4-MY-HOME 1. Débranchez le four ou coupez l’alimentation à la prise d’alimentation secteur. 2. Ouvrez la porte. 3. Retirez les deux vis de la grille du ventilateur (2 vis au milieu) 4.
ENTRETIEN Remplacement de l’éclairage du four 1. 2. 3. 4. Débranchez le four ou coupez l’alimentation à la prise d’alimentation secteur. Ouvrez la porte. Retirez la protection du ventilateur ainsi que les vis. (2 vis au milieu) Faites coulisser la grille vers la gauche, puis tirez-la tout droit vers l’extérieur. 5. Retirez la vis de maintien du support de l’ampoule située au-dessus de la porte vers le centre du four. 6. Retirez le support de l’ampoule. 7. 8. 9.
ENTRETIEN DECOUVREZ VOTRE MICRO-ONDES Cette section vous présente les fonctions principales essentielles à l’utilisation de votre four micro-ondes. Veuillez lire ceci attentivement avant d’utiliser votre four. Guide des ustensiles adaptés aux micro-ondes UTILISATION NE PAS UTILISER PLATS EN VERRE (traité pour résister à de fortes températures) Plats tout usage, moules à pain, moules à gâteaux, tasses graduées, casseroles et bols sans ornements métalliques.
AVANT DE FAIRE APPEL AU SERVICE D’ASSISTANCE Dépannage Des étincelles ou des arcs se forment. Avant de faire appel à un dépanneur, effectuez les vérifications suivantes. • L’affichage et le four ne fonctionnent pas. Le plateau tournant fait du bruit ou ne tourne pas en continu. • • • • • • Insérez correctement la fiche dans une prise avec mise à la terre. Si la prise est commandée par interrupteur mural, assurez-vous que celui-ci est en position ouverte.
- 33 - CANADA-MH5 DE68-03143S_FR.
GARANTIE GARANTIE COMBINEE MICRO-ONDES ET HOTTE Garantie limitée à une année Après l’installation, l’utilisation et l’entretien du produit conformément aux instructions qui l’accompagnent, si l’appareil ne fonctionne pas en raison d’un vice matériel ou de fabrication dans l’année suivant la date d’achat, appelez le 1-800-4-MY-HOME® pour demander une réparation gratuite. Si cet appareil est utilisé dans le cadre d’un usage autre que domestique, la garantie est limitée à 90 jours à compter de la date d’achat.
- 35 - CANADA-MH5 DE68-03143S_FR.