
Owner`s manual
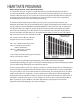


F60 TREADMILL27
CALIBRATION PROCEDURE
1. Remove the Safety Key.
2. Press and hold down the Start and Speed 5 buttons and replace the Safety Key.
Continue to hold the Start and Speed 5 key until the window displays “Factory settings”,
then press the Enter key.
3. You will now be able to set the display to show Metric or English settings (Miles vs.
Kilometers). To do this, press the 5/6 key to show which you want, then press Enter.
4. Make sure the wheel size diameter is 1.83 then press Enter.
5. Adjust the minimum speed (if needed) to 0.5 and then press Enter.
6. Adjust the maximum speed (if needed) to 10.0 and then press Enter.
7. Adjust the maximum elevation (if needed) to 15 and then press Enter.
8. Grade return – On (This allows the incline to return to zero when Stop is pressed. For sale in
Europe, EU standards require this to be o)
9. Press Start to begin calibration. The process is automatic; the speed will start up without
warning, so do not stand on the belt.
ADJUSTING THE SPEED SENSOR
If the calibration does not pass you may need to check the speed sensor alignment.
1. Remove the motor cover hood by loosening the 4 screws that hold it
in place (you do not need to remove them completely).
2. The speed sensor is located on the left side of the frame, right next to
the front roller pulley (the pulley will have a belt around it that also
goes to the motor). The speed sensor is small and black with a wire
connected to it.
3. Make sure the sensor is as close as possible to the pulley without
touching it. You will see a magnet on the face of the pulley; make sure
the sensor is aligned with the magnet. There is a screw that holds the
sensor in place that needs to be loosened to adjust the sensor. Re-tighten the screw when
nished.
A. Key Test - Will allow you to test all the keys to make sure they are functioning
B. Display Test - Tests all the display functions
C. Functions - Press Enter to access settings, use Speed 5/6 keys to scroll
I. Display Mode - Turn o to have the console power down automatically after 30 minutes of inactivity
II. Pause Mode - Turned on to allow 5 minutes of pause, turn o to have console pause in denitely
III. Maintenance - Reset lube message and odometer readings
IV. Units - Choose from English or Metric display readings
V. Key Tone - Will turn on/o beeping noise that is made when keys are pressed.
D. Security - Allows you to lock the keypad so no unauthorized use of the machine is allowed. When the child
lock is enabled, the console will not allow the keypad to operate unless you press and hold the Start and
Enter buttons for 3 seconds to unlock the console.
E. Exit
1. Press and hold the Start, Stop and Enter key at the same time, until the display shows
“Engineering mode” (it may say maintenance menu, depending on version).
Press the Enter key.
2. You can now scroll through the menu using the Speed 5/6 keys. Use the Stop key to
return to previous menu selection. The menu selections are:
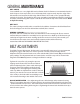
MAINTENANCE MENU