GL36 Model No. 831,283120 Serial No. Write the serial number in the space above for reference. BIKE EXERCISER User's Manual • Assembly • Operation • Maintenance • Part List and Drawing Patent Pending Sears, Roebuck and Co.
GL36 TABLE OF CONTENTS IMPORTANT PRECAUTIONS ............................................................. BEFORE YOU BEGIN ................................................................... ASSEMBLY ........................................................................... HOW TO OPERATE THE EXERCISE CYCLE ................................................. MAINTENANCE AND TROUBLESHOOTING ................................................. CONDITIONING GUIDELINES .............................................
BEFORE YOU BEGIN Congratulations for selecting the new PROFORM ® GL36 exercise cycle. Cycling is one of the most effective exercises for increasing cardiovascularfitness, buildingendurance, and toning the entire body. The PROFORM ®GL36 exercise cycle offers an impressive array of features to let you enjoy this healthful exercise in the convenience and privacyof your home. after readingthis manual, call 1-80O-4-MY-HOME® (1-800-469-4663).
ASSEMBLY Assembly requires two persons. Place all parts of the exemise cycle in a cleared area and remove the packing matedals. Do not dispose of the packing materials until assembly is completed. and Phillips screw- Assembly requires the included tools and your own adjustable wrench _ driver _-. Use the part drawings below to identifythe small parts used in assembly. The number in parenthesis below each drawing refers to the key number of the part, from the PART LIST on page 22.
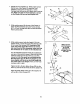
1. Identifythe Front Stabilizer (2). While another person lifts the front of the Frame (1), attach the Front Stabilizer to the Frame with two M10 x 112mm Carriage Bolts (65) and two M10 Black Nylon Locknuts (63). Make sure that the Front Stabilizer is turned so the Wheels (30) are not touching the floor. 30 65 2 63 2. While another person lilts the rear of the Frame (1), attach the Rear Stabilizer (3) to the Frame with two M10 x 112mm Carriage Bolts (65) and two M10 Black Nylon Locknuts (63). 63 3 65 3.
4. Slidethe two Handlebar Collars (7) onto the Left Handlebar (50). Insert the Right Handlebar (51) into the Left Handlebar. Connect the Handlebar Collars, the Left Handlebar, and the Right Handlebar with two M4 x 16mm Screws (66). 4 51 Attach the Handlebar Bracket (15) to the Left and Right Handlebars (50, 51) with four M8 x 22mm Button Screws (74). Attach the Handlebar Bracket (15) to the Upright (13) with two M8 x 39mm Button Bolts (64), two M8 Nylon Locknuts (10), and an M8 x 14mm Button Screw (49).
. Attach the Seat (12) to the Seat Bracket (6) with four M8 Nylon Locknuts (10) and four M8 Split Washers (70). Note: The Nylon Locknuts and the Split Washers may be pre-attached to the underside of the Seat. 12 Tum the indicatedAdjustment Knob (28) counterclockwise two or three tums to loosen it. Next, pull the Knob, slide the Seat Bracket (6) intothe top of the Seat Post (5), and then release the Knob.
HOW TO OPERATE THE EXERCISE CYCLE HOW TO ADJUST THE SEAT POST HOW TO ADJUST For effective exercise, the seat should be at the proper height.As you pedal, there should be a slight bend in your knees Knob when the pedals Post are in the lowest position.To adjust the height of the seat, first turn the indicatedknob counterclockwisetwo or three turnsto loosen it (if the knob is not loosenedenough, it may scratch the seat post).
Display Buttons Button BuRons FEATURES OF THE CONSOLE sonal trainer in your home. Using a stereo audio cable (available at electronicsstores), you can connectthe exercise cycle to your home stereo, portablestereo, computer,or VCR and play special iFIT.comCD and video programs(iFIT.com CDs and videocassettesare available separately), iFIT.
seconds. If you use the handgdp pulse sensor, the display will also show your heart rate (see step 5 on page 12). B Turn on the console, Note: The console requires four 1.5V "D" battedes (see assembly step 6 on page 7). To turn on the console, press the On/Reset button or begin pedaling. (See the drawing on page 10 to identifythe On/Reset button.) B Select the manual mode. Each time the console is turned on, the manual mode will be selected.
To reset the displays, press the On/Reset button. Note: The console can show speed and distance in either miles or kilometers. The letters MPH or KM/H will appear in the lower section of the large display to show whichsystem of measurement is selected. To change the system of measurement, hold down the On/Reset buttonfor about six seconds. Note: When the buttonis held down, the fan willturn on for a moment.When the batteriesare replaced, it may be necessary to reselect the desired system of measurement.
The target pace for the current Indicator..q.__._lp_ \\ , pedod win be shown by the Bar //f_ ,._) );_ arrows in the Arrows_ _j'/" small display.To pedal at the target pace, simply increase or decrease your pace until there is one arrow pointingto each segment of the indicator bar (see the drawing above). At the end of each period, the number of arrows will change if a different target pace is programmed for the next period.
to operate properly.Each time you hold the handgrips, keep your hands on the metal contacts for at least 30 seconds. Note: When you are not holdingthe handgrips,the letters PLS will appear in the large display instead of your heart rate. Heart Rate program 1 is designed to keep your heart rate between 65% and 85% of your maximum heart rate during your workout. (Your maximum heart rate is estimated by subtractingyour age from 220.
Note: If you stop pedaling for a few seconds, the program will end. To use the program again, reselect it and start it at the beginning. r_ Follow your progress with the large display. See step 4 on page 11. B Turn on the fan if desired. See step 6 on page 12. B When you are finished exercising, the console will automatically turn off. To use iFIT.com CDs, the exercisecycle mustbe connectedto yourportableCD player, portablestereo, home stereo, or computerwith CD player.
HOW TO CONNECT YOUR PORTABLE STEREO HOW TO CONNECT YOUR HOME STEREO Note: If your stereo has an RCA-type AUDIO OUT jack, see instruction A below. If your stereo has a 1/8" LINE OUT jack, see instruction B. If your stereo has only a PHONES jack, see instruction C. Note: If your stereo has an unused LINE OUT jack, see instruction A below• If the LINE OUT jack is being used, see instruction B. A.
NOW TO CONNECT YOUR COMPUTER HOW TO CONNECT YOUR VCR Note: If your computer has a 118" LINE OUT jack, see instruction A. If your computer has only a PHONES jack, see instruction B. Note: If your VCR has an unused AUDIO OUT jack, see instruction A below. If the AUDIO OUT jack is being used, see instruction B. If you have a TV with a built-in VCR, see instruction B. If your VCR is connected to your home stereo, see HOW TO CONNECT YOUR HOME STEREO on page 18. A.
The programwill functionin almost the same way as a Smart program (see step 3 on page 13). However, an electronic=chirping"sound willalert you when the resistance level and/or the target pace is about to change. To use iFIT.com CDs or videocassettes, the exercise cycle must be connected to your portable CD player, portable stereo, home stereo, computer with CD player, or VCR. See HOW TO CONNECT YOUR CD PLAYER, VCR, OR COMPUTER on page 15. To purchase iFIT.
L_J Start your Web browser, if necessary, and go to our Web site at www.iFIT.com. Our Web site at www.iFIT.com allows you to play iFIT.com programs directly from the intemet. To use programs from our Web site, the exercise cycle must be connected to your computer.See HOW TO CONNECT YOUR COMPUTER on page 17. In addition, you must have an intemet connection and an intemet service provider.A list of specific system requirements will be found on our Web site.
MAINTENANCE AND TROUBLESHOOTING Inspect and tighten all parts of the exercise cycle regularly. Replace any worn parts immediately. • For the most accurate heart rate reading, hold the metal contactsfor about 30 seconds. To clean the exercise cycle, use a damp cloth and a small amount of mild soap. Important: To avoid damage to the console, keep liquids away from the console and keep the console out of direct sunlight.
CONDITIONING GUIDELINES The followingguidelineswill help you to plan your exercise program. Remember that proper nutrition and adequate rest are essential for successfulresults. During the first few minutes of exercise, your body uses easily accessiblecarbohydrate calories for energy. Only after the first few minutes of exercise does your body begin to use stored fat calories for energy.
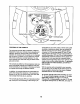
EXPLODED Key No. Qty. 1 2 3 4 5 6 7 8 9 10 11 12 13 14 15 16 17 18 19 20 21 22 23 24 25 26 27 28 29 30 31 32 33 34 35 36 37 38 1 1 1 2 1 1 2 2 1 8 1 1 1 1 1 1 1 1 1 1 2 1 2 1 1 1 1 3 2 2 1 1 1 1 1 1 1 1 DRAWING--Model Description No. 831.283120 Key No. Qty.
EXPLODED DRAWING--Model No. 831.283120 R0603A 66 64 17 66 5O 28 14 30. 29 32 35 57 10 31 67 t 47-..
Your Home For repair - in your home - of all major brand appliances, lawn and garden equipment, or heating and cooling systems, no matter who made it, no matter who sold it! For the replacement parts, accessories, and user's manuals that you need to do-it-yourself. For Sears professional installation of home appliances and items like garage door openers and water heaters. 1-800-4-MY-HOME ® Anytime, day or night (U.S.A. and Canada) www.sears.ca (1-800-469-4663) www.