Model No. 831.287943 Serial No. USER'S MANUAL The serial number can be found in the location shown below. Write the serial number in the space above. Serial Number Decal Patent Pending CAUTION Read all precautions and instructions in this manual before using this equipment. Keep this manual for future reference. SEARS, ROEBUCK AND CO.
TABLE OF CONTENTS IMPORTANT PRECAUTIONS . . . . . . . . . . . . . . . . . . . . . . . . . . . . . . . . . . . . . . . . . . . . . . . . . . . . . . . . . . . . .2 BEFORE YOU BEGIN . . . . . . . . . . . . . . . . . . . . . . . . . . . . . . . . . . . . . . . . . . . . . . . . . . . . . . . . . . . . . . . . . . .3 ASSEMBLY . . . . . . . . . . . . . . . . . . . . . . . . . . . . . . . . . . . . . . . . . . . . . . . . . . . . . . . . . . . . . . . . . . . . . . . . . . .4 ADJUSTMENT AND OPERATION . . . . . .
BEFORE YOU BEGIN Thank you for selecting the new HEALTHRIDER® AEROBIC RIDER 2. The AEROBIC RIDER 2 offers a unique form of low-impact exercise that uses both the upper body and the lower body for greater cardiovascular benefits and increased toning. Saturday, 7 a.m. until 7 p.m. Central Time (excluding holidays). To help us assist you, please note the product model number and serial number before calling. The model number is 831.287943.
ASSEMBLY Before beginning assembly, carefully read the following information and instructions: • Tighten all parts as you assemble them, unless instructed to do otherwise. • Assembly requires two persons. • During assembly, make sure that all parts are oriented as shown in the drawings. • Place all parts in a cleared area and remove the packing materials; do not dispose of the packing materials until assembly is completed.
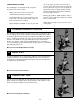
1. Before beginning assembly, make sure that you have read and understand the information on page 4. 1 Attach one of the Stabilizers (31) to the Main Frame (1) with two M6 x 60mm Bolts (53), two M6 Flat Washers (55), and two M6 Hex Nuts (54). 1 54 31 55 53 2. Attach the other Stabilizer (31) to the Main Frame (1) with two M6 x 60mm Bolts (53), two M6 Flat Washers (55), and two M6 Hex Nuts (54). 2 1 53 55 31 54 3.
5. Push the Magnet Bracket (36) into the hole in the Pedal Frame (4). 5 56 1 51 Lubricate an Frame Axle (13). Attach the Pedal Frame (4) to the Main Frame (1) with the Frame Axle (13), two Rubber Washers (51), and two Axle Fasteners (56). Lubricate—13 51 56 4 36 Hole 6. Attach the Left Side Shield (21) to the Seat Frame (2) using three Fastener Bases (45) and three Fastener Pins (58). First, insert the Fastener Bases through the Side Shield and into the Seat Frame.
9. Depress the two buttons on the sides of the Handlebar Assembly (6) with your thumb and forefinger. Insert the Handlebar Assembly (6) into the Handlebar Swing Arm (5). Make sure that the buttons protrude through one of the two sets of holes in the Handlebar Swing Arm. The upper holes offer lower workout resistance; the lower holes offer higher resistance. 9 6 Holes Buttons 10. Slide the Monitor (35) fully onto the Main Frame (1) as shown in inset drawing A.
ADJUSTMENT AND OPERATION a ADJUSTING THE SEAT The monitor offers five modes to provide you with instant exercise feedback: To adjust the position of the seat, Seat loosen the knob Knob under the seat, move the seat to the desired position, and then retighten the knob. To determine if the seat is properly adjusted, sit on the seat and pull the handlebar as close as possible to your stomach. Your legs should be almost straight, with your knees bent slightly.
PROPER EXERCISE FORM ach or rib cage as possible. If you are new to exercise, don’t extend the bar too far forward for the first few weeks of your exercise program. As your back becomes stronger and more flexible, allow the handlebar to travel farther forward for increased range-of-motion. The following tips are provided to help you get the most from your exercise routine: • Always start each exercise session in the standard workout position to warm up.
4 TOES STRAIGHT Place the ball of each foot in the middle of each pedal. Push with your toes pointed forward, then pull your feet back with toes up and heels down. This tones the lower legs. Start with just a few minutes per session and gradually increase with each workout. Muscles affected: Shins and Calves 5 TOES TURNED The direction which your toes are turned will vary the effect of your workout. If your toes are turned slightly in while pointing and flexing, this emphasizes the outer calves.
MAINTENANCE AND TROUBLE-SHOOTING Inspect and tighten all parts of the AEROBIC RIDER 2 regularly. The AEROBIC RIDER 2 can be cleaned with a soft, damp cloth; do not use solvents. To prevent damage to the monitor, keep liquid away from the monitor and keep the monitor out of direct sunlight. When storing the AEROBIC RIDER 2, remove the batteries from the monitor. HOW TO REPLACE THE BATTERIES If the display of the monitor becomes dim, the AA batteries should be replaced.
CONDITIONING GUIDELINES uses easily accessible carbohydrate calories for energy. Only after the first few minutes of exercise does your body begin to use stored fat calories for energy. If your goal is to burn fat, adjust your pace until your heart rate is near the lowest number in your training zone as you exercise. The following general guidelines will help you to plan your exercise program. Remember that proper nutrition and adequate rest are essential for successful results.
Training zone exercise, consisting of 20 to 30 minutes of exercising with your heart rate in your training zone. (See the chart on page 12 to find your training zone.) leave you relaxed and comfortably tired. EXERCISE FREQUENCY To maintain or improve your condition, plan three workouts each week, with at least one day of rest between workouts. After a few months of regular exercise, you may complete up to five workouts each week, if desired.
Qty. 1 1 1 1 1 1 5 1 2 1 1 1 2 1 1 1 1 2 1 1 1 1 Key No. 1 2 3 4 5 6 7 8 9 10 11 12 13 14 15 16 17 18 19 20 21 22 Main Frame Seat Frame Wheel Swing Arm Pedal Frame Handlebar Swing Arm Handlebar Assembly w/Foam Grip M8 Nylon Jam Nut Weight Bracket Weight Collar Long Link Arm Short Link Arm Seat Bracket Frame Axle Seat Axle Wheel Mount Axle Assembly M8 x 1.25” Wheel Bolt M8 x 1.375” Bolt M8 x 1.
24 36 42 41 24 18 45 58 4 11 30 58 30 49 7 29 41 29 42 33 34 45 40 6 35 23 56 25 40 53 23 42 13 32 41 51 39 47 51 55 13 39 51 56 33 29 46 58 31 54 49 29 25 56 51 7 5 45 14 30 1 51 17 47 22 56 2 45 EXPLODED DRAWING—Model No. 831.
ORDERING REPLACEMENT PARTS The model number and serial number of your HEALTHRIDER® AEROBIC RIDER 2 are listed on a decal attached to the frame. See the front cover of this manual to find the location of the decal. QUESTIONS? If you find that: • you need help assembling or operating the AEROBIC RIDER 2 All replacement parts are available for immediate purchase or special order when you visit your nearest SEARS Service Center.