
User`s manual


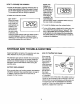


4. The Console (7)-:requirestwo "AA"batteries (not
included). Alkaline batteries are recommended.
Refer to the inset drawing. Remove the battery door
from the back of the Console. Press two batteries
into the battery compartment. Make sure that the
negative ends of the batteries (marked "-") are
touching the springs in the battery compartment.
Re-attach the battery door.
Plug the console wire into the socket on the back of
the Console (7).
Slide the Console (7) onto the console plate. Note:
The Console attaches by friction; it does not snap
into place.
5. Insert the Seat Post (10) into the Frame (1). Press
the Frame Bushing (4) into the Frame. Note: The
Frame Bushing may be pre-assembled.
Align one of the holes in the Seat Post (10) with the
hole in the Frame (1). Insert the Seat Pin (31)
through the Frame and the Seat Post to select the
desired seat height. Make sure to insert the Seat
Pin through one of the holes in the Seat Post;
do not insert the Seat Pin under the Seat Post.
Next, attach the Seat (11) to the Seat Post (10) with
three Seat Nuts (9) and three Seat Washers (8).
6. Identify the Right Pedal (22). (The Right Pedal is
marked with an "R.") Using an adjustable wrench,
tighten the Right Pedal clockwise into the right arm
of the Crank (20).
Tighten the Left Pedal (21) counterclQckwise into
the left arm on the Crank.
4
5
6
8
Plate
9
Wire
Batteries
y Door
7. Make sure that all parts are properly tightened before you use the exercise cycle.
5