OW PRODUCT NAME UA BBQ Pro 2 Burner Gas Grill Product Code: 23668/0-05032618-0 Model: 415.
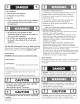
CALIFORNIA If you smell gas: PROPOSITION 65 2. Extinguish any open flame. 1. Combustion by-products produced when using this product contain chemicals known to the State of California to cause cancer, birth defects, and other 3. Open lid. reproductive ], Shut off gas to the appliance. 4. If odor continues, and immediately fire department. keep away from the appliance call your gas supplier or your harm. 2.
ForYourSafety. ............................................................................. 2 BBQ-PRO GrillInformation Center. .............................................................. 2 ProductRecordInformation ......................................................... 2 One Year GRILL WARRANTY Full Warranty SafetySymbols ..............................................................................
Temperature i - Convective The temperature Read your Assembly Manual and ensure the grill is put together properly. material from all grill surfaces before Remove all Point-of-Purchase operating advertising The air temperature grill will never be as hot as the temperature surface. the Note: manufacturing. Since 1995, all regulators the gas tank to regulate safety feature without Lava Rock / Briquettes be used with a heat diffuser heating, improve ups.
Rotisserie Cooking Rotisserie cooking is best for 'round' meat, such as large Outdoor grilling is really quite simple. You'll succeed with burgers, dogs, or steaks usually on your very first try. With experience, creating you will learn how to work with your grill, more imaginative knowledge grilling, organize and required grilling meals all the time. makes up the art of grilling.
Cooking on your new grill is a hands-on experience, and it is recommended to remain outside with your grill while cooking. Grilling can be affected by many external conditions. In cold weather, you will need more heat to reach an ideal cooking temperature, and grilling may take longer. The meat's internal temperature and thickness can also affect cooking times. Cold and thicker meats will take longer to cook. Wood Chips For extra smoke flavor when grilling, try adding wood chips.
Why Clean? We've all heard the saying 'An ounce of prevention is worth a pound of cure'. This is great advice when it comes to Storing Your Grill • Clean cooking grates. • Store grill in dry location. keeping your grill clean. Routine Care Periodic cleaning of this grill is necessary, as grill fires can occur when grease and • When LP cylinder is connected to grill, store outdoors in a well ventilated space and out of reach of children. • Cover grill if stored outdoors.
LP Tank * The LP Tank used with your grill must meet the following requirements: " Use LP Tanks only with these required (30.5cm) capacity • NEVER store a spare appliance LP cylinder or in an enclosed under or near the area. (diameter) maximum. " LP Tanks must be constructed specifications Transportation measurements: 12" x 18" (45.7 cm) (tall) with 20 lb. (9 kg.) and marked in accordance for LP Tanks of the U.S.
LP Tank Exchange " Many retailers that sell grills offer you the option of replacing your empty LP tank through an exchange service. Use only those reputable exchange companies that inspect, precision fill, test and certify their tanks. Exchange your tank only for an OPD safety feature-equlpped tank as described in the "lLP Tank" section of this manual. " Always keep new and exchanged LP tanks in upright position during use, transit or storage.
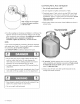
Leak Testing Valves0 Hose and Regulator 1. Turn all grlll control knobs to OFF. 2. Be sure regulator is tightly connected to LP tank. 3. Completely open LP tank valve by turning OPD hand wheel counterclockwise. If you hear a rushing sound, turn gas off immediately. There is a major leak at the connection. Correct before proceeding 1-800-241-7548. Hold coupling nut and regulator by calling 4. Brush soapy solution picture below: as shown for proper connection to LP tank valve.
Safety Tips A Before opening for tightness. For Safe Use of Your Grill and to Avoid Serious " I
ignitor A 1. 2. 3. Burner Lighting Flame Check " Remove cooking grates and heat diffusers. Light burner, rotate knobs from HiGH to LOW. You should see a smaller flame in LOW position than seen on HIGH. Always check flame prior to each use. If only low flame is seen refer to "Sudden drop or low flame" in the Troubleshooting Section. Do not lean over grill while lighting. Turn OFF gas burner control valves. Turn ON gas at LP cylinder. Open lid during lighting. 4.
" Plated wire grates: Wash grates with concentrated grill cleaner or use soap and water solution. Dry thoroughly and store indoors between cookouts. " Stalnless steel surfaces: To maintain your grilrs high quality appearance, wash with mild detergent and warm soapy water and wipe dry with a soft c!oth after each use. Baked-on grease deposits may require the use of an abrasive plastic cleaning pad. Use only in direction of brushed finish to avoid damage. Do not use abrasive pad on areas with graphics.
NOT Pictured 1 1 CART LEG, UPPERLEFT G208-8100-W1 ... 1 HARDWARE 2 1 LEFTBACK LEG, STRAIGHT G208-0068-W1 ... 1 ASSY INSTRUCTION, ENGLISH G208-220801-W1 ...
464622013 _15
Left Leg [] [] Place one upper leg as shown. NOTE: Left front and left back legs do not have leg extenders. In front, attach upper leg, side brace and left front leg (curved) with (1) #10-24xH/4" machine screw and (1) #10-24 flange nut. Tighten screw. Attach support bracket, oriented as shown, in the second hole from bottom of leg with (2) hinge pins and (2) hitch pins (A). U_e_ Leg Hitch Pin Qty. 2 #10-24 #10-24x1-1/4" Machine Screw Flange Nut Qty. 1 Hinge Pin Qty.
FrontPanel [] Layfrontlegs down on the floor. [] Slide front panel between legs, oriented (4) #10-24 flange nuts. as shown. Attach with (4) #10-24x2" machine screws and #10-24 Flange Qty. Nut 4 #10-24x2" Machine Screw Qty. 4 n Back Braces Cartbraces with (4) #10-24x1-1/4" [] Attach (2) to back Wheels machine screws and (4) #10-24 flange nuts each. [] Turn assembly upside down. [] Insert axle rod through wheel, legs and other wheel. Axle rod should pass through top hole (as oriented, A) of leg.
Control Panel [] [] Stand cart upright In front, slide control panel between left and right legs, attach screws and (4) #10-24 flange nuts. Tighten all screws. control panel with (4) #10-24x2" machine Control panel #10-24x2" Machine Screw Qty. 4 #10-24 Flange Nut Qty. 4 Valve/Hose/Regulator and ignitor [] Attach valve/hose/regulator assembly to control panel with (2) #10-24xl/2" machine screws. [] Attach ignitor to control panel using the stamped nut provided.
[_ sheet ook tank metal exclusion screws. wires onto front panel brackets, attach other end to back brace with (2) #8x3/8" #8x3/8" Sheet Metal Screw Qty. 2 Heat Shield [] Attach heat shield with (2) #10-24x1/2" Tank Retainer machine screws and (2) #10-24 flange nuts. [] Insert tank retainer into side brace and secure with (1) #10-24x3/8" wing screw. #10-24x1/2" Machine Screw Qty. 2 Heat Shield #10-24 Flange Nut Qty. 2 #10-24x3/8" Wing Screw Qty.
Burner and Control [] Place,Firebox burner assembly intoKnob firebox. Fasten the burner assembly to the firebox using (2) 5x15 fiber washers and (2) #10-24x1/2" machine screws. Insert (4) #10-24x1-1/4" machine screws (heat diffuser support screws) from outside the firebox, then fasten with (4) 5x15 fiber washers and (4) #10-24 flange nuts from the inside (A). [] Place firebox on cart. Make sure burner tubes are correctly engaged with valves.
Shelves [] Attach mounting brackets, oriented as shown, to side shelf with (4) #8x3/8" sheet metal screw and (4) side shelf bushings (A). [] Attach mounting brackets to front of leg with (2) 1/4"-20x1/2" Machine Screws. And to back of leg with (2) 1/4"-20x1-1/4" machine screws and (2) 1/4"-20 flange nuts (B). [] Repeat above steps for other side. Mounting Bracket A 1/4"-20x1-1/4" Machine Screw 1/4"-20x1/2" Machine Screw Qty. 4 Qty. 4 #8X3/8" Sheet MetaJ Screw Qty.
Lower Hinges [] Attach lower hinges to back of firebox using (4) #10-24x1/2" machine screws, (4) 5x15 fiber washers and (4) #10-24 flange nuts. The center flat portion of the hinge should be at the bottom (see inset). #10-24xl/2" Machine 5x15 Screw Qty. 4 Fiber Washer Qty. 8 #10-24x1/2" Machine Screw #10-24 Flange Nut Qty. 4 5x15 Fiber Washer Center flat portion of hinge on bottom Lid Handle and Upper Hinges [] Attach handle to lid with (4) 7x15 fiber washers and (2) 1/4"-20 wing nuts (A).
Lid Place lid assembly onto firebox, aligning hinges. Upper hinges fit inside lower hinges. Secure using (2) hinge pins and (2) hitch pins. Tighten upper hinge screws. Hinge Pin T Qty. 2 Hitch Pin Qty. 2 Heat Diffuser and Cooking Grate Place heat diffuser into firebox. Align Place cooking grate onto firebox. the slots on heat diffuser to heat diffuser support screws.
Hang grease cup clip from bottom of firebox and place grease cup into grease clip Failure to install grease cup clip and cup will cause hot grease to drip from bottom of grill with risk of fire or property damage. Grease Cup Tank collar opening must face to front of grill. Loosen wing nuts from tank retainer bracket. Set bottom of tank into notches of tank bracket. Place tank retainer bracket onto tank collar and tighten wing nuts. LP CYLINDER IS SOLD SEPARATELY.
DANGER: If a gas leak cannot be stopped, or a fire occurs due to gas leakage, Gas leaking from cracked/cut/burned hose. Gas leaking cylinder. • Damaged hose. call the fire department. • Turn off gas at LP cylinder or at source on natural gas systems. If anything but burned, replace valve!hose!regulator. If burned discontinue use of product until a plumber has investigated cause and corrections are made. from LP • Mechanical mishandling. failure due to rusting or Gas leaking from cylinder valve.
Troubleshooting (continued) Burner(s) will not light using ignitor. PIEZO PUSH-BUTTON AND ROTARY: • Push-button sticks at bottom. • Replace ignitor. • Rotary • Replace knob. knob rotates • Sparking Burner(s) will not match between " See "GAS without clicking. ignitor and electrode. ISSUES: '_ on previous • Inspect wire insulation insulation is broken. and proper connection. Replace wires if page. light. • Match will not reach. • Improper Low flame, drop in gas flow.
464622013 _27
sesrs Distributed Made in / Hecho en CHINA by Sears, Roebuck and Co., Hoffman See our extensive assortment on-line at www.sears.com Estates, IL 60179 of outdoor living products and www.kmart.