FOR MODEL : 821E ELLIPTICAL USER’S GUIDE
INTRODUCTION IN T R O D U C T I O N IMPORTANT PRECAUTIONS CONGRATULATIONS and THANK YOU for your purchase of this Fitness Gear elliptical! ASSEMBLY ASSEMBLY Whether your goal is to win races or simply enjoy a fuller, healthier lifestyle, an Fitness Gear elliptical can help you attain it – adding club-quality performance to your at-home workouts, with the ergonomics and innovative features you need to get stronger and healthier, faster.
INTRODUCTION I M P O R TA N T PRECAUTIONS IMPORTANT PRECAUTIONS SAVE THESE INSTRUCTIONS Read all instructions before using this elliptical. When using an electrical product, basic precautions should always be followed. It is the responsibility of the owner to ensure that all users of this elliptical are adequately informed of all warnings and precautions. If you have any questions after reading this manual, contact Sears at the number listed on the back panel of this manual.
INTRODUCTION A S S E M B LY IMPORTANT PRECAUTIONS IMPORTANT PRECAUTIONS IMPORTANT: READ THESE SAFETY INSTRUCTIONS BEFORE USE! WARNING ASSEMBLY ASSEMBLY There are several areas during the assembly process of an elliptical that special attention must be paid. It is very important to follow the assembly instructions correctly and to make sure all parts are firmly tightened.
INTRODUCTION CONSOLE UPPER HANDLEBAR IMPORTANT PRECAUTIONS HANDLEBAR COVERS BOTTLE HOLDER LOWER HANDLEBAR CONSOLE MAST CONSOLE MAST BOOT ASSEMBLY STABILIZER TUBE TRANSPORT WHEEL PIVOTING FOOTPAD PEDAL ARM COVER GUIDE RAIL BEFORE YOU BEGIN PEDAL ARM LINK ARM ROLLER WHEEL COVERS TOOLS INCLUDED ELLIPTICAL OPERATION c c c c 5mm Allen Wrench 4mm Allen Wrench 13/15mm Flat Wrench 17mm Flat Wrench CONDITIONING GUIDELINES PARTS INCLUDED TROUBLESHOOTING & MAINTENANCE c c c c c c c c 1 Console 1
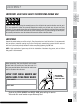
INTRODUCTION ASSEMBLY step 1 A) Open HARDWARE BAG FOR STEP 1. IMPORTANT PRECAUTIONS B) Attach STABILIZER TUBE to the MAIN FRAME using 2 BOLTS (A). #0-5 " ASSEMBLY ASSEMBLY 45"#*-*;&3 56#& ."*/ '3".& HARDWARE BAG FOR STEP 1 CONTENTS : BEFORE YOU BEGIN #0-5 " NN 2UZ ASSEMBLY S T E P 2 ELLIPTICAL OPERATION A) Open HARDWARE BAG FOR STEP 2. B) Slide left and right GUIDE RAILS into MAIN FRAME. CONDITIONING GUIDELINES C) Attach GUIDE RAILS using 2 BOLTS (B).
INTRODUCTION ASSEMBLY step 3 IMPORTANT PRECAUTIONS HARDWARE BAG FOR STEP 3 CONTENTS : CONSOLE MAST CONSOLE WIRES BOLT (C) 15 mm Qty: 3 LOCK WASHER (D) Qty: 3 ARC WASHER (E) Qty: 3 NUT (F) 13 mm Qty: 1 CONSOLE MAST BOOT ASSEMBLY ARC WASHERS (E) NUT (F) BOLTS (C) LOCK WASHERS (D) BOLT (B) BEFORE YOU BEGIN MAIN FRAME BOLT (B) 70 mm Qty: 1 A) Open HARDWARE BAG FOR STEP 3. B) Slide the CONSOLE MAST BOOT over the bottom of the CONSOLE MAST.
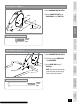
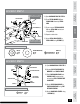
INTRODUCTION /05& XBTIFS PO UPQ TIPVME CF GBDJOH CMBDL TJEF EPXO 1&%"- "3. $07&3 IMPORTANT PRECAUTIONS ASSEMBLY step 4 A) Open HARDWARE BAG FOR STEP 4. B) Place TEFLON WASHER (H) over CRANK ARM followed by PEDAL ARM. 5&'-0/ 8"4)&34 ) C) Place a second TEFLON WASHER (H) over PEDAL ARM and attach using NUT (G). ASSEMBLY ASSEMBLY /65 ( D) Repeat on other side. 4$3&8 * 1&%"- "3. /05& XBTIFS PO CPUUPN TIPVME CF GBDJOH CMBDL TJEF VQ E) Attach PEDAL ARM COVERS to PEDAL ARMS using SCREWS (I).
INTRODUCTION AS S E M B LY S T E P 6 IMPORTANT PRECAUTIONS BOLTS (M) FOOTPAD BRACKET FOOT PAD ASSEMBLY PEDAL ARM WAVY WASHER (L) FOOT PLATE BEFORE YOU BEGIN SCREW (A) A) Open HARDWARE BAG FOR STEP 6. B) 821E: Attach FOOTPAD to FOOT PLATE using 2 SCREWS (A) and 2 SCREWS (B). ELLIPTICAL OPERATION C) Slide WAVY WASHER (L) and the FOOT PLATE onto the PEDAL ARM axle. D) Attach FOOTPAD BRACKET to FOOT PLATE using 3 BOLTS (M). E) Repeat on other side.
INTRODUCTION ASSEMBLY step 7 LOWER HANDLEBAR BRACKET NUT (O) BOLT (N) D) Attach UPPER HANDLEBARS to LOWER HANDLEBARS using PREATTACHED SCREWS. TEFLON WASHER (P) HARDWARE BAG FOR STEP 7 CONTENTS : 5&'-0/ 8"4)&3 1 NN 2UZ D) Attach LINK ARM to LOWER HANDLEBAR using BOLT (N) and NUT (O). BEFORE YOU BEGIN SPACER (Q) E) Repeat on other side. 41"$&3 2 2UZ ELLIPTICAL OPERATION /65 0 2UZ ASSEMBLY ASSEMBLY C) Insert 2 TEFLON WASHERS (P) between LINK ARM and LOWER HANDLEBAR BRACKET.
INTRODUCTION AS S E M B LY S T E P 9 IMPORTANT PRECAUTIONS A) Attach BOTTLE HOLDER to the CONSOLE MAST using the 2 PRE-ATTACHED SCREWS (screws will have to be removed from the console mast first). CONSOLE MAST PRE-ATTACHED SCREWS Connect AC ADAPTOR to the AC ADAPTOR INPUT located at front of the main frame. Connect ADAPTOR to a power outlet.
INTRODUCTION EL L I P T I C A L O P E R AT ION IMPORTANT PRECAUTIONS POWER Your programmable elliptical is powered by a power supply. The power cord must be plugged into the power jack, which is located in the front of the machine near the STABILIZER TUBE. ASSEMBLY ASSEMBLY Do not operate the elliptical if the power cord or plug is damaged. If the elliptical appears not to be working properly, do not use the elliptical.
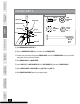
INTRODUCTION 82 1 E C O N S O L E D IS P L AY & O P E R AT I O N IMPORTANT PRECAUTIONS A ASSEMBLY P1: MANUAL P4: WEIGHT LOSS P 2 : I N T E RVA L S P5: HILLS P 3 : M O U N TA I N P6: CARDIO CHALLENGE D E B BEFORE YOU BEGIN C F ELLIPTICAL OPERATION CONDITIONING GUIDELINES Note: There is a thin protective sheet of clear plastic on the overlay of the console and should be removed. A) Monitor DisplayS: Speed, Time, Pulse, Distance, Level, Calories and Program Profiles.
INTRODUCTION IMPORTANT PRECAUTIONS 821E CON S O L E O P E R AT I O N Your Elliptical Trainer is powered by a power supply. The power supply must be plugged into the power jack, which is located in the front of the machine near the front stabilizer tube ASSEMBLY ASSEMBLY Q UICK STA RT Simply press the start key and the TIME will begin counting up from 0:00. BEFORE YOU BEGIN SELECTING P R O G R A M S 1) CHOOSING A PROGRAM Use UP/DOWN arrow keys to select programs 1 - 6, then press the ENTER to select.
INTRODUCTION 82 1 E Program Profiles IMPORTANT PRECAUTIONS P1: manual Allows you to adjust the resistance level to your preference, without a preset program. P2: INTERVALS ASSEMBLY Improves your strength, speed and endurance by raising and lowering the resistance levels through-out your workout to involve both your heart and muscles. P3: MOUNTAIN Simulates climbing mountains by increasing and decreasing the resistance.
INTRODUCTION HEART RAT E IMPORTANT PRECAUTIONS Handlebars 17 LIMITED WARRANTY TROUBLESHOOTING & MAINTENANCE CONDITIONING GUIDELINES ELLIPTICAL OPERATION BEFORE YOU BEGIN ASSEMBLY ASSEMBLY Place the palm of your hands directly on the grip pulse handlebars. Both hands must grip the bars for your heart rate to register. It takes 5 consecutive heart beats (15-20 seconds) for your heart rate to register. When gripping the pulse handlebars, do not grip tightly.
INTRODUCTION C O N D I T I O N I N G GUIDELINES IMPORTANT PRECAUTIONS Always consult your physician before beginning an exercise program. HOW OFTEN? (Frequency of Workouts) ASSEMBLY The American Heart Association recommends that you exercise at least 3 to 4 days per week to maintain cardiovascular fitness. If you have other goals such as weight or fat loss, you will achieve your goal faster with more frequent exercise.
INTRODUCTION 5*14 STRETCHING IMPORTANT PRECAUTIONS STRETCH FIRST ASSEMBLY ASSEMBLY Before using your product, it is best to take a few minutes to do a few gentle stretching exercises. Stretching prior to exercise will improve flexibility and reduce chances of exercise related injury. Ease into each of these stretches with a slow gentle motion. Do not stretch to the point of pain. Make sure not to bounce while doing these stretches. 1.
INTRODUCTION 5*14 THE IMPORTANCE OF WARM UP & COOL DOWN IMPORTANT PRECAUTIONS WARM UP The first 2 to 5 minutes of a workout should be devoted to warming up. The warm-up will limber your muscles and prepare them for more strenuous exercise. Make sure that you warm-up on your product at a slow pace. The warm up should gradually bring your heart rate into your Target Heart Rate Zone.
INTRODUCTION W E E K LY L O G S H E E T S D AY WEEKLY GOAL D ATE DISTANCE CALORIES TIME IMPORTANT PRECAUTIONS WE E K # COMMENTS SUND AY MON D AY TUES D AY WED N E S D AY ASSEMBLY ASSEMBLY THUR S D AY FRID AY SATU R D AY WE E K # D AY BEFORE YOU BEGIN WE E K LY T O TAL S : WEEKLY GOAL D ATE DISTANCE CALORIES TIME COMMENTS SUND AY MON D AY TUES D AY ELLIPTICAL OPERATION WED N E S D AY THUR S D AY FRID AY SATU R D AY WE E K # D AY CONDITIONING GUIDELINES WE E K LY T O TAL S : WEEKLY G
INTRODUCTION M O N T H LY L O G S H EETS IMPORTANT PRECAUTIONS WEEK # D AY WEEKLY GOAL DATE DISTANCE CALORIES TIME COMMENTS S U N D AY M O N D AY T U E S D AY W E D N E S D AY ASSEMBLY T H U R S D AY F R I D AY S AT U R D AY W E E K LY T O TA L S : BEFORE YOU BEGIN WEEK # D AY WEEKLY GOAL DATE DISTANCE CALORIES TIME COMMENTS S U N D AY M O N D AY T U E S D AY ELLIPTICAL OPERATION W E D N E S D AY T H U R S D AY F R I D AY S AT U R D AY W E E K LY T O TA L S : CONDITIONING GUIDELINES
INTRODUCTION TR O U B L E S H O O T I N G IMPORTANT PRECAUTIONS Your Fitness Gear elliptical is designed to be reliable. However, if you do experience problems with your elliptical, please reference the troubleshooting guide listed below. PROBLEM: The console does not turn on. SOLUTION: Verify the following: ASSEMBLY ASSEMBLY • The outlet the machine is plugged into is functional. Double check that the breaker has not tripped. • The correct adapter is being used.
INTRODUCTION HE A R T R AT E T R O U B L E S H O O T I N G PROBLEM: There is no heart rate reading. SOLUTION: Remove the console and verify that the heart rate cables are attached properly, making IMPORTANT PRECAUTIONS sure that the cables are securely inserted into the console. Check your exercise environment for sources of interference such as high power lines, large motors, etc.
INTRODUCTION IMPORTANT PRECAUTIONS COMMON P R O D U C T Q U E S T I O N S ARE THE SOUNDS MY ELLIPTICAL MAKES NORMAL? ASSEMBLY ASSEMBLY Our ellipticals are some of the quietest available because they use belt drives and friction free magnetic resistance. We use the highest grade bearings and belts to minimize noise. However, because the resistance system itself is so quiet, you will occasionally hear other slight mechanical noises.
INTRODUCTION MAINTENANCE IMPORTANT PRECAUTIONS WHAT KIND OF ROUTINE MAINTENANCE IS REQUIRED? We use sealed bearings throughout our ellipticals so lubrication is not needed. The most important maintenance steps are to tighten assembly bolts and wipe your perspiration off the trainer after each use. HOW DO I CLEAN MY ELLIPTICAL? Clean with soap and water cleaners only. Never use solvents on plastic parts.
EXCLUSIONS AND LIMITATIONS FRAME • 5 YEAR FRAME Sears warrants the frame against defects in workmanship and materials for 5 years from date of purchase, so long as the device remains in the possession of the original owner. (The frame is defined as the welded metal base of the unit and does not include any parts that can be removed.) Who IS covered: • The original owner and is not transferable.
Get it fixed, at your home or ours! Just Call: 1-800-4-MY-HOME ® (1-800-469-4663) 24 hours a day, 7 days a week For the repair of major brand appliances in your own home... no matter who made it, no matter who sold it! For your nearest Sears Parts & Service location, to bring in products like vacuums, lawn equipment and electronics. For Sears Parts & Service, to order the replacement parts, accessories and owner's manuals that you need to do-it-yourself. www.sears.