Owner's Manual Manual del Propietario Canister Vacuum Cleaner Aspiradora Model, Modelo 721.24195S Sears, Roebuck and Co., Hoffman Estates, IL 60179 U.S.A www. sears, corn Part No.
Before Using Your NewVacuum ............................2 Performance Features ............................................8 KenmoreApplianceWarranty..................................2 Changing The Dust Bag .........................................9 Important Safety Instructions..................................3 Parts and Features....................................................4 Cleaning Motor Safety Filter ..................................9 Assembly..............................................
WARNING Your safety is important to us. To reduce the risk of fire, electrical shock, injury to persons or damage when using your vacuum cleaner, follow basic safety precautions including the following: Readthis manualbefore assemblingor using your vacuum cleaner. Useyour cleaneronly asdescribedinthis manual.Useonly withsuppliedattachments. To reducethe risk of electricalshock- Do not use outdoors or on wet surfaces. Disconnect electricalsupply beforeservicing or cleaningout brush area.
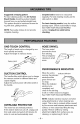
Itisimportant toknow yourvacuum cleaner's partsandfeatures toassure itsproper andsafe use.Review thesebefore using yourcleaner. Slide Switch ___ Hose N Handle Button / _/ ................... Fitting Hook Cord Reel Performance In Telescopic _ / Wand / / // Button Cord Power _ (Not Shown) "/ Lid Release [ // Wand Button ._ _ .... , Suction /_/ Pile Adjustment ...........
CANISTER Before assembling your vacuum cleaner, be sure you have all the parts shown in PARTS AND FEATURES. TELESCOPIC 1. Open the canister hood. 2. Check to see that the dust bag is properly installed.See CHANGING THE DUST BAG for instructions. 3. Check to see that the motor safety filter is properly installed. See CLEANING MOTOR SAFETY FILTER for instructions. WAND Hold spring latch and pull out or push in wand to required length. Spring Latch Safety Filter AIR-TURBINE ' HOSE \ Fitting 1.
USE AND CARE The vacuum cleaner creates suction that picks up dirt. Rapidly moving air carries the dirt to the dust bag through the air flow passages. The dust bag lets the air pass through, while it traps the dirt. For best cleaning results, keep the airflow passage open. Check the starred areas occasionally for clogs. Unplug from outlet before checking. NOTE: Do not stand canister body on its end while operating or you will block the exhaust vents.
ATTACHMENTS ON HANDLE ATTACHMENTS 1. Press handle button on wand and remove it from handle. ON WANDS The crevice tool and dusting/upholstery not have locking holes. Put on attachments See chart below. tool do as needed. 2. Push crevice tool onto handle. The dusting/upholstery tool has two options. When the brush is removed the remaining part can be used as an upholstery tool. Upholstery_ 3. Dusting/Upholstery Brush tool will fit onto extension wand only.
Suggested sweeping pattern For best cleaning action, the Air-Turbine Brush Nozzle should be pushed straight forward from you and pulled straight back. This pattern should be continued across the rug with slow, gliding motions. Carpeted stairs need to be vacuumed regularly. For best cleaning results, put the slide switch on MAX. For best cleaning results, keep the airflow passage open. Check occasionally for clogs. See HOW YOUR VACUUM WORKS section. Unplug from outlet before checking.
For best cleaning results, the dust bag should be changed before it gets full. Use dust bag no. 5231FI2390J 1. Unplug cord from wall outlet. 2. Pull lid release latch out and up, then lift canister hood. 3. Press back the bag mount hook. i_\ Lid Release 4. Remove used bag and throw it away. 5. To insert new dust bag: • Press back the bag mount hook. • Fit bottom edge of bag mount tab onto bag mount ledge. • Pull bag mount tab flush with suction inlet hole.
1. Unplug cord from wall outlet. DO NOT drip water on cleaner. _I_ 2. Clean vacuum exterior using a clean, soft cloth that has been dipped in clean water, then wrung out. Wipe dry after cleaning. NOTE: Regular cleaning helps to reduce static electricity and dust buildup on outer surfaces of cleaner and attachments. CAUTION DO NOT use attachments if they are wet. Damage to dust bag and motor may occur.
1. Press the button on the rear side of the vaccum nozzle to remove air cover. 2. Use the dusting/upholstery tool attachment to clean the brush and fan. Fan Hook Air Cover Brush Disconnect cleaner from electrical outlet. Check and remove hair, string and lint build-up frequently in the air-turbine brush and brush support areas. If build-up becomes excessive, disconnect air-turbine brush nozzle from telescopic wand. TO REMOVE BELT: 1. Turn air-turbine brush nozzle upside down. 2.
4. Carefully insert and lift screwdriver at each brush support to free brush from base. TO REPLACE BELT: 1. Install brush supports onto brush. Brush support 2. Install new belt in belt groove on the brush, then over the fan shaft. Be sure belt is between the belt guards. Refer to parts list for replacement belt number. Support Base 5. Remove worn belt. Fan Belt Guard Belt Groove 3. Insert each support into its base slot. 6. Slide brush supports off to check and clean brush support areas.
Review this chart to find do-it-yourself solutions for minor performance problems. Any other service needed should be performed by a Sears or other qualified service representative. _ Disconnect electrical supply before servicing or cleaning the unit. Electrical Shock Hazard so could result in electrical shock or personal injury. WARNING Failure to do PROBLEM POSSIBLE CAUSE Cleanerwon'tstart. 1. Unplugged at wall outlet. 2. Tripped circuit breaker/blown fuse at household service panel. 3.
VACUUM CLEANER PARTS For Model: 721.
VACUUM CLEANER PARTS For Model • 721.24195S Illust. No. Part No.
AIR-TURBINE BRUSH NOZZLE PARTS For Model' 721.24195S 7 8 21 12_\ 11 10 15 16 13 Illus. No. 1 2 3 4 5 6 7 8 Part No. 3040FI1502B 3550FI1637B 4940FI3736A 5200FI2497B 1KZZFI3001B 4930FI2452B 5901FI2OO1A 4280FI3OO3A DESCRIPTION Nozzle Base Nozzle Cover Pile Adjustment Suction Pipe Key Suction Pipe Holder Fan Assembly Bearing Ball Illus. No. 9 10 11 12 13 Part No.
Master Protection Agreement Congratulations on making a smart purchase. Your new Kenmore®product is designed and manufactured for years of dependable operation. But like all products, it may require preventive maintenance or repair from time to time. The Master Protection Agreement also helps extend the life of your new product. Here's what the Agreement* includes: r_ Parts and labor needed to help keep products operating properly under normal use, not just defects.
Antesde uaar au aapiradora nueva ...............2 Garantiade electrodom6sticoskenrnore .......2 Importantesinstrucciones aobre seguridad............................................... 3 Partesy Caracteriaticas..................................4 Ensarnblaje....................................................... 5 Uao y cuidado................................................... 6 C6mofuncionasu aspiradora............................6 C6moechar a andar a su aspiradora.................6 Aditamentos.............
ADVERTENCIA Nosotros consideramos que su seguridad es muy importante. AI usar su aspiradora, para reducir el riesgo de fuego, de cheque electrico, de lesiones personales o de da_os, observe las precauciones basicas de seguridad incluyendo las siguientes: Lea este manualantesde ensamblaro de usarsu aspiradora. Use suaspiradorasolamentecome sedescribeen este manual.Uselas61econ los aditamentossuministrados. Para reducirel riesgede chequeelectrico- No la utilice en exterioresnisobresuperficiesmojadas.
Para asegurar un uso correcto y seguro, es importante conocer las partes y caracteristicas de la aspiradora. Repase esto antes de utilizarla. Interruptor deslizable __'_ Manguera _o,_° ,..° ,° .°n,,. /? // // /: / T ubo telescop,co \,:_k..._...._/ .____----__ J Indicador de [/_2" rendimiento ]_7 X / / / / / Cerroio nara Entrada de la s Bot6n del tubo _ ........ c.o _ Bot6n para el car rate ae, cable _//_,/ /'__/_'/;_'_ / 'x>__ l'\ _ _ _ [[P_'/,-..J _ Cable de v- _-_._j_.,..
RECIPIENTE Antes de ensamblar su aspiradora, asegurese de tener todas las partes mostradas en PARTES Y CARACTER/STICAS. 1. Abra la cubierta del recipiente (ca.nister). 2. Verifique que la bolsa para el polvo este instalada correctamente. Yea CAMBIANDO LA BOLSA PARA EL POLVO para obtener las instrucciones. 3. Verifique que el filtro de seguridad del motor este instalado correctamente.
USO Y CUIDADO La aspiradoracreaunasucci6nque recogea la suciedad. El airequese mueverapidamenteIlevala suciedadhacia la bolsade polvoa travesde lospasajesde flujo delaire. La bolsade polvodeja pasarelaire, mientrasqueatrapaa lasuciedad.Paraobtenerlosmejoresresultadosde limpieza,mantengadespejadoslospasajesde flujodel aire.Chequeeocasionalmentelasa.reascon asteriscos paraver si hay obstrucciones.Desconectedel tomacorrienteantesde hacerloschequeos.
ADITAMENTOS EN LA MANIJA 1. Presione el bot6n de la manija en el tubo y retirelo fuera de la manija. ADITAMENTOS EN LOS TUBOS La herramientaparahendidurasy la herramientapara polvo/ paratapicerianotienenagujerosde sujeccion. InstalelosaccesoriossegQnseanecesario. Vealatablaquesigue. 2. Empuje la herramienta para hendiduras en la manija. La piezaparapolvo/ paratapiceriatiene2 opciones. Cuandoseretiraelcepillofrontal,laparterestante puedeser usadacomounaccesorioparatapiceria.
Trayectoria de barrido sugerida Para obtener la mejor acci6n de limpieza,la Tobera con del cepillo a turbina de aire debe set empujadahacia adelantey jalada hacia atra.s. Se debe continuar de esta forma a pot toda la alfombra,desliz_ndolacon movimientoslentos. NOTA: Los movimientos ra.pidosy bruscos no proporcionanuna limpiezacompleta. CONTROL DE UN TOQUE Los escalones alfombrados debenset aspirados regularmente.Para obtener los mejores resultados de limpiezaponga el interruptor deslizableen MAX.
Para obtener los mejores resultados de limpieza, la bolsa para polvo debe ser cambiada antes de que se Ilene. Use la bolsa no. 5231FI2390J 1. Desconecteel cable del tomacorriente. 2. Jale el cerrojode la tapa hacia afuera y hacia arriba, luegolevante la tapa del recipiente. 3. Presionehacia atra.selgancho de montaje de la bolsa. _ Cerrojo para _Hberar la tapa 4. Retire la bolsa usada y desechela. 5. Para insertar una nueva bolsa: • Presione hacia atras el gancho de montaje de la bolsa.
1.Desconecte elcabledealimentaci6n del tomacorriente. NOdejegotearagua sobrelaaspiradora. _' PRECAUClON 2.Limpie elexterior delaaspiradora conun pa5osuave escurrido quehaya sido mojado conagualimpia. Seque luego de limpiar. NO use los accesorios cuando est_n mojados. Se pueden ocasionar daSos a la bolsa para polvo y al motor. NOTA: Unalimpieza regular ayuda a reducir laelectricidad est&tica y laacumulaci6n de polvoenlasuperficie delaaspiradora yen losaccesorios.
1. Presione el bot6n en el lado posterior de la tobera de la aspiradora para retirar la cubierta del aire. 2. Use el accesorio para desenpolvar / para tapiceria yaspire el cepillo y el ventilador. Ventilador Bot6ndel tubo Cubierta del aire Cepillo Desconecte la aspiradora del tomacorriente. Revise frecuentemente y retire la acumulaci6n de pelo, hilos y pelusas de las Areas del Cepillo a turbina de aire y de sus soportes.
4. Cuidadosamente inserte y levante el destornillador en cada uno de los soportes del cepillo para liberarlo de la base. PARA REEMPLAZAR LA BANDA: 1. Instale los soportes en el cepillo. Soporte del cepillo 2. Instale la banda nueva en la ranura del cepillo, luego sobre el eje del ventilador. AsegQrese de que la banda quede entre sus resguardos. Iio Base 5. Retire la banda desgastada. Eje del ventilador Banda Resguardo para la banda Ranuraparala banda 3. Inserte cada soporte en su ranura de la base.
Revise esta tabla para encontrar soluciones, que puede hacer usted mismo, a problemas leves de rendimiento. Cualquier otro servicio de mantenimiento que sea necesario, debe ser realizado per Sears o per algQn otro representante de mantenimiento calificado. Desconecte la fuente de energia electrica antes de hacer un mantenimiento o de limpiar a la unidad. ADVERTENCIA Peligro de choque electrico El no hacerlo puede dar como resultado choques electricos o heridas personales.
Contratos de proteccibnmaestra Felicitaciones por su compra inteligente. Su nuevo producto Kenmore®est,. diseflado y fabricado para muchos afios de operacion confiable. Sin embargo, al igual que todos los productos, puede requerir de mantenimiento o reparacion preventivas de vez en cuando. Es ahi cuando el contrato de proteccion maestra le puede ahorrar dinero y molestias. El Contrato de proteccion maestra tambien le ayuda a ampliar la vida de su nuevo producto.
78017_Kenmore vac_SPv00 7/11/07 4:16 @Mh Page 48 Your Home For repairin your home - of all major brand appliances, lawn and garden equipment, or heating and cooling systems, no matter who made it, no matter who sold it! For the replacement parts, accessories and owner's manuals that you need to do-it-yourself. For Sears professional installation of home appliances and items like garage door openers and water heaters. 1-800"4-MY-HOM E _ (1-800-469-4663) Anytime, day or night (U.S.A. and Canada) www.