™ OWNERS MANUAL Model No. 45-04381 40" FRONT MOUNT TINE DETHATCHER CAUTION: Read Rules for Safe Operation and Instructions Carefully Safety Assembly Operating Maintenance Repair Parts the fastest way to purchase parts www.speedepart.com PRINTED IN USA FORM NO.
Any power equipment can cause injury if operated improperly or if the user does not understand how to operate the equipment. Exercise caution at all times, when using power equipment. • • • • • • Read safety rules in the vehicle owners manual and know how to operate your equipment, before using the tine dethatcher. Never operate vehicle and tine dethatcher attachment without wearing substantial footwear, and do not allow anyone to ride or sit on the tine dethatcher.
1 2 3 4 6 5 7 8 10 REF PART NO. 1 2 3 4 5 6 44326 43063 43001 43087 43069 R19212113 12 11 9 QTY DESCRIPTION 12 2 4 2 4 4 Carriage Bolt, 5/16-18 x 1" Hex Bolt, 5/16-18 x 1" Hex Bolt, 3/8-16 x 1" Hex Bolt, 3/8-16 x 1-1/4" Carriage Bolt, 3/8-16 x 1-1/2" Flat Washer, 5/8" REF PART NO. 7 8 9 10 11 12 43343 46838 44044 43055 47810 HA21362 Hairpin Cotter, 1/8" Spacer, .8" x 1" x .
• Remove any front mounted attachments which may be installed on your tractor. • Mark all loose parts and save for reassembly. Stop engine and let muffler cool before attempting to install dethatcher hitch brackets.
4 26 7 APPLY OIL 6 x1 24 x1 6 7 26 24 x1 x2 5 6 7 7 6 x2 x1 6 7 20 x1 20 7 x2 5
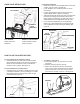
ATTACHING DETHATCHER TO TRACTOR • If the front of your tractor has front mounting holes as shown in figure 7, continue on to figure 8. • If the front of your tractor DOES NOT have front mounting holes, go to figure 9. 7 FRONT MOUNTING HOLES • Remove two self threading bolts (if present) from front cross-member of tractor. Assemble bolts through lower slots in hitch bracket, then reinstall them back into front crossmember. (Make sure notches at top of hitch bracket and crossmember are aligned.
• 10 Assemble the frame mount bracket (27) to the tractor frame using four 3/8" x 1-1/2" carriage bolts (5), spacers (8) and 3/8" nylock nuts (12). The spacers (8) go between the tractor frame and the frame mount bracket.
• Attach dethatcher to hitch plate by placing mounting shaft into slots at front of hitch plate. Dethatcher mounting arms go to inside of hitch plate. Assemble keeper plates onto ends of mounting shaft and secure with (large) 1/8" hairpin cotters.
CUSTOMER RESPONSIBILITIES • Read and follow the maintenance schedule and the maintenance procedures listed in this section. e us se on ge ch ch u eas tora a s e e ea y s e for fter ver efor e E B A B MAINTENANCE SCHEDULE Fill in dates as you complete regular service. Check for loose fasteners Lubrication Service Dates X X CHECK FOR LOOSE FASTENERS • LIFT HANDLE Before each use check all nuts and bolts for tightness. Tighten loose fasteners before using.
KNOW YOUR DETHATCHER Leveling the dethatcher • Move tractor with front mounted dethatcher onto a level surface, such as a drive or garage floor. • Lower dethatcher from transport position to rest on level surface. • Loosen carriage bolts through mounting arms and angle brackets. (Refer to figure 3 on page 5.) • Adjust tine shield until spring tines come in contact with level surface, keeping front and back tines at same height.
40" TINE DETHATCHER MODEL 45-04381 11 18 1 8 15 22 27 5 21 12 9 1 19 11 12 16 23 16 25 7 3 17 1 2 12 10 7 A 20 7 13 11 7 A 1 7 25 13 6 4 11 28 11 14 6 6 24 6 29 REF PART NO. 1 2 3 4 5 6 7 8 9 10 11 12 13 14 15 44326 43063 43001 43087 43069 R19212113 43343 46838 44044 43055 47810 HA21362 24876 23668 62600 7 QTY DESCRIPTION 12 2 4 2 4 4 6 4 1 1 14 10 2 1 1 REF PART NO.
the fastest way to purchase parts www.speedepart.com © 2006 Agri-Fab, Inc. REPAIR PARTS Agri-Fab, Inc. 809 South Hamilton Sullivan, IL. 61951 217-728-8388 www.agri-fab.