Owner's Manual and Installation Instructions One-Speed AUTOMATIC WASHERS IMPORTANT: Read and follow all safety and operating instructions before first use of this product. Sears, Roebuck and Co., Hoffman Estates, IL 60179 U.S.A. Sears Canada Inc., Toronto, Ontario, Canada M5B 2B8 3955142 PRINTED IN U.S.A. www.sears.
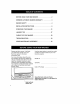
BEFORE USING YOUR NEW WASHER .... 2 KENMORE AUTOMATIC WASHER WARRANTY 3 WASHER SAFETY 4 INSTALLATION ..... INSTRUCTIONS ..... OPERATING YOUR WASHER LAUNDRY TIPS 6 ..... 21 ........... 27 CARING FOR YOUR WASHER TROUBLESHOOTING _ _ ........ SEARS MAINTENANCE _ 29 30 AGREEMENT Please read this manual. It will help you install and operate your new Kenmore washer in the most economical way.
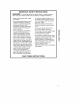
Limited Lifetime Warranty on White Porcelain Basket For the lifetime of the washer from the date of purchase, Sears will replace the white porcelain wash basket if it chips or rusts due to defective material or workmanship. After the first year, you will be charged for labor. Limited 10-Year Warranty on Plastic Tub* For the second through tenth year from the date of purchase, Sears will replace the plastic tub if it is defective in material or workmanship.
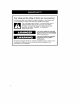
Your safety and the safety We have provided on your appliance. of others are very important. many important safety messages in this manual and Always read and obey all safety messages. This is the safety alerL symbol. This symbol alerts you to potential hazards that can kill or hurt you and others. All safety messages will follow the safety alert symbol and either the word "DANGER" or "WARNING." These words mean: You can be killed or seriously injured if you don't immediately follow instructions.
IMPORTANT SAFETY INSTRUCTIONS WARNING: To reduce the risk of fire_ electric shock, or injury to persons when using your washer, follow basic precautions, including the following: • Read all instructions before using the washer. • Do not wash articles that have been previously cleaned in, washed in, soaked in, or spotted with gasoline, dry-cleaning solvents, other flammable or explosive substances as they give off vapors that could ignite or explode.
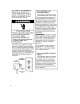
INSTALLATION OVERVIEW For a complete list of tools and parts needed, see pages 7-9. A. SELECT LOCATION FOR YOUR WASHER (pgs. 11-13) Recessed Area/ Closet Installation Instructions (p. 11) Laundry Tub Drain System (p. 12) (99 cm) Standpipe Drain System (p. 13) 39 in 199 cm) Floor Drain System (p.
B.REMOVE SHIPPING STRAP (p,14) ToolsNeeded: Scissors Flashlight (optional depending on installation) C. CONNECT DRAIN HOSE (pgs. 15-16) AWuNsDHI ST Tools Needed: Parts Supplied: Pliers that open to 1%6in (3.
D. CONNECT INLET HOSES TO WASHER (pgs. 16-17) Tools Needed: Parts Supplied: 2 water inlet hoses to 1_6 in (3.95 _..i _ Flashlight (optional depending on installation) 4 flat water inlet hose washers E. CONNECT INLET HOSES TO WATER FAUCETS (p, 17) Tools Needed: Parts Supplied: 2 water inlet hoses Pliers that open to 1_6 in (3.
F. SECURE DRAIN HOSE (p. 18) Tools Needed: Parts Supplied: Flashlight (optional depending on installation) Shipping strap with fastener G, LEVEL WASHER (p, 19) Tools Needed: Parts Supplied: Y_-in (f.
ELECTRICAL REQUIREMENTS 120-Volt, 60-Hz. AC-only, 15- or 20-ampere fused electrical supply is required. (Time-delay fuse or circuit breaker is recommended.) Connect to an individual branch circuit. Electrical Shock Hazard Plug into a grounded 3 prong outlet. Do not remove ground prong. Do not use an adapter. Do not use an extension cord. Failure to follow these instructions can result in death, fire, or electrical shock. This washer is equipped with a power supply cord having a 3-prong grounding plug.
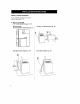
A. SELECT LOCATION FOR YOUR WASHER Selecting the proper location for your washer will improve its performance and minimize concerns like washer walk or noise. RECESSED AREAl CLOSET INSTALLATION INSTRUCTIONS This washer may be installed in a recessed area or closet. oo 14in rna_ • 48 in 2 (310 crn 2) minimum ventilation area 19 in 24 in 2 [_ *0 in 27 in t55 cm2 _,' minimum ventilation area "8 in 1 in (2,5 cm) FrontView (DoorNotShown) 25 ½ in _3in 4 in (10.
LAUNDRY TUB DRAIN SYSTEM Check location where washer will be installed. This washer can be installed using one of three systems: Do not store or operate washer at or below 32°F (O°C) (some water may remain in washer). See page 29 for winterizing information. • Laundry tub drain system (below) • Standpipe drain system (p. 13) • Floor drain system (p.
ALTERNATE LOCATIONS STANDPIPE AND FLOOR DRAIN SYSTEMS Siphon break: Must be purchased separately. See chart below. 38 in (99 cm) J / Standpipe drain system: Needs a 2 in (5 cm) minimum diameter standpipe with minimum carry-away capacity of 17 gal (64 L) per minute. Top of standpipe must be at least 39 in (99 cm) above floor and no higher than 96 in (2.4 m) from bottom of washer. Floor drain system: Requires a siphon break, see chart below.
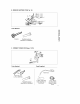
B. REMOVE SHIPPING STRAP STEP 2. Pull firmly to remove the end of the shipping strap that remains pinned to the back of the washer, This will release the rear self-leveling legs. Removing the shipping strap is necessary for smooth operation. If the shipping strap is not removed, the washer will make excessive noise. Pin To prevent floor damage, set washer onto cardboard before moving across floor. Move washer close to its final location. STEP 1. Do not cut yellow strap.
C. CONNECT DRAIN HOSE Proper connection of the drain hose will protect your floors from damage due to water leakage. STEP 1. To prevent the drain hose from coming off or leaking, it must be installed per the following instructions: IMPORTANT: To ensure proper installation, this procedure must be followed exactly, ) a. Wet the inside of the straight end of the drain hose with tap water. DO NOT USE ANY OTHER LUBRICANT. r TWIST AND PUSH b. Squeeze ears of silver, double-wire clamp with pliers to open.
For standpipe or laundry tub drain systems: STEP 2. Open yellow, single-wire clamp with pliers and slide over hooked end of drain hose to secure the rubber and corrugated sections together. DrainHose XookedEnd D. CONNECT INLET HOSES TO WASHER Proper connection of your inlet hoses will allow hot and cold water to enter your washer properly. It also helps prevent water damage due to leaks.
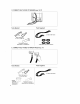
STEP 2. Attach the hose with the red coupling to the hot water (bottom) inlet valve. Attaching the red coupling first makes it easier to tighten connection with pliers. Screw on coupling by hand, Make an additional two4hirds turn with pliers to tighten coupling. DO NOT OVERTIGHTEN; this could damage the valves. E. CONNECT INLET HOSES TO WATER FAUCETS STEP 1, Make sure washer basket is empty.
F. SECURE DRAIN HOSE Securing the drain hose properly will protect your floors from damage due to water leakage. STEP 1. Move washer to its final location. / STEP 2. Locate the remaining piece of shipping strap (not the end with the cotter pins) from STEP 3 of "REMOVE SHIPPING STRAP." Use it to wrap the drain hose together with the laundry tub or standpipe. Push fastener into the nearest hole in the shipping strap.
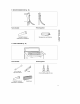
G. LEVEL WASHER Leveling your washer properly prevents excessive noise and vibration, To install front legs: STEP 1. Prop front of washer up (about 4 in [10.2 cm]). Use a wood block or another object that will support the weight of the washer. If washer was placed against a wall, move the washer out slightly before tipping it up. STEP 5. Move washer to its final location. STEP 6. Tilt washer forward until rear of washer is at least 3 in (7,6 cm) off floor.
REVIEW INSTALLATION Take a few minutes to complete this checklist. It will help assure you that you have a proper installation and increase your satisfaction with your Kenmore washer, [ [ Check electrical requirements. Be sure you have correct electrical supply and recommended grounding method. Check that you have: [ Check that: • The washer is level. • The nuts on the front legs are tight. [ Check that the water faucets are turned on.
To get the maximum cleaning and fabric care from your washer, please read and follow these instructions. NOTE: The drawings in this section show the basic features of all models covered by this manual. Refer to the supplied "Feature Sheet" for your washer's particular features. Fire Hazard Never place items in the washer that are dampened with gasoline or other flammable fluids. No washer can completely remove oil. Do not dry anything that has ever had any type of oil on it (including cooking oils).
Antiperspirants, Deodorants Treat with a paste of ammonia and color_ safe bleach. Let stand for 30 minutes. Wash in hottest water safe for fabric. Grass Use an enzyme presoak or rub enzyme detergent on the stain. Launder with deter* gent and bleach appropriate for the fabric. Blood Rinse immediately or soak in cold water with detergent for 30 minutes. Rinse. Rub detergent into any remaining stains. Rinse thoroughly. Wash.
SET WATER LEVEL CONTROL WASH/RINSE WATER TEMPERATURE Your wash/rinse water temperature control is part of the Cycle Selector Control (Timer) knob (see page 24). All rinses are cold to save energy. • For a HOT water wash, select SUPER. • For a WARM water wash, select REGULAR. • For a COLD water wash, select SHORT. This control gives you the flexibility to save water when washing small loads. Your washer lets you select a water setting based on the size of your wash load.
SETTING YOUR CYCLE PERMANENT SELECTOR (TIMER) CONTROL • For sturdy or heavily soiled loads, use SUPER. • For moderately soiled loads, use REGULAR. • For delicate or lightly soiled loads, use SHORT. HEAVY DUTY Use this cycle to get up to 14 minutes of wash time. Wash combines fast speed agitation and fast spin speeds. PRESS The PERMANENT PRESS cycle includes a load cooling process that reduces wrinkling compared to other cycles. Use this cycle to get up to 10 minutes of wash time.
UNDERSTANDING WHAT HAPPENS DURING THE WASHER CYCLE HEAVY DUTY PERMANENT PRESS selected level Fill to selected level Fill to Wash selected time Wash selected time no spin Drain - Partial Drain Spin Pause selected level Fill to cool down Fill for Rinse Wash no spin Drain - no spin Drain - Spin Spin Off selected level Fill to Rinse no spin Drain Spin Off 25
DUAL ACTION ®AGITATOR Kenmore's DUAL ACTION ® Agitator gives you flexible fabric care for even your largest loads, The best cleaning action in your washer takes place at the bottom where the agitator vanes move back and forth to flex the fabric, loosening the soil. To get all your clothes down to the bottom of the washer, the upper portion of the agitator has uniquely designed, spiral vanes to help push the clothes that are on top down to the bottom.
PREPARING CLOTHES FOR WASHING Follow these recommendations to help you prolong the life of your garments. • Close zippers, snaps, and hooks to avoid snagging other items. Remove pins, buckles, and other hard objects to avoid scratching the washer interior. Remove non-washable trim and ornaments. SORTING • Separate heavily soiled items from lightly soiled ones, even if they would normally be washed together. Separate lint givers (towels, chenille) from lint takers (corduroy, synthetics, permanent press).
LOADING • Reduce wash time by using a lower water level setting, Loads with only a few small items need less wash time. Proper loading of your washer contributes to proper cleaning and fabric care and reduces machine noise, • Drop items into washer loosely. Fill to the top of the basket (top row of holes). Do not wrap items around the agitator. Items should move easily through wash water for best cleaning and wrinkle-free results. Items should sink and reappear later.
CLEANING YOUR WASHER Exterior Wipe up detergent, bleach, and other spills with a soft, damp cloth or sponge as they occur. Occasionally wipe the outside of the washer to keep it looking like new. WINTER STORAGE OR MOVING CARE Install and store your washer where it will not freeze, Because some water may stay in the hoses, freezing can damage your washer, If storing or moving your washer during freezing weather, winterize it, Do not put sharp or metal objects in your washer. They can damage the finish.
Most laundering problems are easily solved if you understand the cause. Check these lists for common laundry and washer problems. If you need further assistance, see service and assistance information on back cover. Problem Possible Cause Solution Washer Leaks Household plumbing is leaking. Repair plumbing. Inlet hoses not tight. Tighten hoses (see "Installation Instructions," Sections D & E). Inlet hose washers not properly seated. Reseat washers (see "Installation Instructions," Section D).
Problem Possible Cause Solution Continues to Fill/ Continues to Drain/ Cycle Stuck Drain hose is less than 39 in (99 cm) above floor. Raise the drain hose (see "Installation instructions," Section C). Drain hose fits tightly into standpipe. Adjust drain hose for loose fit (see "Installation instructions," Section C). Drain hose taped into standpipe. Do not seal off drain hose with tape. The drain hose needs an air gap. Load is unbalanced. Redistribute load. Washer is not level.
Problem Possible Cause Solution Machine Stops Power cord not plugged in. Plug into a grounded 3 prong outlet. No power at plug. Check electrical source or call eIectrician. Fuse blown or circuit breaker open. Replace fuse or reset circuit breaker. If problem continues, calI eIectrician. Using an extension cord. Do not use extension cords. Timer is not lined up. Turn timer to the right slightly and pull to start. Timer knob not pulled out. Set and pull out knob. Machine is overloaded.
Problem Possible Cause Solution Tearing Overloading. improper use of washer, Loads should move freely during wash. Wash smaller loads. Improper use of chlorine bIeach. Undiluted bleach will damage fabrics. Do not pour chlorine bleach directly on load. Wipe up bleach spills. Sharp items not removed from pockets; fasteners not fastened. Clean out pockets before washing. Zip zippers before washing. Items damaged before washing, Mend rips and broken threads in seams before washing.
KENMORE WASHERS "We Service What We Sell" is our assurance you can depend on Sears for service. Your Kenmore appliance has added value when you consider that Sears has service units nationwide, staffed with professional technicians trained on all appliances Sears sells. They have the knowledge and skills, tools, parts and equipment to ensure our pledge to you that "We Service What We Sell." Maintain the value of your purchase with a Sears Maintenance Agreement.
Forrepairof majorbrandappliancesin your own hmne... no matterwho madeit, no matterwho soldit! 1-8004-MY-HOME sM_,l_rn_davor n_t To bringin productssuchasvacuums,lawnequipment and electronics for repair,callfor the locationofyournearestSears _ & Repair !-800488-1222 An_me_ dayornight IMfqP_/m Forthereplacementparts,accessories andowner'smanuals thatyou needto do-it-yourself, call.Semrs PallslDirect_! 1"800"366"PART6_.-llp.m.CST. (I -il00-366-7278) 7daysaweek wa_._u,_mn/mrzs_.