Owner's Manual ® 25 GALLON SPRAYER STOP DO NOT RETURN TO STORE For Missing Parts or Assembly Questions Call 1-866-576-8388 Model No. 486.245332 CAUTION: Before using this product, read this manual and follow all Safety Rules and Operating Instructions. • • • • • Safety Assembly Operation Maintenance Parts Sears, Roebuck and Co., Hoffman Estates, IL 60179 U.S.A. www.sears.com/craftsman PRINTED IN U.S.A. FORM NO. 40171 (REV.
TABLE OF CONTENTS SAFETY RULES .............................................................. 2 FULL SIZE HARDWARE CHART .................................... 3 CARTON CONTENTS ..................................................... 4 ASSEMBLY ...................................................................... 4 OPERATION .................................................................... 8 MAINTENANCE ............................................................ 11 STORAGE ................................
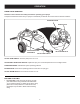
HARDWARE PACKAGE CONTENTS SHOWN FULL SIZE A B H G E D C F I J L K M NOT SHOWN FULL SIZE N P 40 O 20 0 T S KEY QTY. A B C D E F G H I J K 8 2 2 2 4 10 2 4 2 2 1 DESCRIPTION Hex Bolt, 5/16" x 2" Hex Bolt, 5/16" x 1-1/4" Carriage Bolt, 5/16" x 1-1/4" Screw, #10 x 3/8" Nut, 5/16" (SEMS) Nut, Nylock 5/16" Flat Washer, 5/16" Flat Washer, 3/4" Lock Washer, #10 Washer, 5/16" Tooth Lock Hitch Pin 3 Q 60 R 80 100 U KEY QTY.
ASSEMBLY CARTON CONTENTS 1. 2. 3. 4. 5. Lid Tank Return/Bypass Hose (may be assembled to tank) Boom Assembly Boom Mount Bracket 6. Spray Gun Assembly 7. Axle 8. Hitch Arms (2) 9. Hitch Brackets (2) 10. Wheels (2) 1 3 4 2 6 5 10 7 9 8 TOOLS REQUIRED FOR ASSEMBLY (2) (1) (1) (1) 1/2" Wrenches Screwdriver Pliers Hammer STEP 1: (SEE FIGURE 1) • Remove all items from carton and lay out as shown on pages 3 and 4.
STEP 2: (SEE FIGURE 2 AND 1) • Slide the axle through the two axle brackets. • Assemble a spacer (R), a 3/4" washer (H), a wheel (valve stem facing out) and another 3/4" washer (H) onto the axle. Assemble a cotter pin (M) through the end of the axle. Repeat on other end. • Tighten the four nuts which fasten the axle clamps to the frame tubes. Refer back to figure 1. STEP 4: (SEE FIGURE 4) • Fasten the ends of the hitch arms together using two 5/16" x 1-1/4" hex bolts (B) and 5/16" nylock nuts (F).
STEP 6: (SEE FIGURE 6) • Assemble the boom bars to the boom mount bracket using two 5/16" x 1-1/4" carriage bolts (C), tooth lock washers (J) (between the bar and bracket), 5/16" flat washers (G) and knobs (N). The boom connecting hose should extend upward. NOTE: Make sure the nozzles are adjusted so that the openings face straight down when the boom bar is in the horizontal operating position. STEP 8: (SEE FIGURE 8) • Insert a garden hose gasket (T) into the swivel nut on the bypass/return hose.
STEP 9: (SEE FIGURE 9 AND 10) • Attach the sprayer to the tractor hitch and connect the wiring to the tractor battery. The red wire must be connected to the positive post on the battery or to the "HOT" connection on a tractor switch or ammeter. The brown wire may be grounded or connected to the negative battery post.
OPERATION KNOW YOUR SPRAYER Read this owner's manual and safety rules before operating your sprayer. Compare the illustration below with your sprayer to familiarize yourself with the various controls and their locations. PRESSURE GAUGE BYPASS VALVE ADJUSTABLE SPRAY GUN NOZZLE ON-OFF PUMP SWITCH ON-OFF BOOM VALVE ON-OFF PUMP SWITCH Turns the pump motor on or off. ADJUSTABLE SPRAY GUN NOZZLE Adjusts the spray from a cone shaped fine mist to a straight stream.
HOW TO USE YOUR SPRAYER USING THE SPRAYER 1. Determine the application rate (gallons per 1,000 sq. feet or gallons per acre) based on the chemical manufacturers recommendations. Use this rate to help select the pressure setting and tractor speed in the following instructions. BEFORE STARTING It is important to test the boom and spray gun with plain water before using chemicals. This will enable you to check the sprayer for leaks and to set the spray pattern and nozzle pressure.
U.S. GALLON TIP CHART Tip No. #3 Tip No. #3 Spray Height Inches 13" Spray Height Inches 13" Pressure PSI 10 20 30 Pressure PSI 10 20 30 Tip Capacity US Gallons Per Minute .30 .42 .52 Tip Capacity US Gallons Per Minute .30 .42 .52 GALLONS PER ACRE (BASED ON WATER) 1 MPH 44.2 63 76.8 2 MPH 22.1 31.5 38.4 3 MPH 14.8 20.9 25.8 4 MPH 11.1 15.7 19.3 5 MPH 8.9 12.6 15.4 7.5 MPH 5.9 8.4 10.3 10 MPH 4.4 6.3 7.7 GALLONS PER 1000 SQ. FT. (BASED ON WATER) 1 MPH 1.0 1.4 1.8 2 MPH 0.50 0.72 0.88 3 MPH 0.
MAINTENANCE CUSTOMER RESPONSIBILITIES • Read and follow the maintenance schedule and the maintenance procedures listed in this section. se e e n h u h us aso orag c t a e c s e e ea y s e for ter ver efor E Be Af B MAINTENANCE SCHEDULE Fill in dates as you complete regular service.
TROUBLESHOOTING PROBLEM CAUSE CORRECTION Pump motor cycles on and off rapidly. (OK for short periods of time) System pressure is reaching maximum setting of pump's pressure switch. Decrease the system pressure by increasing the opening of the bypass valve. Pressure too low 1. Bypass valve open too far. 2. Tank strainer dirty. 1. Decrease opening of bypass valve 2. Remove strainer and clean. Pressure OK but boom spray weak. Nozzles strainers dirty. Remove strainers and clean.
NOTES 13
PARTS REPAIR PARTS FOR 25 GALLON SPRAYER MODEL 486.
REPAIR PARTS FOR 25 GALLON SPRAYER MODEL 486.245332 REF. NO. PART NO. QTY. 1 2 3 4 5 6 7 8 9 10 11 12 13 14 15 46283 45015 46278 45021 45024 45031 45032 45033 45069 43910 46980 45085 46276 46277 45025 45026 49754 45049 45050 47406 49761 45026 47405 45034 48296 24860 23014 23917 24615 44456 46700 24122 24585 47394 45028 1 1 1 1 1 1 3 1 4 4 4 2 1 1 2 2 1 1 1 1 1 6 6 1 2 2 2 2 1 2 1 2 1 1 2 16 17 18 19 20 21 22 23 24 25 26 27 28 29 30 31 32 33 DESCRIPTION Tank (25 Gal.
Get it fixed, at your home or ours! Your Home For repair – in your home – of all major brand appliances, lawn and garden equipment, or heating and cooling systems, no matter who made it, no matter who sold it! For the replacement parts, accessories and owner’s manuals that you need to do-it-yourself. For Sears professional installation of home appliances and items like garage door openers and water heaters. 1-800-4-MY-HOME® (1-800-469-4663) Call anytime, day or night (U.S.A. and Canada) www.sears.