Owners Manual FOR POTABLEWATER HEATING ONLY NOT SUITABLE FOR SPACEHEATING NOT FOR USE IN MOBILE HOMES Model No. 153.335803 -153.335814 -153.335815 153.335844 153.335861 153.335903 _153.335914 --.153.335915 40 Gal. High Altitude 40 Gal. 40 Gal. 40 Gal. High Altitude LP. 40 Gal. L.R 50GaL High Altitude 50 Gal. 50 GaL 153.335941 153.335961 50 Gal. High Altitude LR 50 Gal. L.
Safety Precautions AW,.ARNING . . Imp,roper installation, ad|ustment, alteratlon, service or I maintenance can cause death, serious bodily injury, or I property damage. Refer to this manual for assistanceor I consult your local Sears Service Center for further information. AWARNING WATER HEATERS EQUIPPED FOR ONE TYPE GAS ONLY: This water heater is equipped for one type gas only. Check the model rating plate near the gas control valve for the correct gas.
Safety Precautions AWARNING _WARNING A gas water heater .cannotoperate properly without the correct amount of mr for combustion. Do not install in a confined area such a closet, unless you provide air as shownin the "Locating The New Water Heater" section. Never obstruct the flow of ventilation air. If you have any doubts or questionsat all, call your gas company.
Safety Precautions AWARNING I I The water heater with draft hood installed must be prop- J Jerly vented to a chimney which terminates outdoors. I I Never operate the water heater unlessit is vented to the J outdoors and has adequate air supply to avoid risks of J Jimproper operation, explosionor asphyxiation. AWARNING J Vent termination must not be within 4 feet of any items J such as gas meters, gas valves or other gas regulating J equipment.
Table of Contents Safety Precautions ............. 2-4 Table of Contents .......................................................................................................... 5 Customer l_esponslt_lllUes ............................................................................................ 6 Product _pecmcauons .................................................................................................. 6 Materials and Basic Tools Needed ....................................................
Customer Responsibilities Thank You for purchasing a Sears water heater. Properly This manual contains instructions for the installation, op_ation, and maintenance of the gas-fired water heater. It also contains warnings through out t_e manual that you must read and be aware of. All warnings and all instructions are essential to the proper operation of the water heater and your safety.
Materials and Basic Tools Needed Materials Needed To simplify the installation Sears has available the installation _larts shown below. You may or may not need all of these materis, depending on your type of installation.
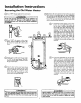
Installation Instructions Removing the Old Water Q Turn "OFF" Heater the gas supply to the water heater. AWARN,. Q 1 If the main gas line--all gas appliances isl used, also shut "off" the gas at each appliance. Leave all [ gas appliances shut "off" until the water heater installation I is complete, Disconnect the vent pipe from the draft hood where they connect to the water heater. In most installations the vent pipe can be lifted off after any screw or other attached devices are removed.
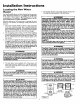
Installation Instructions Locating the New Water Heater 5. The location selection must provide adequate clearances for servicing and proper operation of the water heater. You should carefully choose an indoor location for the new water heater, because the placement is a very important consideration for the safety of the occupants in the building and for the most economical use of the appliance. This water heater is not for use in mobile homes or outdoor installation.
Installation Instructions (cont'd) _,WARNING A gaswnt_ heater cannotoperate properlywithout the correct amountof air for combustion.Do not im_dl in a confined area sucha closet, unlessyou provide air as shown in the "Locating The New Water Heater" section.Never obstruct the flowofventgationair.If you haveanydoubtsor questions at all, call your gas company. Failure to provide the proper amountof combustionair can resultin a fire or explosionand cancausedeath,seriousbodilyinjury,or propertydamage.
Installation Instructions (cont'd) Combustion Air and Ventilation for Appliances Located in Unconfined Spaces Unconfined Space is a space whose volume is not less than 50 cubic feet per 1,000 Btu per hour of the aggregateinput rating of all appliances installed in that space. Rooms communicating directly with the space in which the appliances areinstalled, through openings not furnished with doors, areconsidered a part of the unconfined space.
Installation Water Instructions Piping AWARNING 2. Look at the top cover of the water heater. The cold water inlet is markedcold. Put two or three turns of teflon tape around the threaded end of _e threaded-to-swear coupling and around both ends of the ¾ threaded nipple. Using flexible connectors, connect the cold water pipe to the coldwater inlet of the water heater. HOTTER WATER CAN SCAL_. Water heaters are intended to produce hot water.
Installation Instructions Temperature-Pressure (cont'd) Relief Valve AWARNING AWARNING At the time of manufacturethis water heater was provided with a combinationtemperature-pressures relief valvecertified by a nationally recognized testinglaboratory that maintains periodicinspec_onof productionof listedequipmentor materials, as meeting the requirements for Relief Valves and AutomaticGasShutoffDevicesfur Hot Water SupplySystems, and the latest edition of ANSI Z21.22 and the code requirementsof ASME.
Installation Instructions Filling the Water Heater You must provide all wiring of the proper size outside of the water heater. You must obey local codes and electric company requirements when you install this wiring. ACAUTION Never usethis water heater unlessit iscompletelyElledwith water, To preventdamageto the tank, the tank must be Elled with water.
Installation USE WITHOUT POWER Instructions CORD (cont'd) 3. A standard ½" conduit opening has been made in the water heater junction box for the conduit connection. 4. Use wire nuts and connect the power supply wiring wires "ns'de the water heaters junction box. to the 5. The water heater must be electrically _grounded" installer. A green ground screw has been provided by the on the WIRING (cont'd) water heater's junction box. Connect ground wire to this location.
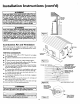
Installation Instructions (cont'd) Venting (cont'd) VENTING SYSTEM FOR ALL MODELS AWARNING Be sure vent pipe is p,_porly connected to prevent escape of dangerousflue gaseswhich could causedeadly asphyxiation, EXAMPLE INSTALLATIONS The vent piping cannot under any circumstances be run downhill.
Installation Instructions VENTING SYSTEM EXAMPLE FOR ALL MODELS (cont'd) INSTALLATIONS (cont'd) CEMENTING PVC, ABS OR CPVC PIPE AND FITHNGS Read and observe all safety information cleaner, and cement containers. 2. Horizontal runs require a minimum ¼" rise per foot. printed on primer, DANGER Primer, cleaner, and cements are extremely flammable. They are harmful or fatal if swallowed. The vapors are harmful. They may irritate eyes and skin and can be absorbed through the skin. 35' Max. 16" MIN.
Installation Instructions (cont'd) Venting (cont'd) CUTTING OPENING THROUGH AN OUTSIDE WALL AND COLLAR INSTALLATION CONNECTING BLOWER After reading the manual and you have determined the location of the opening in the wall, (using the drawing below), cut a 3½" hole through an exterior wall. NOTE: When determining location of the opening in the outside wall allow for the ¼" rise per foot that has taken place in the horizontal run. • a 3 " PVC or ABS Schedule 40 1.
Installation Instructions (cont'd) Gas Piping I AWARNING ] Make sure the gassure type listed on the I model rating plate. The inlet gaspressuremust not exceed 14 incheswater column 'Apoundper squareinch(3.5kPa)]. I The minimum inlet gaspressurelistedon the model rating I f plate isfor the purposeof input adjustment. A sediment trap shall be installed as close to the inlet of the water heater as practical at the time of water heater installation.
Installation Instructions Installation Checklist BEFORE LIGHTING THE PILOT: • (cont'd) VENT PIPETO OUTDOORS Check the gas lines for leaks. a. Use a soapy water solution. DO NOT test for gas leaks usinga match or open flame. b. Brush the soapy water solution on all gas pipes, joints and fittings. c. Check for bubbling soap. This means you have a leak. Turn OFF gas andmake the necessary repairs. d. Recheck for leaks. e. Rinse off soapy solution and wipe dry.
Operating Instructions - This water heater is equipped with an electrically operated venting system and a standing pilot. For the burner to come on, the water heater thermostat must call for heat. Then the system will begin sequencing, each section proving itself before gas is allowed to flow to the burner. BEFORE THE WATER HEATER WILL BLOWER MOTOR OPERATE: VENTING RESET SVVITCH 1. The control system must be connected to a 110/120 volt power supply.
Operating Instructions Lighting A, WARNING BEFORE LIGHTING [PROPANE (L.R) GAS WATER HEATERS]: Propane (I.R) gas is heavier than air. Should there be a leak in the system, the gas will settle near the ground. Basements, crawl spaces, skirted areas under mobile homes (even when ventilated), closetsand areas below ground leve_will serve as pockets for the accumulation of this gas.
Operating Instructions Lighting label on the water FOR YOUR (cont'd) heater as it appears above the thermostat SAFETY READ BEFORE LIGHTING m If you do not follow these instructions exactly, a fire or explosion WARNING I may result causing property damage, personal injury or loss of life. A. This appfiancehas a pilot which mustbe lightedby hand.Whenlightingthe pilot,followtheseinstructions exactly. B. BEFORELIGHTINGsmellall aroundtheappfiancearea for gas.
Operating Temperature Instructions (cont'd) Regulation Turn the water temperature dial dockwise _f"-_) to decrease the temperature, or counterclockwise (4 r _) to increase the temperature. Due to the nature of the typical gas water heater, the water tem_oerature in certain situations may vary up to 30°F higher or wen at the point of use such as, bathtubs, showers, sink, etc.
Service and Adjustment Tank (Sediment) Burner Inspection Cleaning Sediment build-up on the tank bottom may create varying amounts of noise, and if left in the tank will cause premature tank failure. In some water areas, you may not be able to drain all sediment deposits by simply draining the tank. In these cases Mag Erad (part no. 3515) can be used to help remove the sediment deposits. This may be order_ from the Sears Service Center. For ordering, refer to the "Repair Parts section.
Service and Adjustment L.P.Gas Control Valve & Burner Assembly Replacement Information (cont'd) Temperature-Pressure Valve Operation The temperature-pressure at least once a year. Relief relief valve must be manually operated _WARNING PROPANE (L.R) GAS CONTROL VALVE AN BURNER ASSEMBLYREPLACEMENTINFORMATION. RELIEF VALVE For Propane(LR) GasModelsOnly:.
Service and Adjustment Drain Valve Washer Replacement NOTE: For replacement, use a "/_2"• ,3/,, • _,, thick washer available at your nearest hardware store. For ordering replace• merit washers, refer to the Ic Repatr• Parts" sectmn. • • • Turn "OFF" gas supply to water heater. Follow "Draining" instructions. Turning counter clockwise, remove the hex cap below the screw handle. Remove the washer mad put the new one in place.
Troubleshooting Guide Start Up Conditions CONDENSATION SMOKE/ODOR Whenever the water heater is filled with cold water, a certain amount of condensation will form while the burner is on. A water heater may appear to be leakingwhen in fact the water is condensation. This usually happens when: • When a new water heater is filled with cold water for the first time. • When gas burns and water vapor is produced in water heaters, particularly high efficiency models where flue temperatures are lower.
Troubleshooting Operational SMELLY Guide (cont'd) Conditions WATER In each glasslined water heater there is installed at least one anode rod (see parts section) for corrosion protection of the tank. Certain water conditions will cause a reaction between this rod and the water. The most common complaint associated with the anode rod is one of a "rotten egg smell". This odor is derived from hydrogen sulfide gas dissolved in the water.
Troubleshooting Guide Leakage Checkpoints Use this guide to check a "Leaking" water heater. Many suspected "Leakets" are not leaking tanks. Often the source of the water can be found and corrected. A CAUTION Read this manual first. Then before checking the water heater make sure the gas supply has been turned "OFF", and never turn the gas "ON" before the tank is comp etely fu of water.
Notes 31
POWER MISER 8 POWER GAS WATER HEATERS TM MODEL 153.335803 "O VENT NUMBERS: 153.335814 40 Gal. High Altitude 40 Gal. 153.335815 40 Gal. 153.335844 153.335861 40 Gal. High Altitude 40 Gal. L.E 153.335903 153.335914 50 Gal. High Altitude 50 Gal. 153.335915 50 Gal. 153.335941 153.335961 50 Gal. High Altitude 50 Gal. L.P. L.P. 0 50 L.P.
"U Model KEY NO. 1. 2. k_ 153.335803 153.335814 153.335815 9001957 9001957 9O01957 9001957 9OO1993 9001993 9001993 9001993 PART DESCRIPTION Vent Cap w/Screen Wall Collar Numbers 9001957 9001993 153.335915 153.335941 9001957 9001993 9O01957 9OO1957 9001957 9001957 9001993 9001993 9001993 9001958 9001958 9O01993 9OO1958 9OO1959 9001960 9001961 9000736 9001962 9001963 9001699 9000734 9000071 42-33085 IB 3. 4.
POWER MISER** 8 POWER GAS WATER HEATERS MODEL "U VENT NUMBERS: 153.335803 153.335814 40 Gal. High Altitude 40 Gal. 153.335815 40 Gal. 153.335844 153.335861 40 Gal. High Altitude 40 Gal. L.E 153.335903 153.335914 50 Gal. High Altitude 50 Gal. 153.335915 50 Gal. 153.335941 153.335961 50 Gal. High Altitude 50 Gal. L.P. O L.P. t L.
"€ Itl Model KEY t.#0 kii 153.335803 153.335814 153.335815 153.335844 Numbers 153.335861 153.335903 153.335914 153.335915 153.335941 153.335961 NO. PART DESCRIPTION 26. 27. Thermocouple* Lower Manifold 42-9231 9001987 42-9231 9001987 42-9231 9001987 42-9231 9002143 42-9231 9002143 42-9231 9001988 42-9231 9001988 42-9231 9001988 42-9231 9002144 42-9231 9002144 28. Manifold Cover 9001209 9001209 9001209 9001209 9001209 9001209 9001209 9001209 9001209 9001209 29.
Warranty a.Adjusting thermostat. b. Lighting pilot. c. Leaksin pipes or fittings. d. Improper venting e. Condensation About Your Warranty THE PRICE OF YOUR WATER HEATER DOES NOT INCLUDE A FREE CHECKUP SERVICE CALL. On Water Heater lnstalations Arranged BySears,Searswarrants the installation. ON INSTALLATIONS NOT MADE BY SEARS AUTHORIZED CONTRACTORS: 1. YourSearswarranty appliesto the product only. 2. Searsdoes not warrant the installation. 3.