LOW PRO ILE Model No. 831.297662 Serial No. The serialnumber isfound in the location shownbelow.Write the serialnumberin the spaceabove for future reference. TREADM ILL _AY I 2 lgg7 Serial Number Decal E Q u i P M E I-I T HELPLINE! 1-800-736-6879 USER'S MANUAL SEARS, ROEBUCK AND CO.
TABLE OF CONTENTS IMPORTANT PRECAUTIONS ................................................................. BEFORE YOU BEGIN ....................................................................... ASSEMBLY ............................................................................... OPERATION AND ADJUSTMENT ............................................................. HOW TO FOLD AND MOVE THE TREADMILL .................................................. TROUBLE-SHOOTING ......................................
The decals shown below have been placed on your treadmill, if a decal is missing, or if it is not legible, please call our toll-free HELPLINE to order a free replacement decal (see the back cover of this manual). Apply the decal in the location shown. ,_WARHIHG! • Never allow children to play on or around treadmill. • Storage latch must be fully engaged before treadmill is moved or stored.
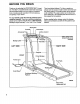
BEFORE YOU BEGIN Thank you for selecting the PROFORM e 585 TL treadmill. The 585 TL treadmill blends advanced technology with innovative design to let you enjoy an excellent form of cardiovascular exercise in the convenience and privacy of your home. For your benefit, read this manual carefully before using the treadmill. If you have additional questions, please call our toll-free HELPLINE at 1-800-736-6879, Monday through Saturday, 7 a.m. until 7 p.m. Central Time (excluding holidays).
ASSEMBLY Assembly requires two people. Set the treadmill in a cleared area and remove the packing matedals. Do not dispose of the packing matedals until assembly is completed. Assembly requires the Included allen wrench |,a phillips screwdriver (not Included). _====(Z_), two adjustable wrenches _ Refer to the drawing on page 4 and Identify the right slde of the treadmill.
Locate the section HOW TO FOLD THE TREADMILL FOR STORAGE on page 10. Follow the instructions to fold the treadmill. Thread two more Handrail Bracket Screws (128) into the right Handrail Bracket (42) and Frame (83). Firmly tighten all four Screws in the Bracket. Thread two more Screws into the left Handrail Bracket and Frame (not shown). Firmly tighten all four Screws in the Bracket. 6. Refer to HOW TO LOWER THE TREADMILL FOR USE on page 11. Follow the instructions to lower the treadmill.
OPERATION AND ADJUSTMENT THE PERFORMANT LUBE TM WALKING BELT Your treadmill features a walking belt coated with PERFORMANT LUBE TM, a high-performance lubricant. IMPORTANT: Never apply silicone spray or other substances to the walking belt or the walking platform. They will deteriorate the walking belt and cause excessive wear, electric shock. This product is equipped with a cord having an equipment-grounding conductor and a grounding plug.
DIAGRAM OF THE CONSOLE Monitor Displays _ "/" i .... '4,'.,......'',.,_,_"'''''_'" ::..-...::::::.::::: ":.:_':£_:?Z': ..... ;"_" b._ _:_:::_: ,_';Z:_ SLOW Cool-.down _._:;: TRAiNiNG ZONES :::: FAT BURN _ o[ _4'r .J.L._ I ml SPEED J=" 1"_ ; CALS. I FAT CALS. I PULSE /11_ q_ THUMB _ PULSE SPEED RESET l"s-'2 KEY "ETa'3 RES SET fr_,_t_t_4_l, ttp. / Pulse Sensor Speed Control / Incline Switch Clip ,, STEP BY STEP CONSOLE OPERATION Insert the key fully Into the power switch.
B Reset the speed control. Slide the speed control down to the RESET position. Note: Each time the walking belt is stopped, the speed control must be moved to the RESET position before the walking belt can be restarted. e'lu_rmar_a.'.'::: AeIZIW_::::. °'::::::::.: ":::::::::' ....... ".':::::P./A#;_::::.'::" .7".::::::.7:" :::.\'::.'::." .\'\\',':.:" .'*':.;;T •i-i'i-i-i-i !'i+."/ wa_,._ Cool.dewn _"i:.:i_ _::i'i",SLOW _':,+. TRAININO ;:: "::: zones ::.'i :"i" speeo Start the walking belt.
Changethe inclineof thetreadmill,if desired. B hen you are finished exercising, walking belt and remove the key. stop the To increase or decrease the incline, hold down the top or bottom of the incline button. Important: Do not change the Incline of the treadmill by placing obJects under the treadmill. Change the Incline only as described above. POWER INCUNE V Important: Before folding the treadmill, adjust the incline to the lowest position.
2. Moveyourrighthandtothepositionshownandholdthe treadmillfirmly.Raisethetreadmilluntilthestoragelatch closesover the frame guide. Make sure that the storage latch closes fully over the frame guide. To protect the floor or carpet from damage, place a mat under the treadmill. Keep the treadmill out of direct sunlight. Do not leave the treadmill in the storage position In temperatures above 85 ° Fahrenheit.
TROUBLE-SHOOTING Most treadmill problems can be solved by following the simple steps below. Find the symptom that applies, and follow the steps listed, if further assistance is needed, call our toll-free HELPLINE at 1-800-736. 6879, Monday through Saturday, 7 a.m. until 7 p.m. Central Time (excluding holidays). 1. SYMPTOM: THE POWER DOES NOT TURN ON a. b° c, Make sure that the power cord is plugged into a surge protector, and that the surge protector is plugged into a properly grounded outlet.
5. SYMPTOM: THE TREADMILL SITS UNEVENLY ON THE FLOOR a. Make sure that the six base pads are attached to the treadmill (see assembly step 2 on page 5).
CONDITIONING GUIDELINES accessible carbohydrate calories for energy. Only after the first few minutes does your body begin to use stored fat calories for energy. If your goal is to bum fat, adjust the speed and incline of the treadmill until your heart rate is near one of the lower two numbers in your training zone. It may also be helpful to set the speed control on the console to FAT BURN to help you maintain the proper intensity level. (See page 9.
A Cool-down Exercise Frequency Finish each workout with 5 to 10 minutes of stretching to cool down. This will increase the flexibility of your muscles and will help to prevent post-exercise problems. To maintain or improve your condition, complete three workouts each week, with at least one day of rest between workouts. After a few months of regular exercise, you may complete up to five workouts each week if desired.
II I REMOVE HIS EXPLODED DRAWING AND PAR LIST FROM HE MANUAL Save this EXPLODED DRAWING and PART LIST for future reference. IHIIIII Note: Specifications are subject to change without notice. For information about ordering replacement parts, see the back cover of the User's Manual.
EXPLODEDDRAWINGmModelNO.831.297662 Ro_97A lol 66* 41 3 62 88 1; 59 6O 95 84 100 ,\ 15 92 \ 130 19 3 28 27 34 39 98 83 15 1 10 16 16 72 77 46 17 14 43.
PART LISTmModel No. 831.297662 Key No. Part No. Qty.
The model number and serial number of your PROFORM ®585 TL treadmill are listed on a decal attached to the frame. See the front cover of this manual to find the location of the decal. Model No. 831.297662 QUESTIONS? All replacement parts are available for immediate purchase or special order when you visit your nearest SEARS Service Center. To request service or to order parts by telephone, call the toll-free numbers listed at the left.