
Installation Guide
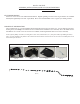


WALL MOUNT
Figure B
Figure C
Your shade can be installed against a wall (Fig B) or against a ceiling/overhang (Fig C).
Your shade is already prepared for a wall
mount, with the crank on the right side
of the shade. If you need to prepare your
shade for a ceiling mount, or if you need
to move your crank to the left side of the
shade, please refer to the last page of this
manual.
CEILING MOUNT
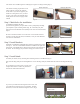
Step 1: Mark holes for installation
An installation template has been
provided to help position your pilot holes. Start by temporarily attaching
your template to your mounting surface (Fig. D). Then drill your pilot
holes in the four marked dark zones (ideally in the center of each dark zone)
(Fig E).
Figure EFigure D
Be sure to mount the brackets to a wood stud. If a wood stud cannot be
located, an anchor must be used (not included). Visit your local hardware
store for more information.
Step 2: Install brackets
Install the Crank Bracket and Plug Bracket with the provided wood screws
(see Fig. F). Note: the Crank Bracket should be installed on the right side
of the shade. The Plug Bracket is designed to be placed on the left side of
the shade. See the last page if you need to change your crank location.
Figure F
Step 3: Install shade
To install your shade, start by attaching the Crank Plug into the Crank Bracket (Fig G).
Next, slide the Plug with pin into the Plug Bracket. Note: the Plug (with pin) should slide and click into the Plug Bracket (Fig
H).
Figure G Figure H
Figure I
Push brackets in, towards shade
to reduce slack
If your shade moves side-to-side, you may want
to adjust the brackets to reduce any movement
between the shade and the brackets.
To prevent your shade from moving from side-to-side, roll
your shade down and loosen the screws slightly. Push the
brackets in, towards the shade and retighten screws. (Fig I)