
Installation Guide


Ceiling Mount or Left Crank Operation (or both)
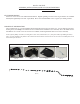
Figure J
Figure K
Figure N
Figure O
Figure P
Figure Q
Figure L
Figure M
WALL INSTALL, CRANK RIGHT
WALL INSTALL, CRANK LEFT
CEILING INSTALL, CRANK LEFT CEILING INSTALL, CRANK RIGHT
Your shade is prepared for a wall installation, with the Crank Bracket on the right side of the
shade. See Figure J for the default bracket conguration.
If you require the Crank Bracket on the left of the shade, or if you require a ceiling installa-
tion (or both), you will need to make a small change to your brackets.
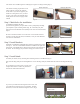
To change your brackets, remove both Bracket Covers (Fig K). Remove the 2 screws from the Crank Bracket (Fig L) and the 3
screws from the Plug Bracket (Fig M).
After removing the screws from both brackets, rotate the hardware to match your install type (Figures N, O and P below).
(DEFAULT SETUP)
Important: if you move your Crank Bracket to the left side of your shade, you will need to remove and reverse the locations of your
Crank Plug and Plug with Pin to match the corresponding bracket. These plugs are pre-installed inside of your top tube
(not illustrated).
If you move your crank to the left of the shade, you will need to change the roll direction of your fabric to prevent the fabric from
interfering with the crank ring. To reverse the roll direction of your fabric, simply roll the shade down completely. After the fabric
is completely lowered, continue rolling the shade...it will roll itself up in the opposite direction.
Maintenance
To clean your shade, rinse with water and scrub with any non-abrasive cleaner (using bleach or other abrasive cleaners will void
your warranty). Roll shade down to air dry.
303.652.6164 (p) M1034
www.shadeinfo.com
Securing your shade
Your shade has Bottom Rail Rings pre-installed on the Bottom
Rail. These rings can be used to secure your shade during slightly
windy conditions. You may use a screw, nail, S-hook, or any
other device to secure your shade. (Fig Q)