
Installation Guide

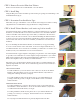

STEP 6: Assemble Pole
To assemble your pole, slide the Pole-Mid Piece onto
the Pole-Long Piece, making sure the holes are point-
ing towards the handle (Fig L). en, slide the Pole-
Handle Piece into the Pole-Mid Piece .
Insert the Pole Screws into the Pole-Mid Piece and
completely tighten (these screws are located in your
pole package). Note: Not all of the Pole-Long Piece is
shown in (Fig L).
To use the pole simply insert the hook into the Ring
and turn the Pole-Handle Piece.
Fig L
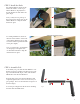
STEP 5: Install the Shade
For wall installations, rst hook the
back of the Valance on the top of
Valance Brackets (Fig H), then ro-
tate the shade down and click it into
place (Fig I).
Note: you may need to push up on
the spring-loaded plastic tabs on the
Valance Brackets to help the shade
click it into place.
Fig H Fig I
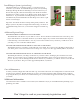
For ceiling installations, rst hook
the back of the Valance on the back
of the Valance Brackets (Fig J), then
rotate the Valance upwards and click
it into place (Fig K).
Note: you may need to push inwards
on the spring-loaded plastic tabs
on the Valance Brackets to help the
shade click it into place.
WALL INSTALLATION
CEILING INSTALLATION
Fig J Fig K
3