
Installation Guide

Ceiling Mount Bracket Adjustment (optional step)
By default, your shade is prepared for a wall installation (Fig L). If you require a
ceiling installation you will need to make a few small changes to your brackets.
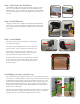
To change your brackets, begin by removing your bracket covers (Fig M). Remove the
2 screws from the Crank Bracket (Fig N) and the 3 screws from the Plug Bracket
(Fig O).
After removing the screws from both brackets rotate the hardware to match the Ceiling
Installation conguration (Fig P)
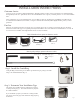
Wall Installation (Default)
Figure L
Figure M
Figure N
Figure O
Figure P
Ceiling Installation
Change the roll direction of your shade
The default fabric roll direction of your shade is “reverse”. That is, the fabric rolls from the back side of the top tube. If you want
the fabric to roll from the front side of the top tube, simply roll your shade down until it rolls itself back up on the other side of the
shade. If you reverse the roll of your fabric, you will need to move the Ring so it does not interfere with the fabric (see below).
Moving the ring from the front to the back of the shade
The default placement for your Ring is in the front of your shade. That is, the Ring
is placed near the front of the fabric roll. If you reversed the roll of your fabric, we
recommend that you change the location of your Ring.
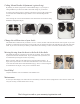
Before you begin, make sure the shade has been removed from the brackets. To
begin, remove your bracket cover from the Crank Mechanism. Then remove the two
screws from the outside of the Crank Mechanism (Fig Q). Then, reverse the Ring and
re-sinstall the Screws (Fig R). Now you can re-install the shade.
Figure Q Figure R
Maintenance
To clean your shade simply rinse with water and scrub with any non-abrasive cleaner (using bleach or other abrasive cleaners will
void your warranty). Roll the shade down to air dry.
303.652.6164 (p) M1033
www.shadeinfo.com
Don’t forget to send us your warranty/registration card.
Need Help?
Complete installation video is available at www.shadeinfo.com
Pg. 3