
Installation Guide


Important: Do Not Cut the Antenna
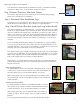
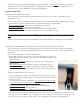
Your shade has an antenna that allows the Remote Control to communicate with the
shade motor. Please do not cut the antenna (see antenna in Fig A).
Step 2: Determine Your Installation Type
WALL INSTALLATION
For wall installations, if there is a ceiling that overhangs the shade, you need
to allow at least 1 inch (2.54 cm) of clearance above the Valance Bracket to
allow the Valance to hook onto the Valance Bracket. See (Fig D).
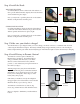
Make sure the plastic tabs on your Valance Brackets are pointing towards
the ground (Fig E). Use the 1.2 inch Valance Bracket screws to install your
Valance Brackets.
CEILING INSTALLATION
For ceiling installations, if there is a wall behind the shade, you need to
allow at least 1 inch (2.54 cm) of clearance behind the Valance Bracket
to allow the Valance to hook onto the Valance Bracket. See (Fig F).
Make sure the plastic tabs on your Valance Brackets are pointing out,
towards you (Fig G). Use the 1.2 inch screws to install your Valance
Brackets.
It is very important that all brackets are perfectly aligned with each other.
Wall Installation
Ceiling Installation
Fig A
Fig B
Fig C
Fig F Fig G
Fig D
Fig E
Your shade is shipped with a protective lm to prevent scratching during shipping.
Please remove this lm prior to installation.
2
Plastic tab
Plastic tab
1’’ or more
1’’ or more
Step 1: Remove Protective Film from Valance
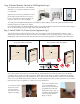
Determine your type of installation. Your sun shade can be hung from a wall or a ceiling.
(Fig B) illustrates a wall installation, (Fig C) illustrates a ceiling installation.
Step 3: Install Valance Brackets (read entire step before install)
Your shade includes three (3) Valance Brackets, you must install at least two (2) of them.
Install one (1) Valance Bracket near each end of the shade. Note: the Valance Brackets
cannot be installed on the extreme edges of the shade, you will need to allow at least 2
inches (5 cm) at the ends of each side. We recommend installing the Valance Brackets
on the closest stud to each end of the shade, remembering to allow at least 2 inches (5
cm) from each end. If wood studs are not available, you will need to use anchors (not
included).
If you are installing the third Valance Bracket (recommended), we suggest installing
it on a wood stud near the center of the shade. It needs to be aligned with the two (2)
end Valance Brackets. If wood studs are not available, you will need to use anchors (not
included). Visit your local hardware store for more information.
Your shade includes a paper template to help align your pilot holes. Use of the template
is optional, but recommended. To use the template, temporarily adhere to your surface.
Make sure the template is at, level and unwrinkled before adhering it to your surface.
Remove the template before you install your Valance Brackets.
Important note: your shade will not install correctly unless your Valance Brackets are
perfectly aligned with each other. We recommend using a laser level (not included) to
align the screw holes.