
Installation Guide


Step 4: Install the Shade
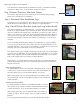
WALL INSTALLATION
For wall installations, rst hook the back of the Valance on
the top of the Valance Brackets (Fig H), then rotate the shade
down and click into place (Fig I).
Note: you may need to push the plastic tabs on the Valance
Brackets to help the shade click into place.
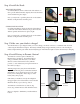
CEILING INSTALLATION
For ceiling installations, rst hook the back of the Valance
on the back of the Valance Brackets (Fig J), then rotate the
Valance upwards and click it into place (Fig K).
Note: you may need to push the plastic tabs on the Valance
Brackets to help the shade click into place.
Step 5: Make sure your shade is charged
Your shade battery is pre-charged. When you need to charge your shade, connect it to a standard 110V electrical
outlet using the included AC adapter. e battery will fully charge in approximately 3-4 hours. e AC adapter
indicator light will turn green when shade is fully charged. If the indicator light is red, the shade battery is charging.
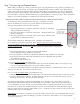
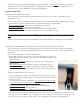
Step 6: Install Battery in Remote Control
Your Remote Control requires a CR2430 (3V)
lithium battery (included). To install the Battery,
using your thumb, slide the battery cover o the
Remote Control and insert the battery with the
positive (+) side of the battery facing the backside of
the remote (see Fig L).
Warning: Keep battery away from small chidlren
or pets. If swallowed, please seek medical attention
immediately. Do no throw battery into a re. is
battery is not rechargeable. Please dispose of this
battery safety and properly.
If the battery is installed correctly, the red light in
the upper right corner of the Remote Control should
illuminate when you press the stop button.
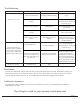
Your Remote Control has ve (5) buttons, Up,
Down, Stop, channel increase and channel decrease.
Please see (Fig M) to familiarize yourself with these
buttons.
Fig H
Fig I
Fig J
Fig K
Fig M
Fig L
3
Up
Down
Channel
Increase
Channel
Decrease
Stop
Top of Remote
Channel 1
Channel 2
Channel 5
Channel 4
Channel 3