
Installation Guide


Step 8: Mount Remote Control to Wall (optional step)
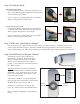
Step 9: Install Cable Tie Down System (optional step)
Your shade includes a Cable Tie Down System to keep your shade secured during mild wind conditions. If you
will be using your shade indoors and do not plan to use the Cable System, you can skip this step. If you intend on
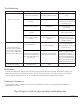
installing the Cable Tie Down System, rst determine if your particular application is suitable for the Cable System.
If you cannot anchor the bottom of your Cable directly underneath the point where the Cable enters the Valance
(see Fig R), then you will not be able to use the provided Cable system. Please see (Fig R) for illustrations showing
appropriate and inappropriate Cable installations. If you cannot use the Cable System, you will need to nd another
way to secure your shade during windy conditions. We oer a Bungee Tie Down System for purchase on our website
that may better suit your application. Contact us for more information.
Fig O Fig P
Fig Q
Acceptable Cable Installation Unacceptable Cable Installation
Fig R
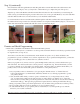
To install your Cable
Tie Down System,
start by screwing
the Cable into your
Valance (See Fig S).
Next, roll your Fabric down
to your desired Bottom
Limit (if you haven’t already
programmed your Bottom
Limit, please refer to Step 6)
and make a horizontal mark
below both Bottom Tube
Plugs (see Fig T).
Fig S
Fig T
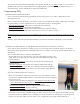
Your shade includes a Remote Control Holder
that allows you to mount your Remote Control
to a wall/beam.
Important: if you mount your Remote Control,
please make sure the remote is in a covered
location. e Remote Control should not be
exposed to rain, snow or direct sunlight.
5
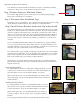
To install, place the Holder Bracket against the installation surface with the narrow side against the wall/beam and
install it using the two Small Screws (Fig O).
Next, slide the Holder onto the Holder Bracket (Fig P). Now slide the Remote Control into the holder bracket (Fig Q).
Note: e holder bracket may have sharp edges, please handle with care.