
Installation Guide
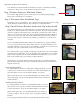
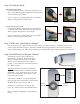


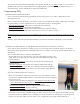

Next, thread the Cable through the Bottom Tube Plug and make a vertical mark where the Cable intersects the
horizontal mark (see Fig U). Note: you may need to roll the Fabric up to complete this part of the process.
Align the top of the Cable Bracket with the horizontal line and centered on the vertical line you created using the
Cables (see Fig V) and install using the provided 1 inch Screws (two screws per Cable Bracket). Note: the Cable Bolt
and Cable Bolt Nut will need to be removed before you can install the Cable Bracket.
Loosen the Bracket Lock Screw and thread the Cable through the Cable Bolt. Pull the Cable taut and tighten both
the Cable Bolt Nut using a wrench (not included) and Hex Lock using the included Hex Key (Fig W). Cut any excess
Cable slack underneath the Cable Bracket with wire cutters (not included) (Fig X).
Step 9: (continued)
Fig U Fig V Fig W
Fig X
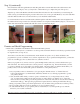
Remote and Shade Programming
USING ONE (1) REMOTE TO OPERATE MULTIPLE SHADES (optional)
If you have not already done so, remember to set the top and bottom fabric limits for each shade you purchased (with
its original remote, see step six (6)).
Your remote control has ve (5) usable channels. Each channel can operate one (1) shade. All shades come
programmed to operate on channel one (1) of their original remote. If you purchased multiple shades, you have the
option of controlling up to ve (5) shades with one (1) Remote Control.
Before you program one (1) remote control to operate multiple shades, make sure you know which remote goes
with each shade. You must have all remote controls present to complete this step. Decide which shade you want
to operate on channel one (1), this will be your primary shade. e remote that goes with this shade will be your
primary remote. Your other shades will operate on channels 2-5 of the primary remote.
1. Put your primary remote on channel two (2) by pressing the “channel increase” or “channel decrease”
button until channel two (2) is illuminated (remember, channel one (1) is already programmed to operate
your primary shade).
2. Next, determine which shade you want to operate on channel two (2) (on the primary remote). is is
your secondary shade. Make sure the remote for the secondary shade is on channel one (1). Using the
remote for the secondary shade, press the Program button on the back of the remote once (the motor will beep
and the fabric will jog). en press the program button again (the motor will beep and the fabric will jog).
3. Using your primary remote, press the Program button once, the fabric will jog and the motor will beep 7 times.
4. Your secondary shade now works on channel two (2) of your primary remote.
5. To add additional shades, set your primar y remote on channel 3, 4 or 5, and rep eat this process with the
remote for your 3rd, 4th or 5th shade.
All buttons must be pressed within 10 seconds of each other or the motor will return to normal operation mode.
6