
Operating instructions


- 13 -
Burner Overhaul
A 2 burner stove takes about 1 ½ hours to complete a factory authorized overhaul. The
procedure for those wishing to perform this maintenance themselves is as follows:
1. Start by completely removing all fuel from the tank, then remove the burner assembly by
following these steps.
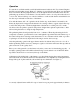
2. Remove the pin in the stem of each heat control (see figure 2) to disengage the control shaft
from the burner.
3. After pulling out the control shaft, remove the fuel pipe connected to the base of the burner.
4. Next remove the burner from its base and position it upside down in a vice. Clamp the vice
jaws on the lower burner body. For models having an internal sintered filter, use an 11/64”
drill bit and bore into the exact center of the filter element to a depth not exceeding 5/8”.
Don’t go any deeper as this could damage the burner assembly beyond repair. From time to
time as you drill, remove the burner from the vice and attempt to tap the filter element out of
the burner base.
5. After it has been removed carefully clean out all foreign particles from the base of the burner.
Be sure nothing remains in there that could eventually clog the jets or nozzle.
6. If the burner is to be completely overhauled while it is apart, remove the outer burner cap on
top by prying up with the corner of a screwdriver, then lift off the inner burner cap.
7. Now you may unscrew the burner nozzle. An exact fitting wrench is recommended.
8. Remove the cleaning needle that is now visible, by turning the burner valve spindle counter
clockwise. This will disengage the gear teeth of the cleaning needle from the valve spindle.
The cleaning needle will now drop out if the burner is turned upside down.
9. Next, unscrew the gland nut from the burner body using a 3/8” wrench, and then turn the
burner valve spindle counter clockwise until its threads disengage from the burner body. At
this point the spindle can be pulled out. The internal packing and washers will come out with
the valve spindle.
10. You are now ready to install the new filter and any other parts required for the overhaul.
Make sure the burner is free from foreign matter inside before pushing the new filter into the
burner base. The new filters are rolled screen which fits quite snugly in the space formerly
occupied by the sintered filter.
11. To install a new valve spindle insert it into the burner and screw it in as far as it will go. The
gear on this valve spindle should show all the way across one side of the top hole in the
burner body.
12. Push in the washers and packing following the same sequence as in the original and re-install
the gland nut. Rotate the control stem back and forth while tightening the gland nut until the
packing is sealed and a slight but definite resistance can be felt when turning the control
stem.
13. Installation of a new cleaning needle is accomplished in the following manner. Turn the
control stem clockwise until the burner is closed and the needle valve is seated. Then put the
cleaning needle into the top of the burner with the needle point up and the teeth facing the
gear on the valve spindle.
Rotate the burner control knob very slowly in a counterclockwise direction while lightly
pushing the cleaning needle down into the burner. The lowest rack tooth will be resting