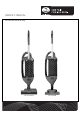
OWNER’S MANUAL For Household Use Only FELIX Premium FELIX Kombi 10
TABLE OF CONTENTS Technical Details Important Safety Instructions Special SEBO Product Features S-Class Filtration Bag Full or Clog Warning – Auto Shut-Off FELIX Flexibility Identification of Parts Assembly Optional Attachments Standard Attachments Power Heads and Floor Tools Operating Instructions Starting the Machine Operating the Machine Suction Control Using the Hose Handle & Attachments Detachable Suction Unit Additional Operating Instructions for FELIX Premium with ET Power Head The Brush Height Adjus
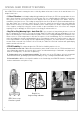
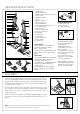
IMPORTANT SAFETY INSTRUCTIONS READ ALL INSTRUCTIONS BEFORE USING THIS MACHINE ! When using an electrical appliance, basic precautions must always be followed. To reduce the risk of electric shock, this vacuum cleaner has a polarized plug; one blade is wider than the other. This plug will fit in a polarized outlet only one way. If the plug does not fit fully in the outlet, reverse the plug. If it still does not fit, contact a qualified electrician to install the proper outlet.
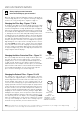
SPECIAL SEBO PRODUCT FEATURES Your SEBO FELIX vacuum is among the most technically advanced vacuum cleaners in the world. Some of its unique features are: • S-Class Filtration. Certified by leading Allergy foundations in Europe, the FELIX vacuum provides the user with S-Class filtration of 99.9% of particles to 0.3 microns. This is accomplished by the SEBO three-step filtration system. First, the three-layer full-size filter bag (A) collects the vast majority of the debris.
IDENTIFICATION OF PARTS 12 1. Handle grip 2. Upper cable hook 3. On/Off switch, power control slider 4. Power cable 5. Handle Assembly 6. Hose 7. Bag full indicator 8. Filter bag cover 9. Filter bag housing 10. Filter bag housing release latch 11. Carrying handle 12. Exhaust filter 13. Filter retaining rings 14. Tool release button 15. Foot pedal 16. Power head 17. Cable hook 18. Suction opening 19. Hose handle 20. Swivel neck 11 Power Heads 18 19 16.
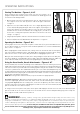
OPERATING INSTRUCTIONS Starting The Machine - Figures 3, 4 & 5 Before turning on your vacuum cleaner, make sure that the vacuum is in its upright locked position and that you have a firm hold on the handle grip to keep the machine from moving forward. 4 1. With the power switch (3) in the OFF position, turn the cable hook (17) to the left or right to release the cable (4). Lift the cable off the upper cable hook see figure 3. 2.
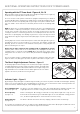
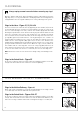
ADDITIONAL OPERATING INSTRUCTIONS FOR ET POWER HEADS Operating with the ET Power Head - Figures 8, 9 & 10 When the power head is on with the handle in the upright locked position (see figure 8), the brush roller on your ET power head will not spin. To release the ET-1 or ET-2 power head from the upright locked position, press down on the foot pedal (#15, figure 9) and lower the handle into the normal operating position.
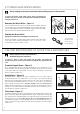
ET POWER HEAD MAINTENANCE ! Always unplug vacuum from outlet before dismantling any part of the machine! To remove the power head, switch off the power and unplug the vacuum. Then, press the tool release button (12) and pull the vacuum out of the swivel neck. 36 37 Removing the Brush Roller - Figure 12 To remove the brush roller, press the button marked “PRESS” (36) and turn the brush roller end cap (37) downward. Turn the brush (38) slightly to the right and pull it out.
VACUUM MAINTENANCE ! Always unplug vacuum from outlet before dismantling any part of machine! 7 When the “bag full” indicator (7) displays, airflow is reduced due to a full filter bag, dirty filters, or a clog. If the filter bag is empty and the filters are clean, you may have a clog. Refer to page 10. Changing the Filter Bag - Figures 17 & 18 To change the filter bag, set the canister upright, open the filter bag cover (8) by pulling the cover release flap (10) upward (figure 17).
CLOG REMOVAL ! Always unplug vacuum from outlet before removing any clogs! When the “bag full” indicator (7, figure 21) displays, airflow is reduced due to a full filter bag, dirty filters, or a clog. If the indicator is still displayed after the filter bag has been changed and the filters are in good condition, there is likely a blockage in the system.
TROUBLE-SHOOTING GUIDE ! Always unplug vacuum from outlet before dismantling any part of the machine! PROBLEM REASON SOLUTION Does not turn on 1. Not plugged into working outlet. 1. Use another outlet. 2. Cable worn. 2. Replace cable. 3. The power control slider switch is set to the“OFF” position. 3. Slide slider switch to “ON” position. See page 6. 1. Bag full. 1. Replace filter bag. See page 9. 2. Clog in hose, swivel neck, brush or head 2. See Clog Removal on page 10. 3.
ADDITIONAL TROUBLE-SHOOTING GUIDE FOR ET POWER HEADS ! Always unplug vacuum from outlet before dismantling any part of the machine! PROBLEM REASON SOLUTION Does not turn on 1. The switch on the power head is off. 1. Press the power head brush on/off switch. See page 7. 2. The internal switch in the swivel neck is off because the machine is in the upright locked position. 2. Release the foot pedal and lower the telescopic tube to operating level. See page 7. 1. Brush worn. 1. Replace brush.
FELIX PREMIUM / KOMBI - ICE BLUE #9806 AM #9813 AM #9824 AM FELIX PREMIUM (White/Blue) - 12 inch FELIX PREMIUM (White Blue) - 15 inch FELIX KOMBI (White/Blue) - 12 inch Bag Housing with Handle White/Blue Machine Pos.
FELIX PREMIUM - ICE BLUE # 9806 AM 14 FELIX PREMIUM (White/Blue) - 12 inch Powerhead - 12 inch White Machine Pos.
FELIX PREMIUM - ICE BLUE # 9813 AM FELIX PREMIUM (White/Blue) - 15 inch Powerhead - 15 inch White Machine Pos.
FELIX PREMIUM / KOMBI - FUN # 9803 AM # 9825 AM FELIX PREMIUM (Orange/Purple) FELIX KOMBI (Orange/Purple) Bag Housing with Handle Orange/Purple Machine Pos.
FELIX PREMIUM - FUN # 9803 AM FELIX PREMIUM (Orange) Power Head Orange Machine Pos.
FELIX PREMIUM / KOMBI - CLASSIC # 9804 AM # 9826 AM FELIX PREMIUM (Ivory/Plaid) FELIX KOMBI (Ivory/Plaid) Bag Housing with Handle Ivory/Plaid Machine Pos.
FELIX PREMIUM - CLASSIC # 9804 AM FELIX PREMIUM (Ivory) Power Head Ivory Machine Pos.
SEBO VACUUM CLEANER WARRANTY Five Years Motor - Three Years Non-Wear Parts - One Year Labor 1. 2. Your authorized SEBO dealer or SEBO will provide the original product purchaser with replacement of NonWear Parts which fail due to a material or workmanship defect for a period of three (3) years from the original date of purchase of new product. SEBO America will provide a five (5) year warranty on suction motors and brush drive motors.