OWNER’S MANUAL For Household Use Only
TABLE OF CONTENTS Technical Details Wiring Diagram Important Safety Instructions Special SEBO Product Features Brush Roller Obstruction – Auto Shut-Off Bag Full or Clog Warning – Auto Shut-Off Brush Roller Deterioration Warning S-Class Filtration Optional Attachments, Accessories, Bags & Filters Identification of Parts Standard Attachments Optional Attachments Assembly Operating Instructions Starting the Machine Operating Positions Using the Attachment Tube, Hose & Attachments The Display Panel The Height A
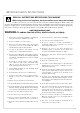
IMPORTANT SAFETY INSTRUCTIONS ! READ ALL INSTRUCTIONS BEFORE USING THIS MACHINE When using an electrical appliance, basic precautions must always be followed. To reduce the risk of electric shock, this vacuum cleaner has a polarized plug; one blade is wider than the other. This plug will fit in a polarized outlet only one way. If the plug does not fit fully in the outlet, reverse the plug. If it still does not fit, contact a qualified electrician to install the proper outlet.
SEBO ESSENTIAL G PRODUCT FEATURES SEBO Vacuums Save Money! – SEBO vacuums are the highest quality machines available. In fact, if properly maintained, SEBO vacuums can save ordinary residential users hundreds of dollars by providing excellent performance for ten to fifteen years or more. Typical vacuums perform poorly and usually do not last beyond two years. So, in the long run, SEBO vacuums cost less money than the five to six other vacuums purchased during that time period.
Two Power Head Widths – The ESSENTIAL G1 is 12 inches wide, with a cleaning width of 10 ½ inches. The ESSENTIAL G2 is 15 inches wide, with a cleaning width of 13 ¼ inches. Both heads have one-sided edge cleaning. Soft Start Feature – The vacuum’s gradual power-up capability extends motor life. Combination Carrying Handle with Rotating Cord Hook – The vacuum is easy to carry, or quickly unwind the cord, using its unique handle with integrated rotating cord hook. G1 G2 A Flat-to-the-floor, 5.
IDENTIFICATION OF PARTS 1. Handle grip 2. On/Off switch 3. Handle assembly 4. Retaining ring 5. Cover release flap 6. Dust bag housing 7. Front cover 8. Housing release button 9. Power head with brush 10. Cable (cord) 11. Attachment tube handle 12. Attachment hose 13. Carrying handle 14. Cable (cord) hook 15. Attachment tube (active wand) 16. Crevice nozzle 17. Upholstery nozzle 18. Pile adjustment knob 19. Foot pedal 20. Swivel neck 21. Support lever 22. Handle release catch 23. Projection tab 24.
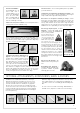
OPERATING INSTRUCTIONS Starting The Machine - Figures 1 & 2 Before turning on your vacuum cleaner, make sure that the vacuum handle is in its upright locked position and that you have a firm hold on the handle grip to keep the machine from moving forward. 14 1. Turn the quick release cable hook (14) to the up position by moving it to the left or right (figure 1). 2. Release the power cord plug from the power cord and lift the cord off of the upper cord hook (27 - figure 2). 3.
Using the Attachment Tube, Hose & Attachments - 1 12 Figures 4, 5 & 6 11 The attachment tube (15) is useful for vacuuming corners and hard-to-reach areas. The handle grip (1) should be in the upright, locked position (as shown in figure 4). Grip the attachment tube handle (11), pull it up and away from the machine and stretch out the hose (12) until it locks to the back of the tube (this locking action will prevent the hose from retracting back into the attachment tube while it is in use).
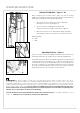
MAINTENANCE ! Always unplug vacuum from outlet before dismantling any part of the machine! Changing the Dust Bag - Figure 9 To change the dust bag, pull the cover release flap forward (#5 on page 6) and lift the cover (7) from the dust bag housing. The cover release flap must remain in a forward “pulled-out” position to change dust bags and lock them into place. Squeeze the clamps on both sides of the dust bag sealing plate (29), slide the plate from the holder (30) and push the cap on to seal the bag.
CLOG REMOVAL ! Always unplug vacuum from outlet before removing any clogs! Clogs in the Airflow Pathway - Figure 13 Most clogs can be removed by accessing the airflow pathway via the orange colored access door (39) located on the underside of the power head. However, other clogs may only be removed by accessing the airflow pathway by disassembling the machine in the opposite sequence of the machine’s original assembly (see assembly, page 6).
TROUBLE-SHOOTING GUIDE ! Always unplug vacuum from outlet before dismantling any part of the machine! PROBLEM REASON SOLUTION Does not turn on or machine shuts off intermittently 1. Handle not fully inserted into the bag housing, causing a faulty connection. 1. Release handle catch, push handle down, close handle catch. 2. Not plugged into good outlet. 2. Use another outlet. 3. Cable worn. 3. Replace cable. 4.
ESSENTIAL G1 AND G2 SCHEMATIC AND PARTS LIST Filter Bag Housing and Handle #9591AT G1 and #9592AT G2 Teal/Light Gray Machines Pos. Part # Description Handle with cable, teal, complete 1 5624AT 5296ES 2 Handle grip (incl. pos. 3, 7 & 10) 3 5359HG Grommet 4 5450DG Power supply cord 5 05113 Switch, cpl. Switch cap - teal 6 5160TK 7 5161HG Switch cap holder- light gray 8 5162 Cable clamp 0103 Screw C 3,9 x 16 9 10 5253UL Antistatic-wire, cpl.
ESSENTIAL G1 SCHEMATIC AND PARTS LIST Power Head 9591AT G1 Teal/Light Gray Machine Part # Description Pos. 100 2831AT Power head cover, complete - teal Exhaust filter 101 2846 Exhaust filter cover - teal 102 2820TK Swivel neck assembly 103 2823UL 104 2883 Male contact holder 105 2494 Cable clamp 106 0102 Screw F 3.9 x 13 107 2835 Bypass valve 108 0869 Internal cable 109 2825 Swivel neck bearing r.h. Swivel neck support r.h. 110 2824 111 5479 Swivel neck support l.h. Swivel neck bearing l.h.
ESSENTIAL G2 SCHEMATIC AND PARTS LIST Power Head #9592AT G2 Teal/Light Gray Machine Part # Description Pos. 100 2832AT Power head cover, complete - teal Exhaust filter 101 2846 Exhaust filter cover - teal 102 2820TK Swivel neck assembly 103 2823UL 104 2883 Male contact holder 105 2494 Cable clamp 106 0102 Screw F 3.9 x 13 107 2835 Bypass valve 108 0869 Internal cable 109 2825 Swivel neck bearing r.h. Swivel neck support r.h. 110 2824 111 5479 Swivel neck support l.h. Swivel neck bearing l.h.
SEBO VACUUM CLEANER WARRANTY 1. Your authorized SEBO dealer or SEBO will provide the original product purchaser with replacement of NonWear Parts which fail due to a material or workmanship defect for a period of five (5) years from the original date of purchase of new product. SEBO will provide a five (5) year warranty on suction motors and brush drive motors. 2.