
Owner`s manual


10
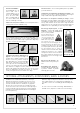
CLOG REMOVAL
Clogs in the Airflow Pathway - Figure 13
M
ost clogs can be removed by accessing the airflow pathway via the orange col-
ored access door (39) located on the underside of the power head. However,
o
ther clogs may only be removed by accessing the airflow pathway by disas-
sembling the machine in the opposite sequence of the machine’s original
assembly (see assembly, page 6).
Clogs in the Attachment Hose - Figure 14
Blockages in the hose can be cleared by removing the attachment hose (12)
from the machine by squeezing the retaining ring (4) and inserting the opposite
end of the hose in the connecting tube (24). Hold the hose upright with one hand
blocking the top end and switch on the machine. If necessary, quickly lift your
hand on and off the end of the hose. If this procedure does not clear the clog, a
straight wire can be inserted into the hose to push out the clog. Take care not
to puncture the hose with the wire.
Clogs in the Attachment Tube (Active Wand) - Figure 15
Remove attachment hose (12) from the attachment tube (15) by pressing the
hose release button (27). Then, grip attachment tube handle (11) and remove
tube from the machine. A straight wire can be inserted into the tube to push out
the clog.
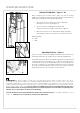
Clogs in Entrance to Dust Bag - Figure 16
Remove attachment hose (12) from vacuum cleaner (see figure 14) and remove
front cover (7). Clean out connecting tube (24) and/or entrance to bag (40).
Clogs in the Swivel Neck - Figure 17
Clogs in the swivel neck (20) can be removed by first pressing the housing
release button (8) and lifting off the dust bag housing (6). Lift upward firmly and
evenly to properly remove the dust bag housing. Then, release the foot pedal
(19), lower the swivel neck, check inside the swivel neck channel closest to the
foot pedal (see arrow), and clean out pathway.
Figure 17
Figure 14
Figure 13
Always unplug vacuum from outlet before removing
any clogs!
!
Figure 16
Figure 15
39
4
12
24
12
15
11
27
7
40
8
20
6