® OPERATING GUIDE for Secabo C30 and C40 cutting plotters Congratulations on purchasing your Secabo cutting plotter! Please read this guide carefully. It tells you how to prepare your cutting plotter for production use in a few easy steps. This guide must not be reproduced in any form without written consent from Nepata Vertrieb GmbH. Modifications and errors in technical specifications and product features reserved.
® 1. Precautions Please read these instructions and precautionary notes carefully before using the machine for the first time! • Do not place magnetic objects near the cutting head as even contact pressure cannot otherwise be guaranteed. • Do not unplug the computer connection lead while a plot is running. • Release the pressure on contact rollers when not in use by flipping the pressure levers up. • Keep your hands out of the machine while it is connected to the mains power supply.
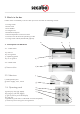
® 2. What‘s in the box Please check immediately to ensure that you have received the following articles: • Cutting Plotter • Power Lead • Knife Holder • 3 Drag Knives • Penholder and pens • Serial and parallel connection lead • CD Rom with drivers and Operating Guide • Cutting Plotter Stand (dismantled) (option) a) 3. Description of Machine b) c) 3.1. Front view a) Case lid b) Cutting head c) Operating panel d) Cut-off groove d) 3.2. Rear view e) Pressure rollers 3.3.
® 4. Installation and Test 4.1. Setting up the cutting plotter Make sure that there is enough space to allow unhindered media input and output at the front and rear of the cutting plotter. The operating environment for the cutting plotter must be clean and dry. • Attach the plotter to a 200V mains power supply using the supplied power lead. • Now switch the cutting plotter on. Caution – when the cutting plotter is switched on the cutting head automatically moves to the right. 4.2.
® As various media thicknesses require different knife settings, or even special blades, you may need to repeat the steps detailed above. 4.5. Inserting the knife holder • Start by loosening the knife holder screw on the cutting head. • Then holding the knife holder from the top, push the knife holder into the aperture at the side until it is seated properly, and tighten the retaining screw. 4.6. Loading media • Always load media for processing from the rear of the machine.
® • You can now adjust the zero point by pressing the four arrow keys. We recommend setting the zero point to the front right corner of the media. • Press the Speed key to confirm the new zero point setting. By setting the zero point, you can also target specific media positions, or avoid damaged areas of the media. 4.8. Cutting test • Press the Self Check key to perform a cutting test. • The cutting test helps you verify the knife holder setting and cutting force.
® 5. Device Settings 5.1. Changing the cutting force and speed If the cutting plotter is plotting, you need to press the Local key to stop the plotter. Pressing the Local key again will restart the plot. To change the cutting force, turn the small wheel inside the cutting plotter on the right. The force can be set in 8 steps, where the lowest setting corresponds to 70g and the highest to 350g. Recommended values for several media: normal self-adhesive media: approx. 100g Transflex media: approx.
® 6. After cutting 6.1. Removing the media • After pressing the Online key in the operating panel, you can use the arrow keys to feed the media forward and backward. To ensure clean cutting of the plotted objects, feed the media forward sufficiently to allow a clean cut at the cutting edge using a suitable knife. • If you are working with pre-cut media, simply release the pressure rollers and remove the media from the machine. 6.2. Finishing the media 6.2.1.
® 7. Drag knives Drag knives are extremely sensitive, but also extremely sharp and dangerous precision tools. • Always keep knives well out the reach of children! • To avoid danger of injury, always handle knives with caution. • Handle drag knives with caution, and always replace the protective cap when not in use. If the tip of the knife comes into contact with a hard material such as glass or stone, tiny fissures may occur at the knife tip making the knife useless.
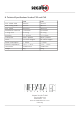
® 8. Technical Specifications Secabo C30 and C40 max. media width max. cutting width max. speed Mechanical resolution Cutting force Accuracy Connectors Drive Power consumption Ambient temperature Dimensions Weight C30 385mm 300mm 300mm/s 0,0254mm 70-350g +/- 0,1mm serial / parallel DC Micro Stepper < 120W +5°C - +35°C 55x28x24cm 9kg C40 470mm 385mm 300mm/s 0,0254mm 70-350g +/- 0,1mm serial / parallel DC Micro Stepper < 120W +5°C - +35°C 7x28x24cm 12kg Nepata Vertrieb GmbH www.secabo.com Raiffeisenstr.