NVD Bullet Cameras On-Screen Display Manual 3 Cameras in 1: Model # EV-1626-NKGQ EV-1626-NWGQ 1 /3 ” Sony Super HAD CCD 12VDC/24VAC Lens Size 2.8~12mm 6~50mm OSD with service monitor port 550 TV lines NVD Bullet Cameras have an ultra-low lux rating of 0.000006 allowing the camera to see in almost total darkness. Note: Products with model numbers that end with “Q” or that have a round green “Q” sticker are RoHS compliant.
On-Screen Display Manual Precautions: PLEASE READ THIS MANUAL THOROUGHLY BEFORE USING THE CAMERA TO BECOME FAMILIAR WITH THE CORRECT OPERATIONAL PROCEDURES. Precautions While Camera is in Use: Do not open the camera body or touch any electrical parts. Electric shock may occur. Do not disconnect the power cord from the camera before disconnecting from the wall outlet. Do not insert objects into the camera body. Doing so may cause fire or electric shock.
On-Screen Display Manual Table of Contents: Features..................................................... 3 Day/Night ................................................... 10 Menu Diagram ........................................... 4 3DNR ........................................................ 10 Special Menu Diagram .............................. 5 Special ...................................................... 11 Menu Setup ............................................... 5 Adjust ...................
On-Screen Display Manual Menu Diagram: SETUP MENU 1) 2) LENS SETTINGS DC/MANUAL Range: 0~100 Level Adjustable SHUTTER (seconds) BRIGHTNESS AGC SENSE-UP FLK, 1/60, 1/250, 1/500, 1/2000, 1/5000, 1/10000, 1/100000 Range: 0~100 Level Adjustable OFF / LOW / MIDDLE / HIGH Range: x2~x258 Level Adjustable OFF / BLC (GAIN: LOW, MIDDLE, HIGH/DEFAULT: LEFT/RIGHT, WIDTH, TOP / BOTTOM, HEIGHT, RETURN) HSBLC: (LEVEL: RANGE 1~8 Selectable/DEFAULT: LEFT/RIGHT, WIDTH,TOP / BOTTOM, HEIGHT, RETURN) OFF / INDOOR / OUTDO
On-Screen Display Manual Special Menu Diagram: SPECIAL MENU 1) 2) 3) CAMERA TITLE DIGITAL–EFFECT MOTION 4) PRIVACY 5) RETURN DEFAULT SETTINGS SETTING OPTIONS OFF ON / OFF OFF FREEZE / MIRROR / D-ZOOM / GAMMA / NEG.
On-Screen Display Manual Lens: This function controls the brightness of the image. 1. Move the arrow indicator to LENS using the UP and DOWN buttons on the SETUP menu screen. 2. Select the desired lens type by pressing the LEFT and RIGHT buttons. 3. Press RETURN to return to the SETUP menu. Note: When DC is selected from the SETUP menu, the brightness can be adjusted. The brightness control range is 1~100.
On-Screen Display Manual AGC (AUTOMATIC GAIN CONTROL): A higher gain increases brightness, but also increases any noise. A. OFF: Deactivates the AGC function. B. LOW: Sets automatic gain control to LOW. C. MIDDLE: Sets automatic gain control to MIDDLE. D. HIGH: Sets automatic gain control to HIGH. SENSE-UP: Selecting this will magnify existing light sources so the camera can pick up images at night. The values range from 2x~258x. If the AGC mode is turned OFF, the SENSE-UP function will be disabled.
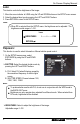
On-Screen Display Manual BLC, continued BLC OFF BLC ON C. Select a mode using the LEFT and RIGHT buttons, then press the SET button. Select BLC to adjust the desired BLC area and GAIN level. GAIN: Adjust the BLC sensitivity. DEFAULT: Go back to factory setting. LEFT / RIGHT and TOP / BOTTOM: Select the desired area position. WIDTH: Change the cell width using the LEFT and RIGHT buttons. HEIGHT: Change the cell height using the LEFT and RIGHT buttons. RETURN: Save changes and return to the EXPOSURE menu.
On-Screen Display Manual D-WDR (Digital Wide Dynamic Range): A. B. Select D-WDR using the UP and DOWN buttons on the EXPOSURE menu screen. Select the desired feature by using the LEFT and RIGHT buttons. D-WDR : When there are both bright and dark image areas, D-WDR makes both of them distinct. User can choose between OUTDOOR and INDOOR settings. OFF: Disable D-WDR function. RETURN: Save changes in the EXPOSURE menu and return to the SETUP menu.
On-Screen Display Manual Day / Night: 1. Select DAY / NIGHT using the UP and DOWN buttons on the SETUP menu screen. 2. Select the desired mode using the LEFT and RIGHT buttons. COLOR: The picture is always displayed in color. B / W: The picture is always displayed in black and white. AUTO: The mode automatically switches to COLOR in normal situations and B / W when ambient light is low. To set the time and speed in AUTO mode, press the SET button. A.
On-Screen Display Manual Special: 1. Select SPECIAL by using the UP and DOWN buttons. 2. Select one of the modes by using the UP and DOWN buttons. CAM TITLE: When input, the Camera ID is displayed on the monitor. A. Move the arrow indicator to CAMERA ID using the UP and DOWN buttons on the SETUP menu screen. B. Select ON using the LEFT and RIGHT buttons. Note: When CAM TITLE is set to OFF, the camera title is not displayed on the monitor. C. Press the SET UP button. D.
On-Screen Display Manual Cam Title, continued E. To select the camera title position on screen, move the cursor to POS and press the SET button. F. Created camera title is displayed. G. Select a new position by using the four directional buttons. Press the SET button to confirm the position. H. Select RETURN to return to the SPECIAL menu when finished. Factory Default D-EFFECT: Set to apply various digital effects to the image displayed by the camera. A. B.
On-Screen Display Manual D-Effect, continued MIRROR OFF MIRROR ON C. D-ZOOM: Digital zoom available. (1x~32x) PAN: -100~100 adjustable range. TILT: -100~100 adjustable range. D. GAMMA: 0.05~1.00 adjustable range. E. NEG. IMAGE: ON: Activates negative image. OFF: Normal image. F. RETURN: Return to SPECIAL menu. MOTION: Select to apply settings for highlighting moving objects. A. AREA SELECT: Determines the motion detection area selected. B. LEFT / RIGHT and TOP/BOTTOM: Select the desired area position.
On-Screen Display Manual PRIVACY: Hides desired on-screen area. A. Set up the area mode using the four directional buttons. AREA SELECT: Determines the area selected. AREA DISPLAY: Determines whether the area display is activated or disabled. LEFT / RIGHT and TOP / BOTTOM: Determines the desired area position between 0~100. WIDTH and HEIGHT: Determine the size of the desired area between 0~100. COLOR: Determine color or area cells. 15 different colors available.
On-Screen Display Manual Adjust: 1. When the SETUP menu screen is displayed, select ADJUST using the UP and DOWN buttons. 2. Select the desired mode by using the UP and DOWN buttons. SHARPNESS: Improves image clarity. Setting the level too high can distort the image or cause noise. 1~100 adjustable range. BLUE: Increases or decreases the value of B-Gain while monitoring the color of the image. 1~100 adjustable range.
On-Screen Display Manual Troubleshooting: The screen is blank. Check that the camera is powered up. Check that the power supply’s polarity is correct. Check that the monitor is powered up. Check that the video cable connecting the camera to the monitor is connected properly. The screen image is dim. Clean the lens using a soft, clean cloth. Check that the light source is adequate. The screen image has poor contrast. Adjust the monitor’s contrast knob. Change the position of the camera.