
Security Camera User Manual
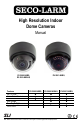

SECO-LARM High Resolution Indoor Dome Cameras
SECO-LARM U.S.A., Inc. 3
1. Remove the dome by twisting counterclockwise. Be
careful not to scratch the dome. Do not touch any of
the components inside the dome.
2. Temporarily connect the camera to the video monitor via
the video cable. If a service monitor is available, use the
included service monitor adapter.
3. Temporarily connect the camera to a 12VDC
power source. (24VAC may be connected for
EV-2660-NKBAQ and EV-2661-NKBQ).
4. Hold the base of the dome camera with your hand against
the ceiling, and try various locations and angles while
watching the video monitor to find the location which
offers the best protection. Mark that location
with a pencil.
5. Run a hidden, permanent video cable from the monitor to
the mounting location.
Before Starting
Installation
1. This product was designed for indoor use only. Do not
mount the CCTV camera where it is exposed to rain or
other moisture, or in humid or dusty places.
2. Do not point the CCTV camera at the sun. Heat could
damage the camera, even when not in use.
3. Do not mount the CCTV camera in areas exposed to
radiation, strong magnetic fields, or strong electrical
signals.*
4. Do not open or disassemble the camera. There are no
user serviceable parts inside.
5. Do not drop the camera or subject it to strong vibrations.
Note: Many video monitors produce strong
electromagnetic fields close to the display CRT,
especially when the monitor is turned on or during de-
Gaussing, which occurs automatically with many
monitors when the monitor is turned on.
Installation
6. Run a hidden cable from the power supply to the
mounting location.
7. Connect the two cables to the dome camera. Do not
cut any wires, as warranty will be voided. If needed,
use the included DC plug with terminal block.
8. Mount the base to the ceiling at the selected location.
9. Use the 3-axis gimbal to adjust the angle of the camera.
(See opposite page for further instructions.)
10. Make any necessary adjustments to the Zoom and
Focus by pulling the respective levers out and turning
them clockwise or counterclockwise.
11. Replace the dome, taking care not to touch the camera
or scratch the dome.
12. Test the camera again under the exact lighting
conditions under which it is expected to be used.
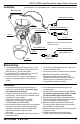
DC plug with terminal block
Mounting screw
Focus
Zoom
Dome
Base
EV-2660-NKBQ or EV-2660-NKBAQ shown. Installation is the same for all three models.
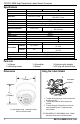
DC Jack
(connect to power)
Female BNC connector
(connect to video device)
Service monitor adapter
Connect to service monitor
at the installation site
Important: Do not cut DC jack or BNC connector as
warranty will be voided.
Service Monitor Port
Connects to Service
Monitor Port
Mounting surface