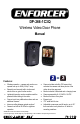
DP-266-1C3Q Wireless Video Door Phone Manual * Features: Wireless operation – camera and monitor can operate from up to 492ft (150m)** away Remotely and securely talk to visitors and unlock doors or gates via the monitor Lightweight monitor can be carried around the premises while talking to the visitor Connect up to two additional monitors and one additional camera* Intercom calling between paired monitors* Camera has built-in IR LEDs for nighttime operation Camera includes
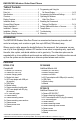
ENFORCER Wireless Video Door Phone Table of Contents: Introduction ................................................................ 2 Parts List.................................................................... 2 Specifications ............................................................ 3 Overview.................................................................... 3 Display Overview ....................................................... 4 Installation Notes .............................................
ENFORCER Wireless Video Door Phone Specifications: Camera Type Chip Resolution Lens Field of view Camera angle adjustment Operating voltage Relock delay Relay output Active Current draw Standby Active Battery life Standby IR LED Range IR LED Frequency PIR Detection range PIR Detection angle Dimensions (with bracket) Weight Operating temperature Monitor Color camera CMOS 480 TV Lines 2mm 170° Up to 20° any direction 9~16 VAC/5~16 VDC 3/6/8 Seconds 3A@250VAC/30VDC 300mA@12VDC 15mA@12VDC ~7 Hours ~60 Days 5
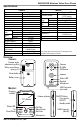
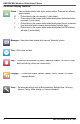
ENFORCER Wireless Video Door Phone Display Overview: : ID – Displays the monitor ID number : Signal Strength – Displays the wireless signal strength : Communication Mode – Displays current communication mode – Bell indicates an incoming call – Crossed out microphone indicates one-way communication – Microphone indicates two-way communication : Message – Displays when there is a message due to a missed call : PIR – Displays when the PIR sensor is turned on : Photo – Displays when a photo is taken : Relay –
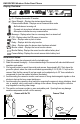
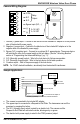
ENFORCER Wireless Video Door Phone 6 COM 5 N.C. 4 N.O. 3 Egress input (N.O., –) 2 (–) 1 Camera Wiring Diagram: (+) Relay Output Reset 9~16 VAC/ 5~16 VDC 1. Positive (+) power input – Connect to the red wire of the included AC adapter or to the positive wire of the doorbell's power supply. 2. Negative (-) power input – Connect to the black wire of the included AC adapter or to the negative wire of the doorbell's power supply. 3. Egress (N.O.) negative input – Connect to an optional N.O.
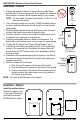
ENFORCER Wireless Video Door Phone Installation – Camera: Reset 1. Position the camera so the area to be monitored is easily visible, optimally 5ft (1.5m) above the ground. Do not position the camera in direct sunlight, or where it will be exposed directly to rain or snow. NOTE: For best results, the visitor should stand 2.5~5 ft (0.8~1.5 m) 5ft away from the camera. (1.5m) 2. Cut a hole large enough to run the min.
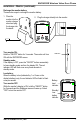
ENFORCER Wireless Video Door Phone Installation – Monitor (continued): Recharge the monitor battery: There are two ways to recharge the monitor battery. 1. Place the monitor into the monitor charger stand and plug the charger into the stand. 2. Plug the charger directly into the monitor. MENU OK EXIT Turn monitor ON: Hold the "ON/OFF" button for 3 seconds. The monitor will turn ON with the ENFORCER screen.
ENFORCER Wireless Video Door Phone On-Screen Display Features: Photos – View and delete photos taken by the camera station. There are four different types of photos M – Photos taken by the user manually (1 photo taken). A – Photos taken by the camera station automatically when the doorbell button is pressed (1 photo taken). T – Photos taken by the camera station automatically when the unit is removed from the bracket and the tamper alarm activates (4 photos taken).
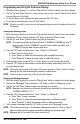
ENFORCER Wireless Video Door Phone Programming and Using the On-Screen Display: 1. While the monitor display is on, press the "Menu/Unlock" button to open the on-screen display. 2. Use the "Up" and "Down" buttons to move the cursor up or down. Use the "Menu/Unlock" button to move the cursor to the right. 3. To select a Menu option, highlight the option and press the "OK" button. 4. To exit the on-screen display, press the "Exit" button.
ENFORCER Wireless Video Door Phone Programming and Using the On-Screen Display (continued): Programming the time and date: 1. While the monitor display is on, press the "Menu/Unlock" button to open the on-screen display. 2. Highlight the "Time" icon and press the "OK" button to enter the "Time" screen. 3. Use the "Up" and "Down" buttons to adjust the value. Use the "Menu/Unlock" button to move to the next value. 4. Press the "OK" button when finished programming to go back to the on-screen display menu.
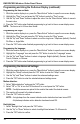
ENFORCER Wireless Video Door Phone Programming the Advanced Settings (continued): Unlocking duration: 1. Select "Unlocking duration" and press the "OK" button. 2. Select from 3, 6, or 8 seconds and press the "OK" button. NOTE: If multiple cameras are paired to the monitor then select the desired camera. 3. The monitor will connect to the desired camera. 4. Press the "OK" button to confirm.
ENFORCER Wireless Video Door Phone Operating the Wireless Video Door Phone: Communicating with the camera Request entry: 1. Press the doorbell button on the camera. The indoor monitor will ring and display an image from the camera. The monitor will also display a bell icon. 2. Wait for the indoor user to accept the call and activate the onboard relay as necessary. ON/OFF: Turn monitor ON/OFF Standby mode OK/Talk Up Doorbell Down/Photo OK MENU Menu/Unlock EXIT Exit/View Receive a visitor: 1.
ENFORCER Wireless Video Door Phone Operating the Wireless Video Door Phone (continued): Communicating between monitors NOTE: The Wireless Video Door Phone system can be set up with up to 2 cameras and 3 monitors. If multiple monitors are set up, then the system can be used as an intercom between each monitor. To pair additional monitors see "Pairing Additional Monitors or Cameras," pg. 14. Intercom feature with two monitors: 1. Make sure both monitors are powered ON. 2.
ENFORCER Wireless Video Door Phone Resetting the Camera and Pairing a First Monitor (continued): :3. Reconnect the power wires and return the camera to the bracket. 4. Press the doorbell button on the camera to confirm the connection. Pairing Additional Monitors or Cameras: NOTE: By default, the monitor in the DP-266-1C3Q Complete Kit is paired with the camera. These instructions apply to pairing a second or third monitor, or a second camera. To pair an additional monitor: 1.
ENFORCER Wireless Video Door Phone Tamper Alarm: The tamper alarm activates anytime the camera is removed from the bracket, warning the user of possible vandalism. The tamper alarm will sound on the camera and any connected monitors. 1. To disable the tamper alarm if no monitors are paired with the camera: a. Return the camera to the bracket. b. If the alarm persists, unplug the camera and remove the battery. c. Return the camera's battery and reconnect it to power. 2.
ENFORCER Wireless Video Door Phone Also Available from SECO-LARM®: Additional Monitor Additional Camera 2-Wire Hands-Free Video Door Phone DP-266-M3Q DP-266-CQ DP-234Q 2-Wire Color Video Door Phone Wireless Intercom CBA® Wireless Alert System DP-222Q DP-T100-2Q RA-4961-K1Q IMPORTANT: Users and installers of this product are responsible for ensuring this product complies with all national, state, and local laws and statutes related to monitoring and recording audio and video signals.