DR-1 Series H.264 Network DVR Quick Setup Guide* DR-104Q DR-108Q DR-116Q DR-104-500Q DR-108-500Q DR-116-1.0TQ No. of Pictures/ HDD Channels Second Capacity 4 120 N/A 8 240 N/A 16 480 N/A 4 120 500GB 8 240 500GB 16 480 1TB Easy recording and setup. Remote LAN and Web viewing. iPhone/Smartphone compatible. Per-event recording and search. BNC, HDMI, and VGA outputs. Programmable motion detection. Multi-channel audio recording. Free DDNS server.
ENFORCER DR-1 Series H.264 Network DVR Quick Setup Guide Table of Contents: Parts List .......................................................2 Using the Mouse ...........................................2 Front Panel ....................................................3 Rear Panel ....................................................4 Getting Started .......................................... 5-6 Connecting a PTZ Camera ........................ 6-7 Viewing ...................................................
ENFORCER DR-1 Series H.264 Network DVR Quick Setup Guide Front Panel: 2 1 18 9 3 17 16 15 14 13 12 4 5 11 10 6 7 9 8 Front panel feature descriptions: 1 Channel selection buttons 2 3 4 5 6 Alarm LED Network LED Record LED IR sensor Escape 7 Arrow buttons 8 Zoom/Enter 9 Menu/Tele 10 Search/Wide 11 Mode/Iris Open 12 Play/Stop / Iris Close 13 Freeze/Focus (-) 14 Seq/Focus (+) 15 16 17 18 Dome Copy Call USB Port 1.
ENFORCER DR-1 Series H.264 Network DVR Quick Setup Guide Rear Panel: DR-104Q and DR-104-500Q: 1 2 12 11 10 3 4 9 8 3 4 9 8 5 6 7 DR-108Q and DR-108-500Q: 1 2 12 11 10 5 6 7 DR-116Q and DR-116-1.0TQ: 1 12 8,9 10 3 2 11 4 5 6 7 Rear panel feature descriptions: 1 LAN 10/100/1000M Use a Cat5e/6 cable to connect the DVR to a Local Area Network for remote access. Alarm I/O, RS-485, Allows the DVR to connect to alarm I/O and other RS-485 devices.
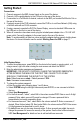
ENFORCER DR-1 Series H.264 Network DVR Quick Setup Guide Getting Started: Connections: 1. Connect cameras to the BNC channel inputs on the rear of the device. 2. Connect a VGA-capable display to the VGA port on the rear of the device. 3. If connection to a Call Monitor is desired, connect via the BNC port marked Call Monitor Out on the rear of the device. 4. If network access to the DVR is desired, connect the DVR to a Local Area Network (LAN) using a Cat5e/6 cable with an RJ-45 connector. 5.
ENFORCER DR-1 Series H.264 Network DVR Quick Setup Guide Continued from page 5. 4. To adjust the time and date: Note: Changes to time and date settings may cause inconsistency or data loss in previously recorded material. Back up all data before making changes. For more information on how to back up data, please see Exporting Video on pg. 11 of this guide. a. Enter the system menu and select System. b. Select Date/Time. c. Select Date and adjust the values as needed. Repeat for Time. d. Select Time Zone.
ENFORCER DR-1 Series H.264 Network DVR Quick Setup Guide Viewing: The main screen shows live data from cameras connected to the DVR. 1. Display Modes – when viewing the main screen, scan through the modes by pressing the MODE button on the front panel/remote. Using the mouse, right click the main screen and choose Mode. See each mode description below for further instructions. a. Full screen – shows one channel.
ENFORCER DR-1 Series H.264 Network DVR Quick Setup Guide Recording: By default, the DVR will record any data received from cameras connected to it. The following provides instructions for making basic adjustments to the record settings. See the User’s Manual section 3.5 Record Schedule / Quality Settings for more details. 1. Enter the system menu by pressing MENU on the front panel/remote or by right clicking the main screen and choosing Menu. Enter a username and password if necessary.
ENFORCER DR-1 Series H.264 Network DVR Quick Setup Guide Remote Viewing: The DVR provides full access to live and recorded data, DVR settings, and export features via the Windows Internet Explorer Internet browser. 1. Ensure the DVR is connected to the local area network. Note the DVR’s IP address via System MenuSystem SetupLAN SetupIP. If using other network options, see the User’s Manual section 5. Remote Monitoring Software, or consult your network’s administrator. 2.
ENFORCER DR-1 Series H.264 Network DVR Quick Setup Guide Mobile Viewing: If the DVR is connected to the Internet, mobile device with Java-capable Internet browsers can be used to view live data. 1. In the mobile device web browser, enter the IP address of the DVR. Consult your network administrator for further information. 2. A window will display requesting a username and password. These are the same as those used to access the DVR via other means. 3.
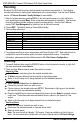
ENFORCER DR-1 Series H.264 Network DVR Quick Setup Guide Pin Connection for Alarm I/O & RS-485, and Audio In: Alarm I/O & RS-485: DR-104Q: Pin 1 2 3 4 5 6 7 Definition Alarm Out N.O. Alarm out COM RS-485 D+ Alarm In 1 Alarm In 3 Reserved Reserved Pin 8 9 10 11 12 13 14 Definition Audio In 1 Audio In 3 Reserved Reserved GND GND Alarm Out N.C.
ENFORCER DR-1 Series H.