
User Manual


ENFORCER IP / Ethernet Extenders
3
SECO-LARM U.S.A., Inc.
1. Determine the location where the units will be placed as well as how much cable will be required.
2. If desired, use the included screws to mount the receiver and transmitter to a wall or other surface.
Use the mounting tabs found on the corners of the enclosure.
3. On one unit, switch the Tx/Rx DIP switch to “Tx”. This is now the transmitter.
4. Connect the transmitter to an IP camera or other TCP/IP output device using Cat5e/6 cable.
Connect via the Ethernet port found on the front of the Active IP Balun.
5. On the second unit, switch the Tx/Rx DIP switch to “Rx”. This is now the receiver.
6. Connect the receiver to a DVR, PC or other TCP/IP receiving device using Cat5e/6 cable.
Connect via the Ethernet port found on the front of the Active IP Balun.
7. Run a cable between the two units and connect them via the rear-panel connectors.
Use Cat5e/6 cable for the IPB-A1100Q. Use coaxial cable for the IPB-A1200Q.
8. Connect one 5VDC adapter to the transmitter and another to the receiver.
9. Switch on the IP source (i.e. CCTV camera) and verify that the system is functioning properly.
Installation:
IPB-A1200Q
Up to 5,900’
(1,800m) of coaxial
IP Camera
PC or DVR
Sample Application:
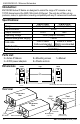
Tx/Rx DIP Switch Positions
The unit is a
transmitter
The unit is a
receiver
Each unit can act either as
a transmitter (Tx) or a
receiver (Rx). To set the
function of a unit, simply
set the DIP switch located
on the rear of the unit to
the desired position.
Rear panel connections
IPB-A1100Q
Set Tx/Rx DIP Switch
Connect Cat5e/6 cable between
the receiver and transmitter
Front panel connections
Both models
Connect 5VDC Adapter
Connect Cat5e/6 cable to a TCP/IP device.
IPB-A1100Q
Up to 3,900’
(1,200m) of Cat5e/6
IP Camera
PC or DVR
Rear panel connections
IPB-A1200Q
Set Tx/Rx DIP Switch
Connect coax cable between
the receiver and transmitter