
User's Guide


Doc No.: A22270882 Rev. B ECO: 13058 Date: 04/09/18 10
SECTION 2 POLICY AND PROCEDURES
Removing the Transmitter from the Infant
1. Turn on the Tester and verify the green power LED labeled PWR is on solid; if blinking, replace the 9-volt battery.
2. Enter the Security Code *23456 and verify that "ENABLE" is displayed on tester.
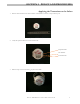
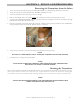
3. Orient the transmitter on the infant's leg as shown to the right.
4. Place the Tester display end so it is actually touching the transmitter front with the strap facing front to back.
5. Verify the yellow LED labeled SIGNAL is blinking and proper ID code is displayed on the tester. The display will toggle
back and forth between ID code and “TX OK”.
6. Enter sleep command on the Tester keypad by pressing #. Hold the tester against the transmitter until a "SLEEP OK"
message is displayed and you hear 5 beeps. This may take up to 15 seconds.
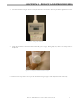
5. You now have 30 seconds to remove the transmitter from the infant by cutting the strap.
NOTE:
DO NOT CUT THE STRAP UNTILL "SLEEP OK "IS DISPLAYED ON THE TESTER
7. Completely remove old strap from the transmitter.
NOTE:
FAILURE TO COMPLETELY REMOVE THE STRAP FROM THE TRANSMITTER
MAY RESULT IN FALSE CUTBAND ALARMS.
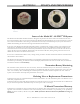
Cleaning the Transmitter
Secure Care recommends transmitters are cleaned after each use. To properly clean the transmitter use lint free IPA (Isopropyl
Alcohol) wipes. With the transmitter removed from the baby, wipe the transmitter on all sides with the IPA wipe, ensuring there
are no lint fibers attached to the transmitter. When cleaning is finished, store the transmitter in a transmitter containment box.
NOTE:
ALWAYS STORE TRANSMITTERS IN THE TRANSMITTER CONTAINMENT BOX
WHEN NOT BEING USED ON INFANTS
Figure 2-8 - Putting the transmitter to sleep.