
User's Manual


Doc No.: A20470691 Rev. B ECO: 11750 Date: 08/18/2015 9
Removing the Transmitter from the Infant
1. Turn on the Tester and verify the green power LED labeled PWR is on solid; if blinking, replace the (2) 9-volt batteries.
2. Enter the Security Code *23456 and verify that "ENABLE" is displayed on tester.
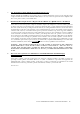
3. Orient the transmitter on the front of the infant’s leg. (Please refer to Figure 1.4 and Figure 1.5 on page 7 for proper
orientation.
4. Place the Tester display end so it is actually touching
the transmitter front and verify blinking yellow LED labeled
SIGNAL and proper ID code is displayed on the Tester and toggles between ID code and “TX OK”.
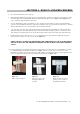
5. Enter sleep command on the Tester keypad by pressing # (Press and release the # key, do not hold). Hold the tester
against the transmitter until a "SLEEP OK" message is displayed and you hear 6 beeps. This may take up to 15 seconds.
6. You now have 30 seconds to remove the transmitter from the infant by cutting the strap. The transmitter reactivates after
30 seconds if the strap is not compromised in that time period.
NOTE: DO NOT CUT STRAP UNLESS "SLEEP OK "IS BEING DISPLAYED
7. Keep the cut strap on the transmitter until you are ready to clean it back at the Transmitter Storage Box.
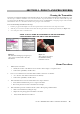
8. Remove old strap from the transmitter by pulling the strap up in the direction of the transmitter label.
9. If you pull down on the strap pieces may break off in the latching mechanism and you will have to grab the pick to push
out excess strap pieces left inside as shown below.
10. If the tester flashes “SLEEP FAIL” turn the tester off and repeat the process over again.
SECTION 2 POLICY AND PROCEDURES