
User manual


Getting Started
26
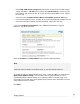
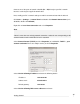
Preferred DNS server: 192.168.0.1
Note
If you wish to retain your existing IP settings for this network connection, click Advanced
and Add the secondary IP address of 192.168.0.100, subnet mask 255.255.255.0.
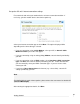
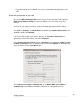
Set up the SG unit’s password and LAN connection settings
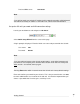
Launch your web browser and navigate to 192.168.0.1.
Select Quick Setup Wizard from the center of the page.
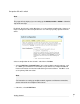
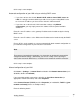
A log in prompt is displayed. Enter the initial user name and password for the SG unit:
User name: root
Password: default
Note
If you are unable to browse to the SG unit at 192.168.0.1, or the initial username and
password are not accepted, press the black Erase button on the SG unit’s front panel
twice, wait 20 – 30 seconds, then try again.
Pressing Erase twice within 2 seconds resets the SG unit to its factory default settings.
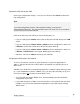
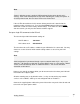
Enter and confirm a password for your SG unit. This is the password for the user root,
the main administrative user account on the SG unit. It is therefore important that you
choose a password that is hard to guess, and keep it safe.