
User manual


Getting Started
31
Note
The purpose of restarting the computers is to force them to update their automatically
configured network settings. Alternatively you can use a utility such as ipconfig to
release then renew the DHCP lease, or disable and re-enable the network connection.
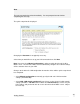
Manual configuration of your LAN
Click Start -> (Settings ->) Control Panel and double click Network Connections (or in
95/98/Me, double click Network).
If presented with multiple connections, right click on Local Area Connection (or
appropriate network connection) and select Properties.
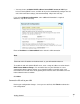
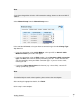
Select Internet Protocol (TCP/IP) and click Properties (or in 95/98/Me, TCP/IP -> [your
network card name] if there are multiple entries).
Enter the following details:
IP address is an IP address that is part of the same subnet range as the SG unit’s
LAN connection (e.g. if using the default settings, 192.168.0.2 – 192.168.0.254).
Subnet mask is the subnet mask of the SG unit’s LAN connection (if using the
default settings, 255.255.255.0).
Default gateway is the IP address of the SG unit’s LAN connection (if using the
default settings, 192.168.0.1).
Preferred DNS server is the IP address of the SG unit’s LAN connection (if using the
default settings, 192.168.0.1).
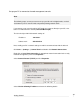
Click OK (or in 95/98/Me, Add then OK, reboot the PC if prompted to do so).
Perform these steps for each PC on your network.
Set up the SG unit’s Internet connection settings
Choose a port on the SG unit for your primary Internet connection. Port C is used in this
guide. Attach Port C to your modem device or Internet connection medium. If
necessary, give the modem device some time to power up.