
User's Manual
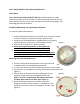
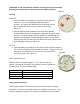


Figure 2
AT&T Model SW-ATT-GB, Glass Break Detector
Description
The AT&T model number SW-ATT-GB Glass Break Detector is a fully
supervised, tamper protected ceiling -or wall-mounted unit with a fifteen (15)
foot maximum detection range, 360° maximum horizontal sensing angle, and
dual-stage glass break detection.
Installation/Mounting & Programming Guidelines
To setup the glass break detector:
1. Hold the Glass Break Detector unit upside down and twist the base
counter clockwise to remove the detector from the base.
2. Install the two CR123A batteries supplied with the unit paying
careful attention to observe the correct battery polarity
3. Wait five (5) seconds for the power up delay.
4. Enter the programming mode on the Digital Life
Controller (Information to be supplied by AT&T)
5. Enroll the Glass Break Detector by pressing and
holding the tamper switch for a minimum of 2 seconds
(See Figure 4) or per information supplied by AT&T.
Mounting the Glass Break Detector
1. Place the Glass Break Detector base on the opposite wall
or adjacent wall to the window being protected.
2. You may also mount the Glass Break Detector base on the ceiling.
3. Use the base as a template for locating the three mounting holes (See
Figure 2)
4. Affix the base to the desired location utilizing the 3 long
mounting screws and anchors supplied with the unit.
NOTE: for wall mounting the test button should be
oriented down nearest the floor (See Figure 1)
5. When attaching the detector to the base, match the
alignment marks and twist clockwise. If batteries are not
installed, the detector cannot be installed to its base. (See
Figure 3)
Figure 1