
User Manual


OVERVIEW USER MODE ADMIN MODE MANAGING DRIVE CONTACT & WARRANTY
SecureDrive KP User Guide ▪ 6
2.13.2020
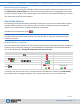
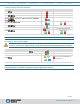
Disconnecting from Your Computer
Generally, you can just unplug the USB cable. However, some computer systems may require you to click
the Safely Remove Hardware/Eject icon within your operating system prior to unplugging the drive cable
from your computer. Wait for the red LED to light to turn solid or turn off completely indicating it is locked
and ready to disconnect from the computer.
User Mode Options
The following section describe options and features requiring only a User PIN. For Administration options
see Admin Mode on page 11. This section includes instructions on enabling read-only and read/write
options in user mode as well as enabling and disabling a timeout lock.
Procedures that end with these LEDs [ ].
Note: All procedures require the Drive to be connected to a computer with the USB cable. Each step
in all procedures have a ten second window to start the step after it. In general, a blinking LED times
out after ten seconds.
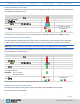
Enabling Read-Only in User Mode
The User is able to write content to the Drive and then restrict access to read-only (R-O). Once R-O Mode is
activated, access is limited to reading only, until Read/Write is enabled (which can be accomplished by a
User or an Administrator). Setting to Read-Only does not unlock the drive.
STEPS
LED
ERROR STATE
With the Drive locked, press .
-
Enter your User PIN.
-
Press .
-
Wait for , then press .
-
Press 7, 6. (R, O for Read-Only).
-
Press .
- briefly
Then
+
If unsuccessfull, LEDS will
immediately be:
+
If successful, the next time the Drive is unlocked it will be in R-O Mode as indicated by the slow blinking
green LED (as well as messages provided by your computer when you try to save or delete a file).